
Trotec Tool Guide - Flat Cutting and Engraving
The Trotec Laser can cut and engrave a variety of materials from a digital file in fine detail. Projects up to 21"x17" will fit in this laser.
SAFETY |
CARE |
CLEANUP |
|
1. Always keep the lid closed, do not tamper with the safety switches on the lid. |
1. Do not force the lid open higher than the shocks allow. |
1. Vacuum up small parts, clean catch tray when numerous small parts have fallen between the honeycomb. |
|
2. Cut and engrave approved materials only. |
2. Handle the honeycomb table carefully, bent surfaces cause cuts in the underside of the materials. |
2. Place the rotary tool back in the storage cabinet. |
|
3. Be sure both fans are operating. |
3. Submit a maintenance request when needed. |
3. |
Tool Anatomy
-
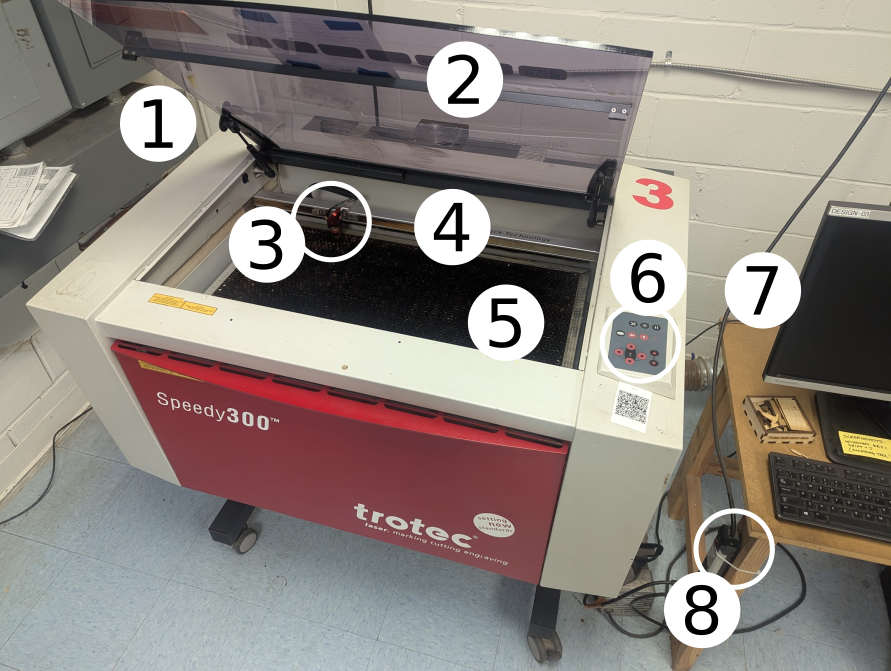
Power Switch - on/off switch, located on the back left of the machine
- Lid
-
Lens carriage
- Gantry
- Bed
-
Control panel
- Desktop computer
-
Exhaust switch - activate the power strip to pull smoke from the bed to outside
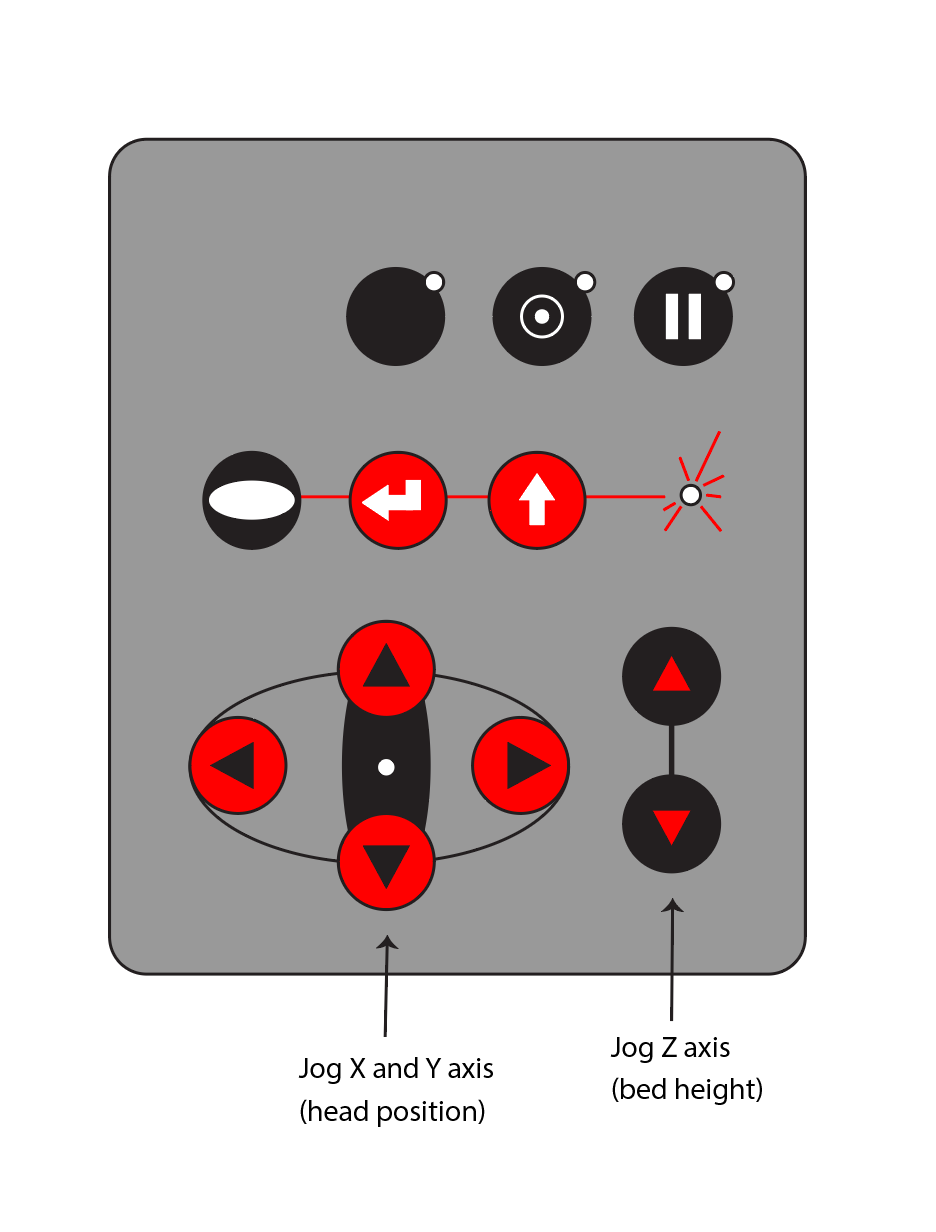
CONTROL PANEL
Safety
Common Hazards
- The lid of the machine protects against stray emissions and eye damage. The lid should always be shut when in use, there are switches to automatically turn the laser off when the lid is opened. Immediately report any problems with the lid.
- Ventilation: Make sure the fan is on before cutting.
- Flames: Watch for flames and pause the laser and use spray bottle with water if a flame develops.
- Cuts: Bodily hazard of being cut by your own sharp material.
- Toxicity: Only use approved materials on the machine to avoid creating toxic gas.
- Noise: The combined sound of the Trotec motors and the Rabbits is LOUD! Noise cancelling headphones recommended.
Materials
Many materials can emit melt, catch fire, or emit toxic fumes when cut with a CO2 laser.
Consult the allowed and prohibited materials list before cutting or engraving new materials, and use the speed and power settings on that page as a starting point for your project.
File Setup
Using ADOBE Illustrator
-
You can use any vector based software to design your artwork as long as it can export files using file types .svg or .ai. Save your file to a USB thumb drive and bring that to the computer.
-
Open Adobe Illustrator on the desktop computer.
-
New from template> Desktop > Template Trotec*. This template contains the palette below as well as the Graphic Styles palette where red and black are already set up.
-
Copy and paste your artwork into this document.
-
The software that this machine is picky about the line types it can use. Make sure your cutting lines are 0.001 stroke width and the colors are as listed as in the chart below for them to be read.
-
Print - Job Control will start
Using Corel Draw
-
-
Save files as svg
- Open Corel Draw
- Check line weights for cutting are 0.001 and any other colors are the same as the chart below.
- Print - Job Control will start.
-
Document color setup
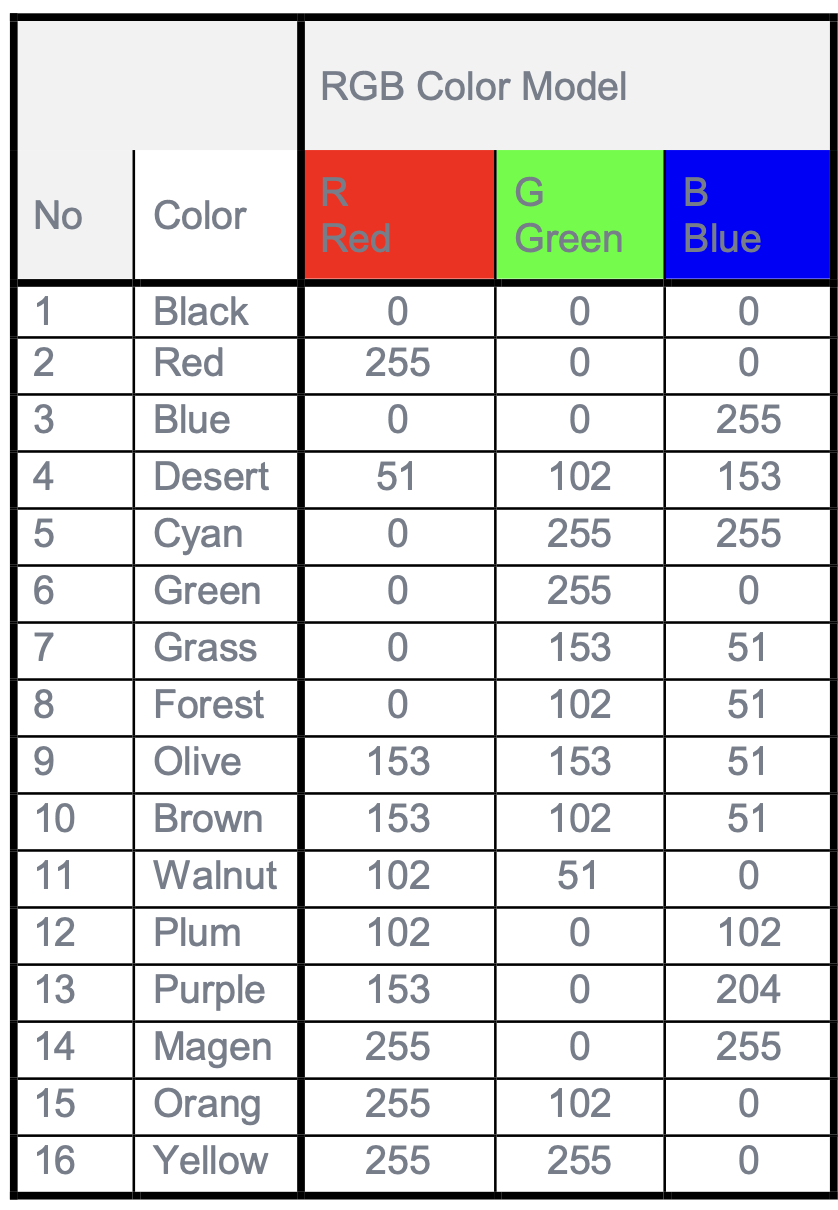
The TROTEC JobControl allows the selection of 16 different colors in the material templates to specify 16 different power levels during cutting or engraving. When using this function, the colors in the graphics program must match exactly the colors listed in the TROTEC JobControl (on using Corel draw make sure that color management is OFF). In some graphics programs these Basic colors are already predefined, with other programs, you must define each color separately with its RGB components first. If the 16 driver colors are not automatically available in the software, use the values in the following list:
* This set of colors can be found in the Trotec template on the desktop. Corel Draw RGB defaults to these. (double check)
Machine Setup
SETUP CHECKLIST
|
Job Control
The Job Control software functions more like a driver for a desktop printer, in other words, you can't open files directly in Job Control, they need to run through a vector draw program "Print File" dialog boxes. There are three levels to this:
- Print, click on the "Preferences" button.
- You will see Printing Preferences, size will be "User Defined" or Bed Size"
- (Optional) Material Setup (also available in Job Control, the two will talk to each other)
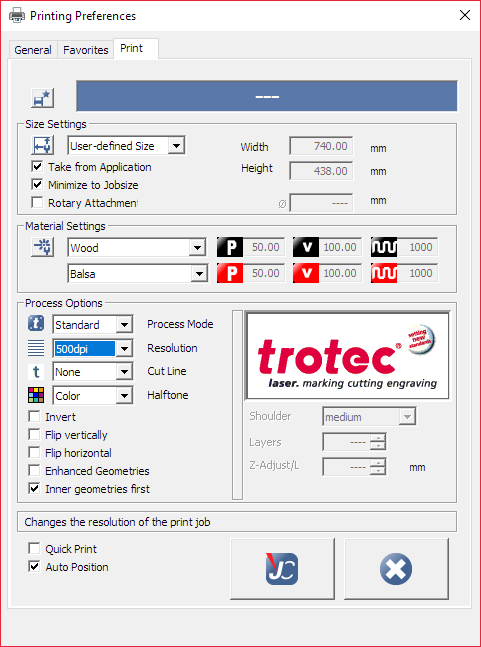
Materials Settings: Use a thickness and material that best matches.
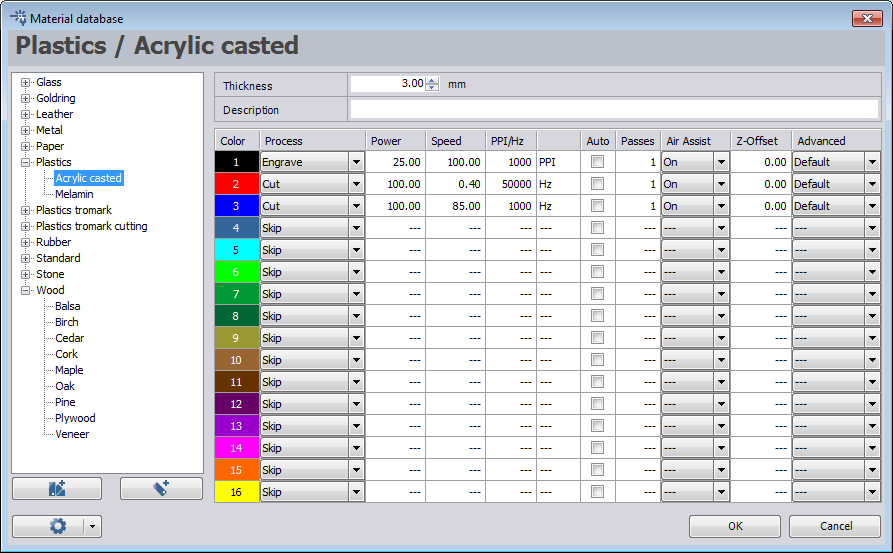
Click OK, then the JC Button, Then JC on the original screen. Job Control will start.
- To see an actual preview of your job on the bed, click the WYSIWYG button
 (Ctrl + I)
 - Set the speed/power settings for the material & line colours in the Material Templates window

-
Your artwork will appear on a panel on the right hand side in the “Jobs” panel. Click and drag to add it to the bed. The art can be placed on any of the intersections of the crosshairs or directly on center.If the
Add more here!
Common Settings
Settings for this machine are stored in an internal database that is editable by members.
It's recommended to look up the desired material and thickness in the allowed and prohibited materials list to make sure power, speed, and other settings are correctly set.
Basic Operation
-
Power on the machine. The switch is on the back of the machine on the left side, near the circuit breakers.
-
Power on the exhaust fan by turning on the power strip on the front left leg of the desktop computer table.
-
Connect the machine and Job Control by clicking the USB port button in the bottom right corner.
-
Add your material. Open the lid and place your material on the bed. You can secure the material using wood clips. This bed is made of aluminum and therefore is both delicate and not magnetic.
-
Move the head over the material. Hang one of the focus measuring pieces on the laser head and raise the bed slowly until the piece falls off.
-
Move the head to your origin
-
Close the lid
-
Cut using Job Control
-
Watch your job to make sure it goes smoothly. If you notice a problem, you can:
A. pause the job with the pause button on the control panel.
B. Pause using the Job Control Software. (the pause button on the machine panel will not allow a restart of the job, using pause in the software will let you finish where you left off.
If your material catches on fire, pause the job and use the water spray bottle to extinguish it.
Cleanup
-
Power off the Laser
-
Reset any modified computer settings to default
-
Vacuum the interior so material does not build up beneath the honeycomb
-
Note any maintenance needs or concerns on the tag and at protohaven.org/maintenance
-
Recycle or dispose of waste in the single-stream scrap bins or trash can
- Return the rotary tool to the cabinet.
Scrap Breakdown
There are two black scrap bins reserved for laser waste. Maintaining these is a shared, communal responsibility.
When you notice the scrap bins are full, it’s time to take it to the dumpster out back. Feel free to enlist a helping hand.
If you notice valuable material while emptying the bins, use your judgment to selectively save a few pieces or take it home for your personal use.
Troubleshooting
Common Issues |
Possible Causes |
Resolutions |
| Job control WSIWYG doesn't show all lines in a cut or engraving | Not using the correct line weight or colors. | Use the Illustrator template "Trotec Template" |
| The honeycomb bed doesn't show up in JC, I see the rotary tool | The last setup was for the rotary tool. | Go to Settings/Options/accessories and uncheck rotary tool, check honeycomb bed.**Valerie check! |
| My parts don't fit in the JC engraving area | The last setup was for the rotary tool |
Print setup + + +**Valerie check! Set to "Bed Size" |
Special Setups
Rotary tool
The Trotec can engrave on cylindrical materials - tumblers, glasses, pipes, etc.
Read the Trotec Rotary Tool Guide for details on how to set up and use the rotary tool attachment..
No Comments