
Electric Slip Roll Tool Tutorial
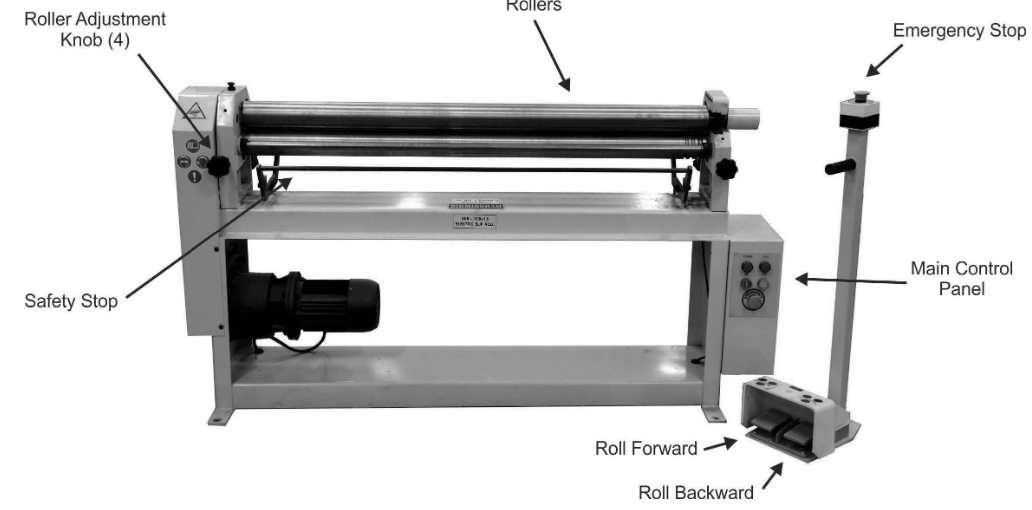
A slip roll uses three rolls to form light gauge sheet metal into curves and pipe. The two front rollers of a slip roll, or pinch rollers, are used to feed the sheet metal into the rear bending, or forming, roller that places the arc in the sheet metal. By adjusting the position of the bending roller, you can change the diameter of the curves produced. Once you’re finished forming, the top roller is hinged so you can “slip” the metal off the roller. The slip roll can roll up to 16 gauge sheet metal.
Safety and Procedures
- Keep hands and fingers away from the rollers during operation, so that your hands are not pulled in and crushed.
- Use the blue safety to stop the machine movement.
- Do not attempt to roll metal thicker than 16 gauge.
- Keep your foot OFF the control pedals until your hands are clear of the machine.
- The rollers are extremely heavy. When lifting the top roller, make a firm grip, since dropping the roller may damage it or cause serious injury. Ask a shop tech for assistance if you need it.
- When setting the top roller back in place, make sure your fingers do not get pinched.
Adjustments
Pinch Rollers
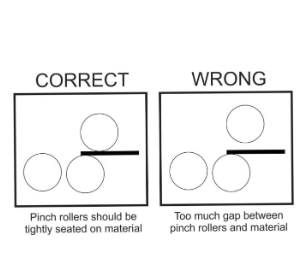
The pinch rollers are used to feed your material into the machine so that it can be formed by the bending roller. Your material must be held tightly in order for it to feed into the machine consistently.
Use the scales on each end of the roller to create even tension, or you can offset the tension to roll cones.
Bending Roller
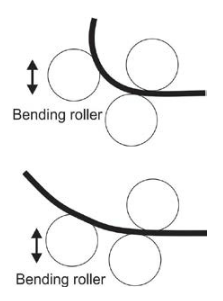
The height of the bending roller determines the curve radius that will be produced. Each side of the bending roller moves independently, so be sure to move them the same amount for accurate curves. Raising the bending roller produces tighter curves.
You must start with the bending roller top surface level with the material you are feeding through. Raise the bending roller each time you run your material through, until you reach your desired bend radius.
Basic Operation
- Rest your metal on the bottom pinch roller and push the metal into the slip roller.
- Turn the front knobs directly below the bottom pinch roller until the sheet metal is held tightly between the rollers.
- Turn the machine on and release all E-stops by gently turning the knobs.
- Make sure your hands are clear of the rollers, then press the forward feed pedal to feed your metal into the machine until it is just in front of the bending roller.
- Adjust both knobs that move the bending roll until it is slightly higher than the sheet metal.
- Press the forward feed pedal to run your sheet metal over the bending roll and curve the metal. Feed your sheet metal all the way out of the machine.
- Raise the bending roll slightly, using the scales on each side to make both ends the same height.
- Run your sheet metal back through the slip roll.
- Repeat the process of raising the bending roll and running the sheet metal through the slip roll until you achieve your desired curve.
Tips and Tricks
- Tight curves require several passes through the machine. If you’re forming multiple pieces of sheet metal, you may wish to run all the pieces through at the same setting, then move the bending roller up to continue the process of forming
- Complex curves can be created by feeding your sheet metal into the machine at an angle
- Cones and tapered curves can be formed by setting one end of the bending roller lower than the other end to change the bending radius
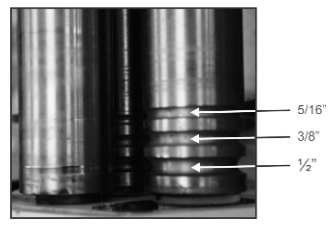
- The grooved section of the rollers can be used to form round stock.
- All round stock must be smooth and free of burrs. Rebar is not allowed on this machine
- Be sure to use the groove size that corresponds to your round stock size
No Comments