
Tool Tutorial
Introduction
Notes
Safety
Hot parts, Compressed air hazard, pinch points (electric assisted lift)
Common Hazards
Hot parts
Care
Be Careful
Remove any protective film from plastic before putting it under the heater
TAKE CARE WHEN REACHING TO THE BACK OF THE MACHINE. THERE MAY BE VERY HOT SUR-
FACES IN THIS AREA. COUNTERWEIGHTS ARE HEAVY ITEMS AND HENCE CARE MUST BE TAKEN TO PREVENT TRAPPING OF FINGERS. TAKE CARE WHEN ASSEMBLING, LOADING AND UNLOADING COUNTERWEIGHT. HEAVY ITEMS CAN CAUSE CRUSHING IF MISHANDLED, MISUSED OR IF DROPPED. WHEN LOADING AND UNLOADING COUNTERWEIGHTS ENSURE THE LOCKING SPLIT PIN AND WASHER ARE REPLACED AT THE END OF THE COUNTERWEIGHT ARM.
Do not touch the heated plastic material with your hand or any other object during the heating cycle. This may cause harm or damage the material itself. Rely on the visible slight sag as the indicator for the optimum temperature to perform the vacuum form, or use a temperature gun to aid you.
Do not attempt to raise the table of the vacuum forming machine when the heaters are in the forward position. This may damage the lever mechanism, or the heating elements. Most vacuum forming machines have a safety mechanism that will not allow the table to be raised unless the heaters are in their fully back position, or for the heaters to be pulled forwards if the table is raised.
When lowering the table, be sure to make this a smooth and steady motion rather than dropping it. This will prevent any damage or movement of the mold tool within the forming area, and reduce stress on the machine.
Always remember, this machine produces heat that reaches very high temperatures. Do not touch or put
anything on top of the heating draw of the machine, or put your hand under the heating drawer itself.
Repairs to the vacuum circuit can be costly. The use of talc as a release agent is not recommended. It may clog the vacuum pump, valves and hoses.
Note: the heater timer on the HMI display runs fast - the actual elapsed time may be less than indicated.
Do not leave auto-level on while the bed is close to the top of the machine - this will leave auto-level running, which could blow softened plastic into the heater.
There is no guarantee any saved settings will be persisted - do not assume that a setting you saved is still correct. If you wish to record settings, use the Member Notes page on this wiki.
Use
Consumables
None
Tooling
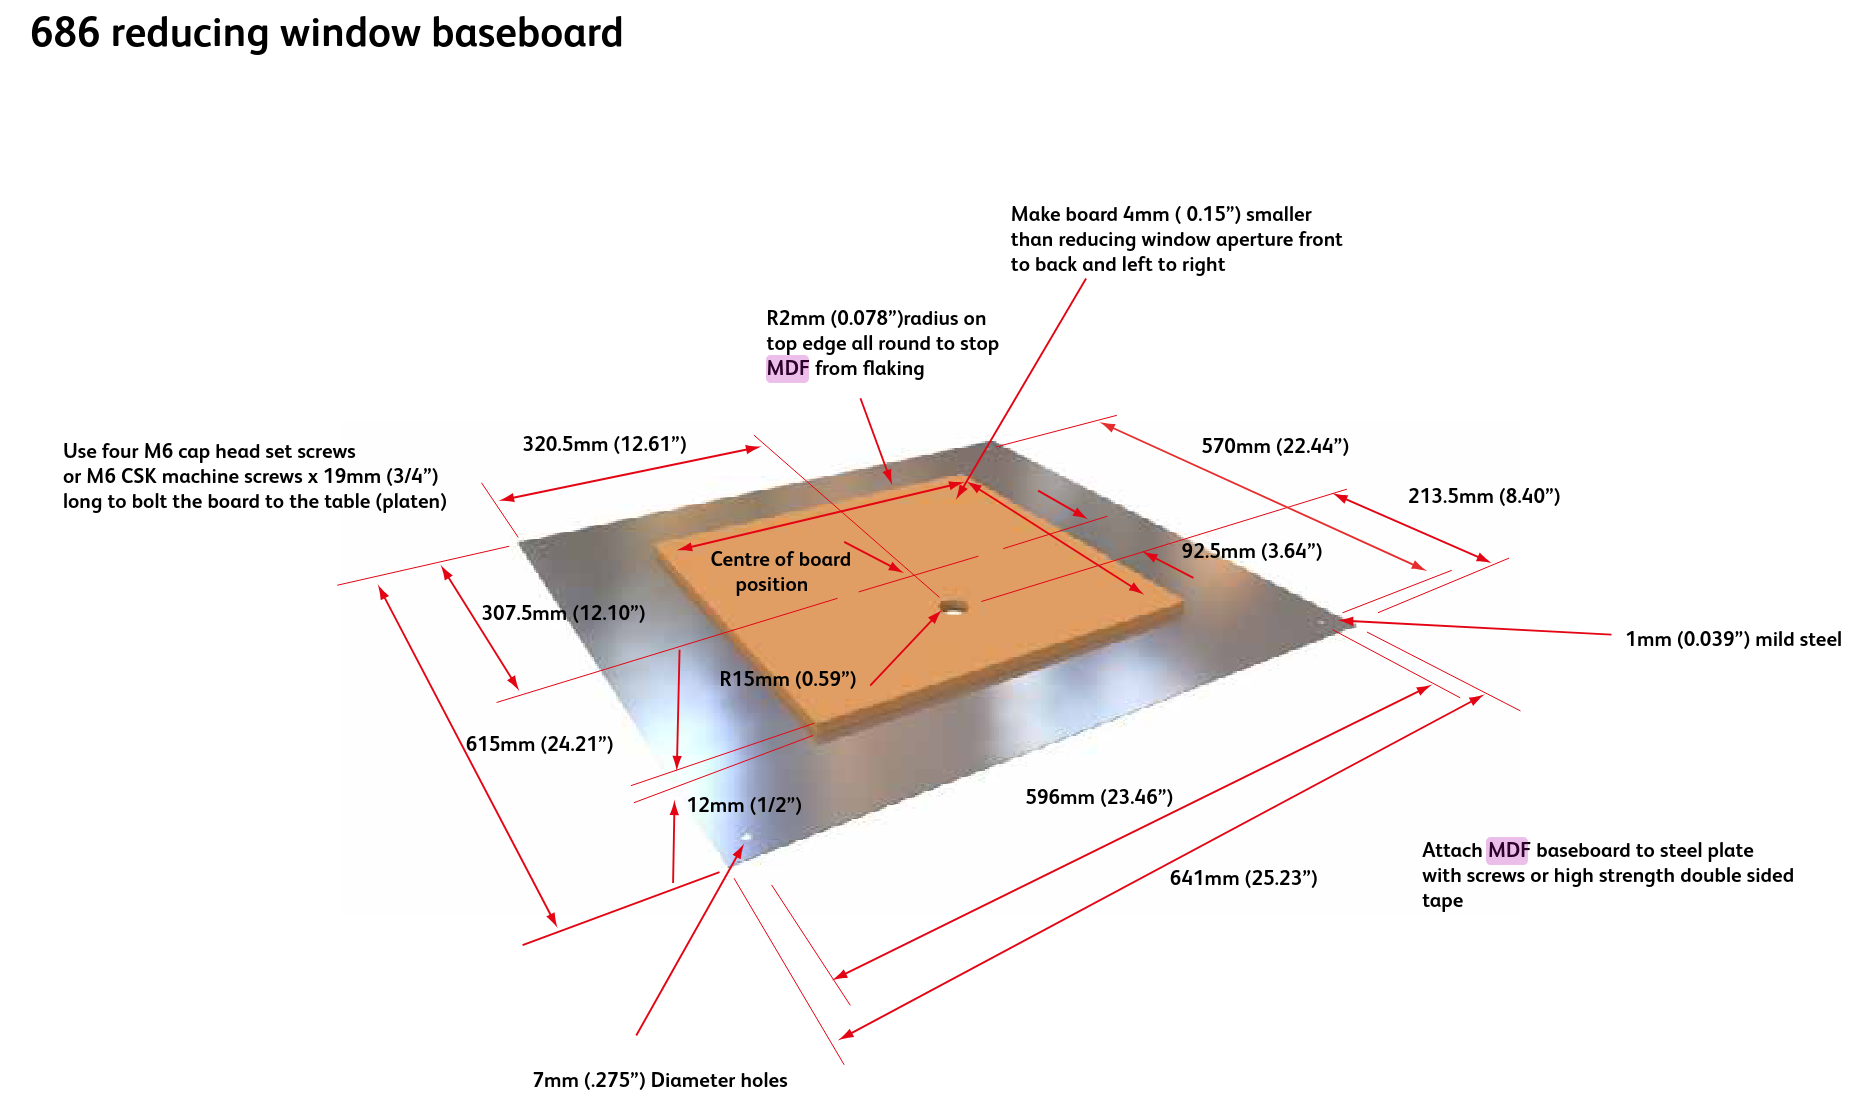
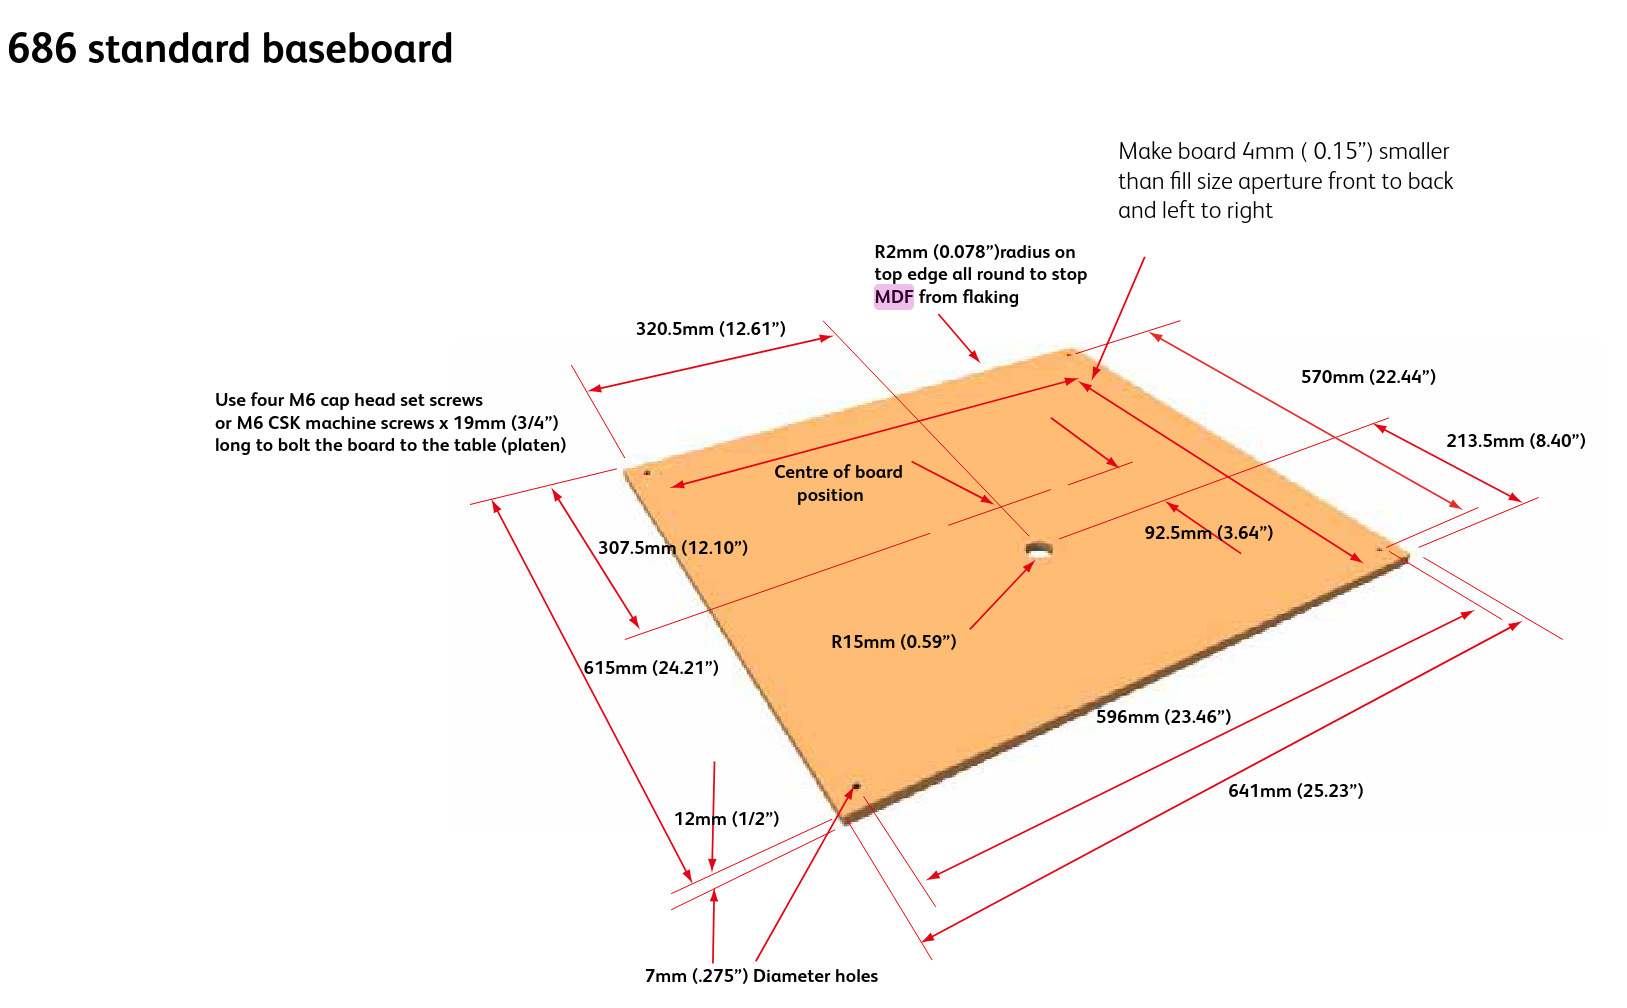
All tools should be mounted on a baseboard. They should not have undercuts and must be produced with slightly angular sides (‘draft angle’) to aid release. Vent holes are needed to allow the air to be evacuated from pockets and sharp angles on the tool. Providing these holes are kept small (1mm diameter or less) they will not leave marks on the surface of the finished molding.
Porous mold materials such as wood and plaster should be properly sealed to prevent the vacuum pump from sucking out any moisture or sawdust, loose plaster etc. The vacuum circuit may quickly become blocked with dust or slurry if moulds are not properly sealed.
As the plastic cools after forming it will contract, gripping the tool tightly. If the tool has been made with sloping sides and has a good surface finish it will release more easily. Where the draft angle must be kept to a minimum a release agent may be used to assist release.
Sealed molds will usually release more easily. Silicon based release agents may be used on more difficult molds. Silicon based release agents are rapidly absorbed by porous (unsealed) molds, rendering them ineffective. The use of talc as a release agent is not recommended. It may clog the vacuum circuit.
The baseboard can be made from either MDF or aluminum and needs to be 12.00mm (1/2”) thick. The vacuum hole can be 30.00mm diameter and needs to be positioned 94mm forward of the center of the
table.
30mm
94mm
The baseboard has to be 4mm shorter in both directions than the forming aperture of the machine e.g. Forming aperture
280mm x 430mm = baseboard size
276mm x 426mm.
Materials
Any thermoform plastic, thickness per manual recommendation, max size 24x24
Plastic sheet is commercially available in a wide variety of grades, thickness and colours. Materials such as styrene and PVC are most suited to vacuum forming. Other materials such as acrylic, polypropylene and polycarbonate will mould but difficulties may be encountered.
Parts of the Tool
Annotated Image(s)
Part Description
Part Description
Part Description
The 686PT is fitted with an automatic sheet levelling system. An optical sensor directs a beam of infrared light across the machine. The system comprises of a transmitter and receiver. When the beam is broken air is pumped into the machine cabinet under the plastic lifting it until beam transmission is re-established. The optical sensors are located under the top-frame at the sides.
Basic Operation
Setting Up
Confirm air line is hooked up
Plug in and rotate the red switch at the back to turn on
Roll the sheet holders at the back so that the counterweights do not come in contact
Undo the clamps and lift the top plate
Insert desired frame from the cart at the back - make sure the gaskets are unobstructed and the alignment bolts at the back go through the hole on the frame
Hit heater on to start preheating - needs 15 mins to come to temp
START >
- LOAD DEFAULT SETTINGS -> uses system default (doesn't auto start)
- LOAD CURRENT SETTINGS
- LOAD NEW JOB
- Heater timer -> goes to heat zone select. Set all zones not in use to 0%
Workholding
Table down - use button on HMI
Table up - press both buttons on front of machine
Settings & Timing
It is important to heat the plastic material appropriately to gain the perfect vacuum form. This comes with the experience of just a few forming cycles, although a good general rule is to apply 20 seconds of heat for every 0.5mm of thickness of the plastic material.
For example, 1.5mm thick plastic requires approximately 60 seconds of heat.
Standby settings add considerable time to the actual vacuum forming - recommend setting to the same as heating time.
For 12x12 mold, recommend starting with 100% in very center heat zone, 100% in the middle ring, 0% on outside.
Using the Tool
Remove any protective film from plastic before putting it under the heater. Put the plastic in smooth side down, so it seals effectively
Make sure clamps are tight
Pull the heater forwards over the clamped plastic. The heater icon will start counting up.
Activate the auto-level if required by touching the button so it shows green . If the plastic is sagging and not being heated evenly then the auto-level feature is used to keep the plastic level while the heater is forward and until ready to form a mould.
As the plastic heats up it may begin to rise slightly. It will then soften and begin to drop back.
When performing an initial forming it will be necessary to check the progress of heating as this will vary with plastic type, thickness and color. Push the heater back slightly to test the softness of the plastic manually or to observe its state. Continue with heating until it is soft enough to form. When the plastic softness is correct push back the heater fully back.
Press the PRE-STRETCH button to inflate the plastic before molding if required. This feature is particularly useful if the mold is high because it keeps the plastic at a more even thickness throughout the molding. If the molding is quite high it may be necessary to pre-stretch the plastic before molding takes place.
Press the two TABLE UP buttons simultaneously and hold until the table is fully raised. Then press the VACUUM icon to latch on the vacuum. The molding will form around the tooling.
The AUTO-VACUUM feature may be enabled before bring the table up. This feature will start the vacuum automatically when the table rises. The trigger point of the auto-vacuum sensor may be adjusted if required.
At the appropriate time when the plastic has formed around the mold tool the fans may be turned on to start the plastic cooling process – press the FAN icon . When the molding is adequately cooled, press the fan icon again to turn it off.
NOTE: WE DO NOT HAVE A FAN; THIS BUTTON DOES NOTHING
Once the plastic has cooled sufficiently the RELEASE icon may be pressed to blow the molding off the mold. Too long or too soon a release may distort the molding.
Once released the molding is now complete and the table may be lowered. Press the TABLE DOWN icon and ensure the molding has released from the mold tool. Ensure the table has reached its lower position. Release the clamp frame to remove the molding for inspection.
Review the results and determine the parameters required to produce the forming. Use the settings mode to set and record the values for later recall.
Cleaning Up
Remove all of your plastic and mold supplies from the machine.
Turn the machine off via the red switch at the back.
Tidy around the machine, put away any frames not already in the rack.
No Comments