
Tool Tutorial
Heat Press
-
Manufacturer: Heat Press Nation
-
Manual: Manual
Keep hands clear when locking the pressure
Ensure work area is clear before heating
Tool Anatomy
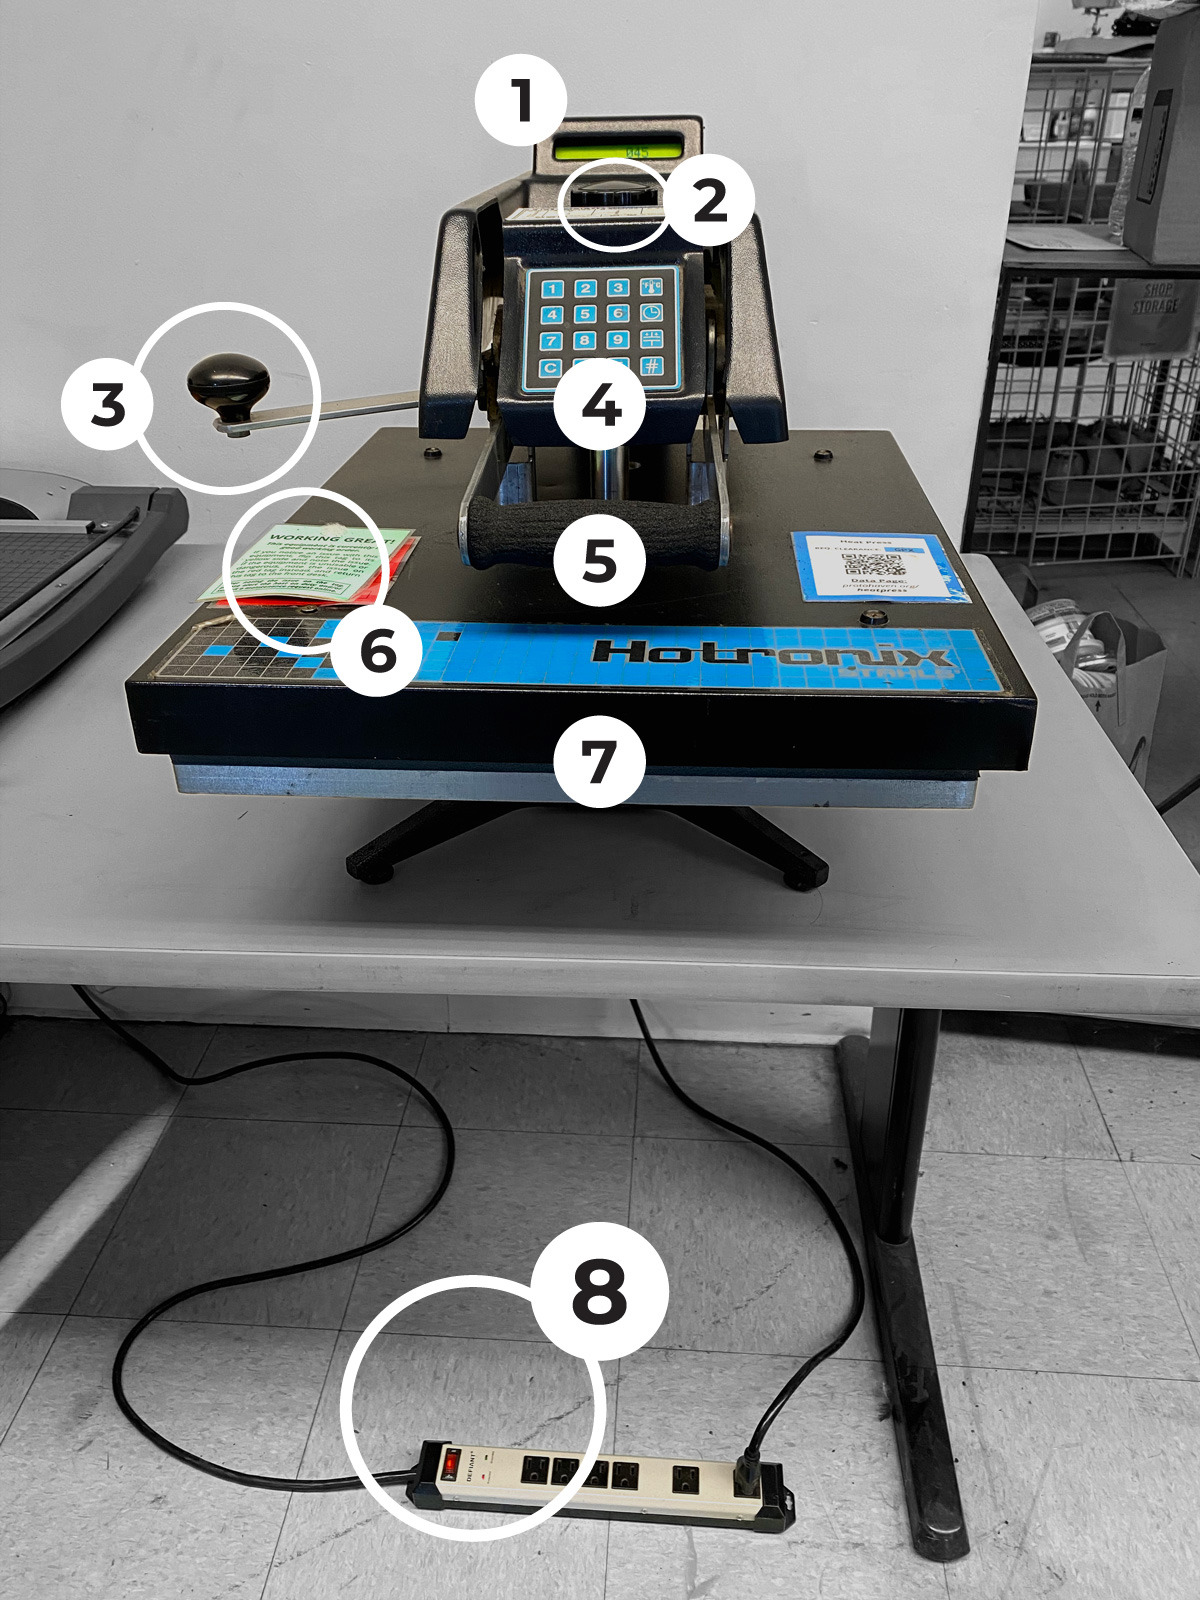
-
Display
-
Pressure Adjustment
-
Swing Handle
-
Keypad
-
Lift Handle
-
Maintenance Tag
-
Heat Platen
-
Power Switch
CONTROL PANEL
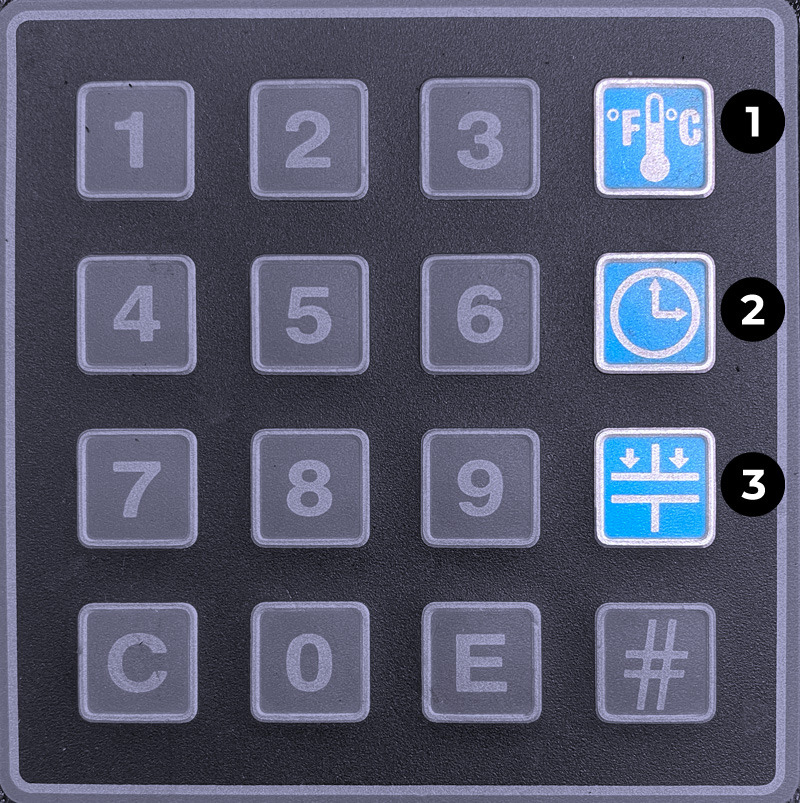
-
Set Temperature
-
Set Time
-
Set Pressure
-
Enter
Tool Safety
-
To avoid burns, do not touch the heated platen during use.
-
Keep hands clear of the upper platen of the press during platen lock down as the pressure may cause injury.
-
Work area must be kept clean, tidy and free of obstructions.
-
Ensure temperatures are safe to use with material at hand.
Setup
-
Connect the power cable to the power strip
-
Power on the power strip
-
Position substrate between teflon sheets (use kraft paper if dye sublimating)
-
Adjust the pressure and time
-
Set the target temperature
-
Wait for the target temperature to be reached
-
Begin pressing
Common Settings
| Substrate | Press Time | Temp | Tips |
|---|---|---|---|
| Ceramic Mugs | 150-210 sec | 350-400º F | Time varies. Press into silicon pad. Mugs should be cooled in warm water or using a cooling plate after transfer. |
| Poly Fabric | 35-40 sec | 400º F | Pre-press shirt for 3-5 min to eliminate moisture. |
| Vapor Apparel | 45-55 sec | 380-390º F | See vaporapparel.com for tips on reducing presslines |
| Mousepads (neoprene) | 45 sec | 400º F | Look for a tight knit and high white point for more brilliant color results. |
| Metal (Unisub) | 60 sec | 400º F | Use blow-out paper. Remove plastic coating before pressing. |
| Metal (Other Brands) | 60 sec | 375-400º F | Time varies. Place absorbent sheet on the bottom of heat press. Then, place product transfer side DOWN on top of the absorbent sheet. |
| Outdoor Metal Panels | 60-90 sec | 400º F | Time varies. Place absorbent sheet on the bottom of heat press. Then, place product transfer side DOWN on top of the absorbent sheet. |
| Unisub Products | 60 sec | 400º F | Remove plastic coating. Tear transfer paper away immediately after pressing. |
| Fire Retardant Plastics | 40-75 sec | 400º F | Remove plastic coating. Tear transfer paper away immediately after pressing. |
| Glass/Ceramic Flat Tiles | 300-720 sec | 400º F | Time varies. Press tiles from back (transfer side down). Press into silicon pad. |
Adjust the Pressure
This part of the tutorial is for an older version of heat press and needs to be remade with the new controller.

The Actual Platen Pressure displays the manual pressure you are applying (Numbers 1 - 9)
The Target Pressure will always display 0 when manually applying the pressure
1 - 3 = Light Pressure
4 - 7 = Medium Pressure
8 - 9 = Heavy Pressure
-
Press the Pressure Key for 2 seconds
-
Raise the platen to the up position, disengaged from the printing plate
-
Position material on the press plate
-
Turn the pressure adjustment knob to adjust the pressure
-
clockwise to increase the pressure
-
counterclockwise to decrease the pressure
-
Lower the platen to print position
-
Repeat until the Actual Platen Pressure displays desired setting
Set The Temperature
This part of the tutorial is for an older version of heat press and needs to be remade with the new controller.

Press the Temperature Key for 2 seconds
Input the desired temperature
Use 3 digits for fahrenheit
Use 4 digits for centigrade

The press accepts temperatures between
205º - 430º F

Press Enter to set the temperature
Set The Time
This part of the tutorial is for an older version of heat press and needs to be remade with the new controller.

Press the Time Key for 2 seconds

Input the desired range of seconds in 3 digits
The press accepts inputs of 001-999 seconds
Press Enter to set the time
Your time is now set!
Operation
-
Preheat press to achieve the target temperature
-
Swing platen away from the base
-
Position substrate & your graphic between teflon sheets (use paper if dye sublimating)
-
Swing platen into final position
-
Lower and lock the platen into the press position
-
Wait for countdown to complete
-
Immediately lift up and swing the platen away
-
Remove materials and proceed to application’s instructions
-
Monitor the press until the entire run is complete
-
Cleanup
Cleanup
-
Power off the Power Strip
-
Unplug the Heat Press Power Cable from the Power Strip
-
Lift up the press
-
Monitor the area while platen remains hot
-
Clear the work area, recycling where possible
Scrap Breakdown
There is one blue scrap bin reserved for vinyl waste and several trash bins in the studio. Maintaining these are a shared, communal responsibility.
When you notice the scrap bins are full, it’s time to take it to the dumpster out back. Feel free to enlist a helping hand.
If you notice valuable material while emptying the bins, use your judgement to selectively save a few pieces or take it home for your personal use.
Troubleshooting
This part of the tutorial is for an older version of heat press and needs to be remade with the new controller.
If a beep is heard at any time during programming, an error has been made.
The press will not accept temperatures below 205° F (096° C) or above 430° F (221.6° C). If you mistakenly attempt to key in a temperature beyond the allowable range, the press will beep to alert you of your error.
The press will not accept times below 001 or above 999 seconds. If you mistakenly attempt to key in a time beyond the allowable range, the press will beep to alert you of your error.
Special Setups
The Heat Press is a versatile tool in the printing process that allows you to get extremely creative with your work! Combining your use of the Heat Press with other tools is what will help you push the boundaries.
The Heat Press is most commonly used with the Vinyl Cutter and the Dye Sublimation Printer.
Printing registration marks in your artwork will allow you to make highly repeatable, complex cuts at the Vinyl Cutter, Laser Cutter, or CNC Router once your artwork is transferred to the final substrate.
No Comments