
Tool Tutorial
Horizontal Band Saw
The horizontal Band Saw is a liquid cooled, fairly accurate saw capable of cutting mild steel, aluminum and other non-ferrous metals. The horizontal Band Saw is different from a vertical band saw in that your material stays stationary while the arm that holds the blade steadily drops down and automatically cuts your metal. At Protohaven, the saw is hydraulically controlled so you do not need to touch the saw once it is running and coolant is flowing. The saw will automatically finish the cut and turn itself off. Since your work is clamped into a vise, and the blade is steadily dropped, a horizontal band saw is capable of making more precise cuts than a vertical band saw. However, unlike a vertical band saw, you are limited to making straight cuts.
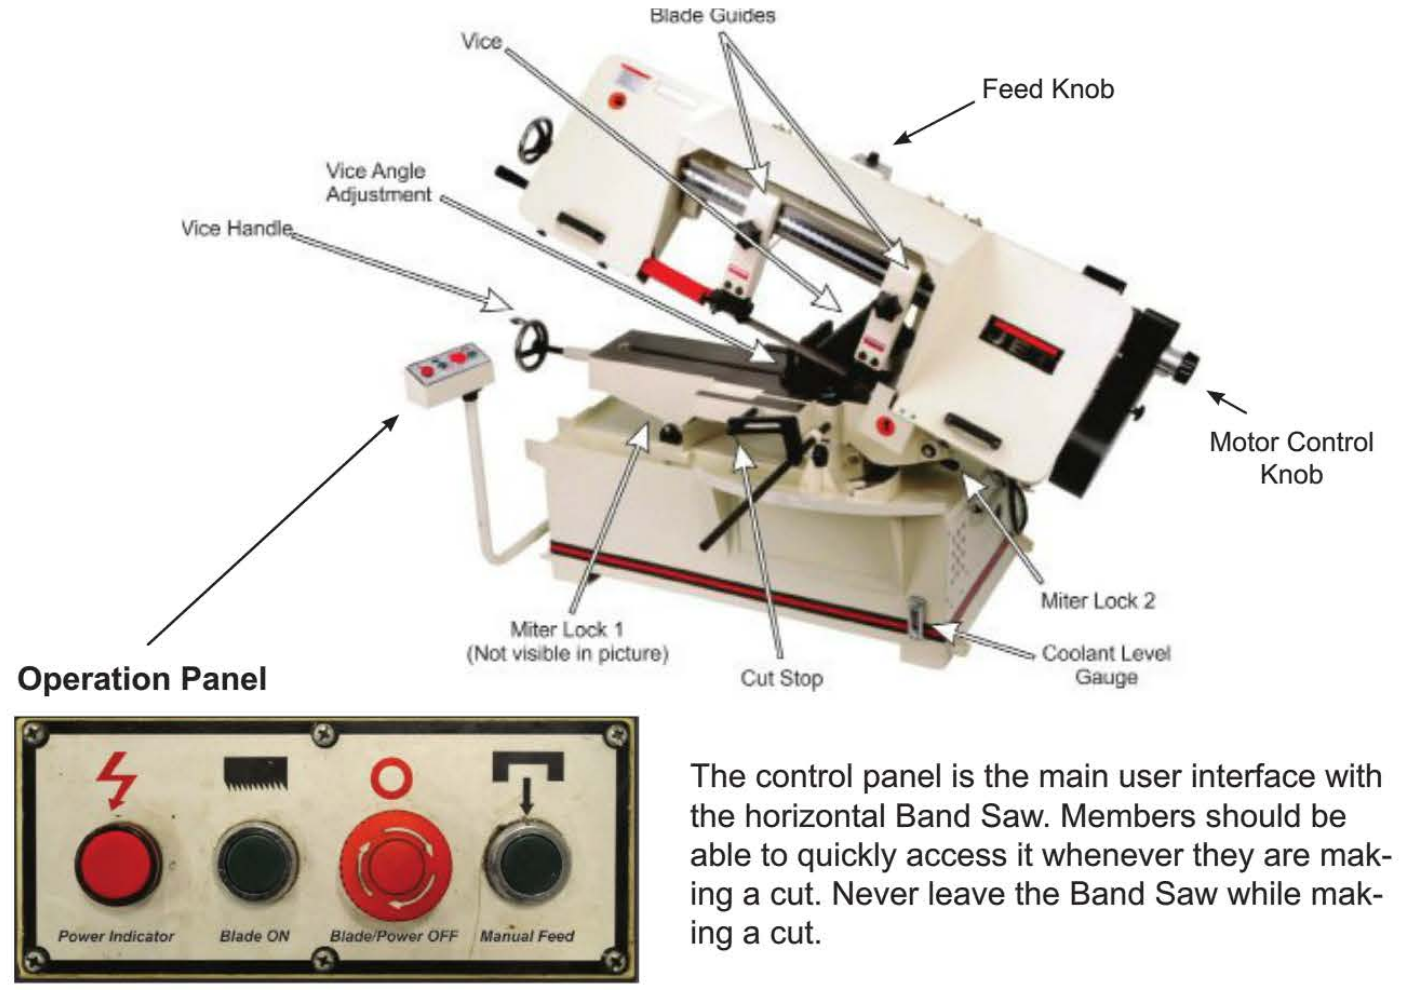
- Power Indicator: This red light turns on when the machine is powered and ready to cut.
- Blade ON: Press this green button to start the cutting process. It starts both the motor spinning the blade and the pneumatic arm dropping.
- Blade/Power OFF: This large red switch stops any cutting processes. When it is pressed, the machine will not engage and the power indicator will turn off. To run the machine twist the button clockwise until it pops out. This will turn on the power indicator signaling the machine is live and ready to cut.
- Manual Feed: This button causes the arm of the saw to drop at the speed set on the feed knob WITHOUT running the blade. It is used for positioning the blade above your materials before you cut as well as for lowering the arm into a resting position after you have finished using the machine.
Adjustments
Adjusting feed and speed
The most important adjustments members make to the horizontal band saw is the motor speed at which the blade cuts and the feed speed (drop rate) of the arm. Safe cutting of a material is an appropriate combination of these two movements of the blade. Incorrect settings for your material will crash the machine, break the blade, damage your part, potentially injuring you as well.
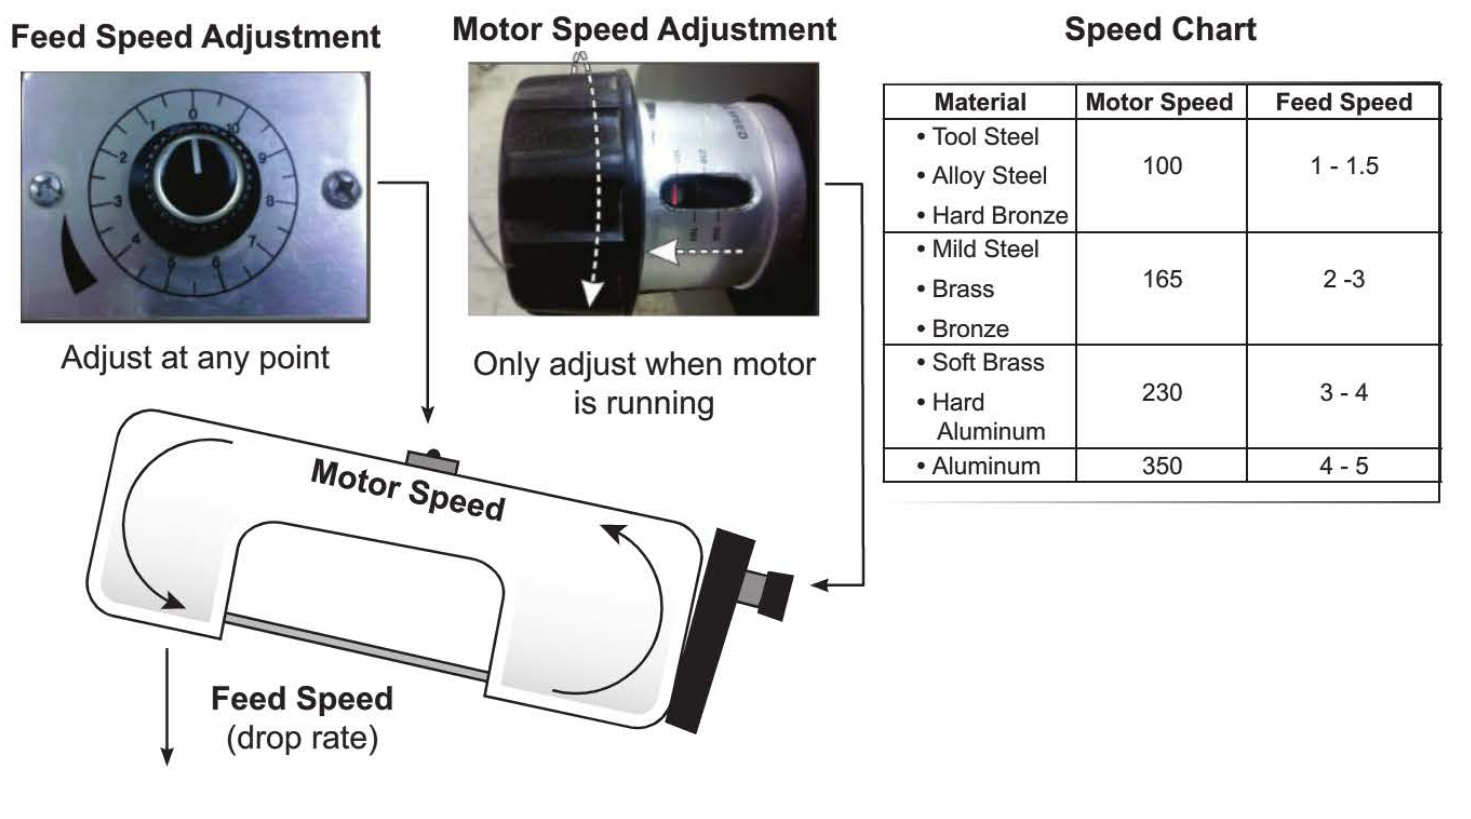
Feed Speed Adjustment
This knob controls how quickly the arm drops. It can be adjusted at any time during the operation. When it is set to zero, the blade will not drop. Use this knob in conjunction with the manual feed button to completely drop the saw when finished using.
Motor Speed Adjustment
This controls how fast the motor rotates the blade. This adjustment can only be made when the motor is running. When changing speeds make sure the red indicator line is pointing towards one of the predefined speed numbers.
Proper Adjustment Sequence
- Raise arm by handle only
- Turn feed speed knob to 0
- Push the green blade on button to start the saw
- Turn the Motor Speed Adjustment knob to the appropriate speed.
Blade Guide Adjustment
The blade guides should generally not be adjusted. Their purpose is to keep the blade rigid despite the
force of the cut. The only time a member would adjust the guides is when the width of the material exceeds the current cutting area between the guides or during a miter cut. If adjustment is needed, only move the frontal (left) guard arm.
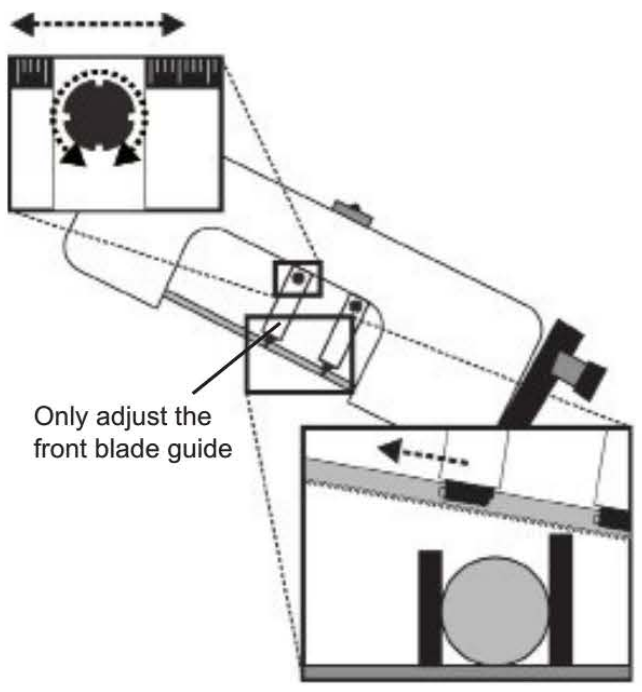
Never move the back blade guide! Improper guide adjustment risks damaging the machine.
Ideally, you should have 1” of clearance between your material and the frontal blade guide. It is possible for a member to have adjusted this before you and left it, so always check the tolerances at slow feed without the blade running.
Angled Cut Adjustment
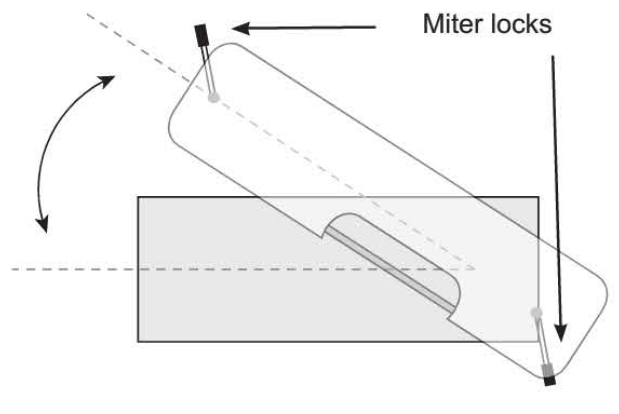
Changing the Blade Angle
- Loosen both front and back miter locks. When facing each lock pull towards the left to unlock.
- Move entire carriage by pulling the handle to the left to desired angle. Check angle against gauge.
- Relock both miter locks.
Changing the Front Vise Angle
- Loosen the vise angle lock bolt.
- Turn vise crank handle and clamp onto your part. As the front vise jaw moves towards your material it will automatically align its angle to seat parallel against your part.
- Tighten the vise angle lock bolt.
Coolant Flow Adjustment
To protect both the blade and your material from the effects of heating due to the friction of the cut, the horizontal Band Saw has an automatic coolant system. Because of this system, only metals can be cut on this machine. Wood or plastic will ruin the coolant system and make the machine inoperable. To cut wood or plastic, use the vertical band saw located in the general woodshop area.
- At all times coolant must flow during a cut. The entire cutting surface of the blade needs to be covered in coolant.
- Before making a cut, allow the blade to run for a few seconds with the feed knob set to 0 so the arm does not descend.
- If there is not a steady flow of coolant, check the red coolant flow lever on top of the arm near the feed speed control knob. Ask a facilities staff member for assistance.
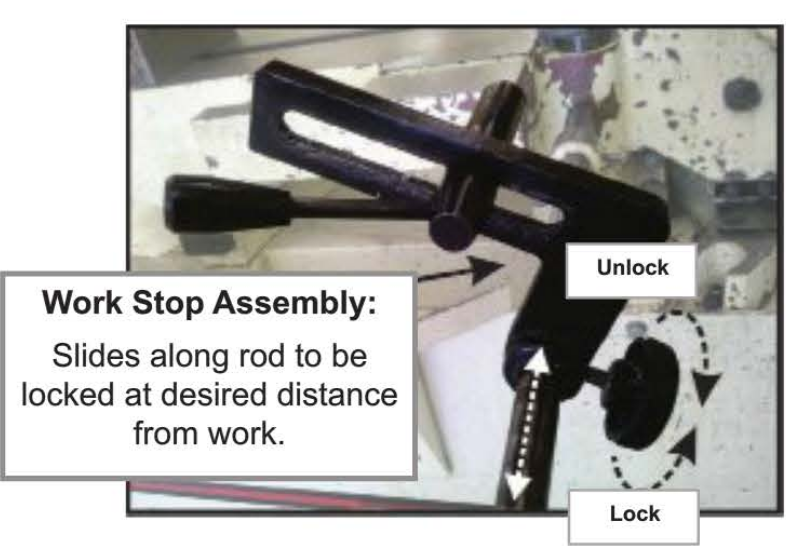
Setting the Work Stop
The work stop is a mechanical stop that can be locked at a specific distance from the vise to allow you to quickly cut many parts of the same length without having to measure every time you cut.
Caution: Do not use work stop with angle cuts.
- Hold part loosely in vise and slowly drop blade to 1/2"above material.
- Measure and move material until the correct cut length is achieved. Allow for the blade kerf (the thickness of the blade).
- Tighten the vise.
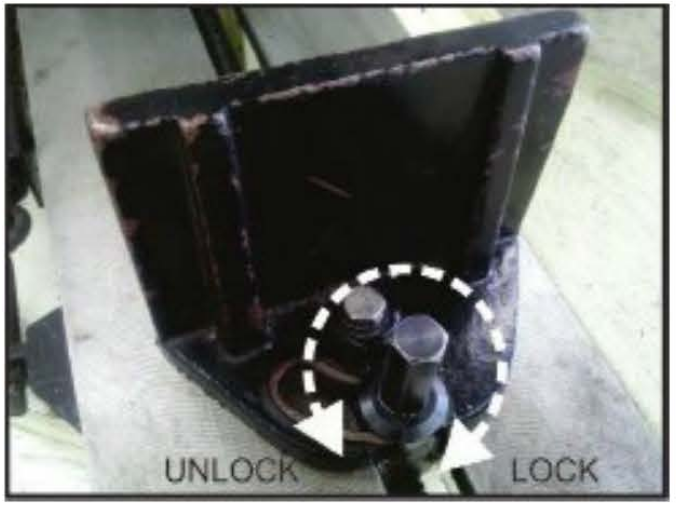
- Loosen the work stop lock.
- Slide towards the protruding end of your material until it is 1/8” from material.
- Lock work stop down.
Basic Operation
Making a Slow Test Drop
Use the feed adjustment knob and manual feed button to do a slow test drop. Check to make sure:
- Blade guards do not hit vise or part
- Blade does not cut vise
- Cut is in correct place on material
- There is nothing obstructing the downward motion of the arm.
Basic Cut:
- Grab upper handle and raise the cut arm.
- If you are going to cut at an angle, change the miter angle of the arm.
- Insert part into the vise and clamp loosely.
- Perform a slow drop to check measurement and clearances.
- Clamp vise tight on material.
- Lift blade 2 to 3 inches above material.
- Set feed speed knob to 0.
- Push the green button to turn blade on.
- Wait until coolant starts flowing and completely covers cutting surface of the blade.
- Check the chart (posted on the arm of the saw) for appropriate motor speed for your material and adjust the motor speed while the blade is running.
- Check the chart (posted on the arm of the saw) for appropriate feed (drop) speed and turn knob slightly below chart setting to initiate cut.
- As the blade enters the material, increase feed to appropriate chart number.
- Keep your hand near emergency stop button and watch entire cut.
- Wait for the blade to stop itself as it finishes cutting through your part.
- Pull handle up and remove your material from the vise.
- Discard large scraps, vacuum chips and coolant from machine and surrounding floor area.
- When you finish using the band saw, use the feed knob and manual feed button to drop the saw to resting position.
Notes
- Lightly hold your part with your hand to prevent it from falling when cut finishes. Only do this if the length protruding from the vise exceeds six inches.
- For clamping round stock use V blocks. If cutting a large tube, you can clamp the inside of the tube to back jaw in addition to mild clamping.
- If you are cutting too fast (speed too high) you will get tightly curled DISCOLORED chips. If you are feeding too slowly, you will get powdery chips.
- Always re-lock both miter locks after you have changed the cut angle. This ensures your angle does not shift during cutting.
No Comments