
Tool Tutorial
Cold Saw
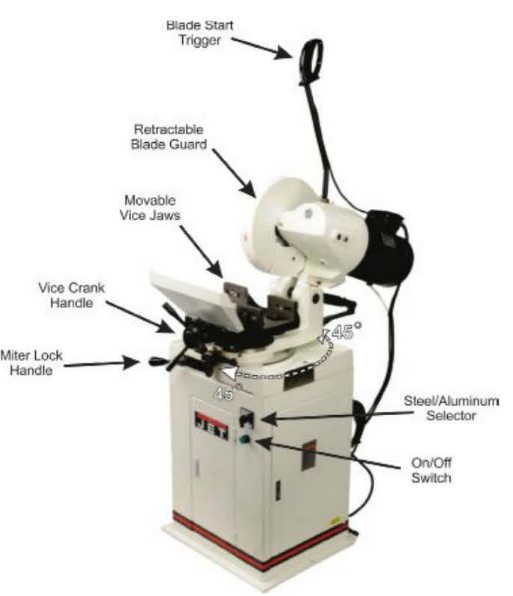
The cold saw makes accurate, square and angled cuts in steel and aluminum. The saw is heavy and stable and the dual vise clamping system makes for more accurate cuts than an abrasive chop saw with minimal burring, almost like a machined edge. It uses a solid HSS (high speed steel) circular saw blade to cut the material with the force of the user. It's a “cold saw” because it transfers the heat generated by cutting to the chips created by the saw blade. This is the opposite of an abrasive saw which abrades the metal and stores a great deal of heat in the material and the blade.
Safety Precautions and Features
- The cold saw can handle a range of materials from aluminum to steel. However, hardened steel and stainless steel are too hard and must be cut with an abrasive chop saw. If you want to cut these materials, consult a shop tech.
- Because of the high cutting forces involved with the thick blade, the material being cut must be held correctly and tightly in the vise. If you are uncertain about your workholding, please ask a shop tech member for assistance.
- When cutting keep both hands on the trigger handle. This ensures that your hands are not near the cutting plane and allows you to provide appropriate, constant downward pressure (feed).
Adjustments
Work holding
Work holding is one of the most important adjustments you can make to the cold saw because of the high cutting forces involved. The four jaws of the vise are locked together and work like a normal vise except that there is support on both sides of the blade for your material which greatly increases rigidity.
- Clamp work very tightly in the vise using the vise handle
- The jaws of the vise can be loosened with the Allen wrench on the side of the machine and moved left and right along your
material to accommodate the saw blade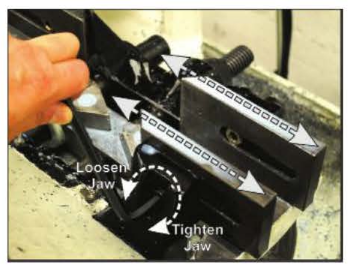
- IN NORMAL STRAIGHT CUTS the vise jaws should have a 1/8” clearance on either side of the blade to allow safe blade passage and also to have better grip on your part.
- Always make sure to re-tighten your vise jaws after adjusting.

Miter (Angle) Cuts
The cold saw upper assembly is capable of being rotated to make angled cuts up to 45° degrees in your material in both directions. It is important to always test whether or not the blade will hit the vise jaws and adjust the jaws according to your angle.
Changing Angle of Cut
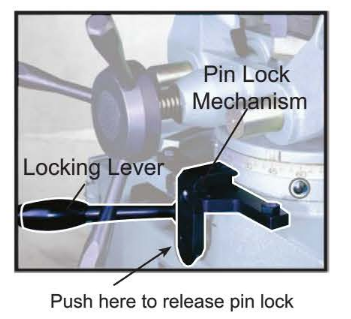
- Loosen the locking lever by moving it to the left
- Push in lock mechanism to release it from pin
- Pull the back of the saw to set desired angle for your cut.
- There is a fixed stop pin at 45°. If you are cutting a 45° angle, release the lock mechanism near 45° and allow it to lock.
- If you are cutting angles aside from 45°, stop at your desired position and re-tighten the locking lever by moving it to the right.
Adjust the Vice Jaws
- Remove the allen wrench from left side of the machine and loosen the bolts on appropriate jaws.
- Move jaws out of blade path.
- With the saw turned OFF, bring the blade down with jaws in new position to check for clearance.
- If blade is clear of jaws, re-tighten jaws and replace allen wrench in the slot on left side of machine.

Work Stop Adjustment
The work stop is a mechanical stop that can be locked at a specific distance from the vise to allow you to quickly cut many parts of the same length without having to measure every time you cut.
- Hold part loosely in the vise and slowly drop blade to 1/2” above material.
- Measure and move material until correct cut length is achieved.
- Tighten work holding vise.
- Loosen the work stop lock.
- Slide work stop towards protruding end of your material until it is 1/8” from material.
- Lock work stop down.
Set Speed Appropriately for Material
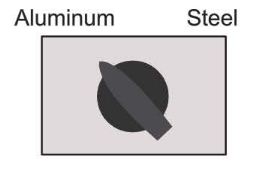
You will have to adjust the blade speed appropriately for the material you are cutting. This saw has two speeds: steel and aluminum. Make sure this is set appropriately
Basic Operation
- If making a straight cut, check that the locking pin is engaged and the saw is locked correctly.
- If making an angle cut, unlock the miter locking lever, release the locking mechanism and move to desired position and then relock the miter locking lever.
- Slowly drop the saw without turning on the blade to check vise jaw clearance.
- Adjust the vise jaws appropriately to allow clearance.
- Clamp material tightly in the vise. Use appropriate workholding for geometry of your material.
- Turn on the machine using the switch on the front.
- Switch between aluminum or steel. Do not do this when the blade is running.
- Depress the trigger to turn the blade on.
- Allow blade to spin up to maximum velocity. Ensure that coolant is flowing and fully covering the cutting surface of the blade.
DRY CUTTING will break the blade. This is considered to be tool abuse and you could be held responsible for replacing the blade.
- With BOTH hands on trigger. Evenly apply downward pressure and begin cutting material.
- Continue applying steady, downward force and FOLLOW THROUGH until saw reaches end of travel. The blade travel stops before the saw reaches the bed of the vise so do not attempt to stop cut prematurely.
- Once cut is complete, release trigger and return saw to upper position.
- Unclamp material and remove scraps.
- If you made any angle adjustments return the saw to 0° and RE-ADJUST THE Vise JAWS. Also ensure that the locking pin is in place and the miter locking lever is locked.
Notes
- The saw will make a loud grinding noise. This is the nature of this machine. If you do not feel like you are removing material at a rapid rate you are probably cutting the wrong material
- Keep both hands on the handle and slightly lean into the saw. The weight of your body alone with a little force is enough to cut.
Do NOT attempt to force the cut. If you see the blade skipping, you are applying too much force.
DRY CUTTING will break the blade. This is considered to be “abuse of tools” and you could be held responsible for replacing the blade.
No Comments