
Tool Tutorial
Pedestal Grinders
The grinder is an abrasive wheel that uses a rough stone to wear away harder metals. It can shape the metal, remove burrs and clean up rough cut edges.
Because of the soft nature of aluminum, you MUST only grind it on the "Aluminum" machine.
Using aluminum on the "Steel" grinder with standard wheels will cause it to embed into the wheel. This inhibits material removal, causes rapid friction heating and eventual explosion of the wheel if further grinding is attempted.

Safety Precautions and Features
The rapidly spinning disks on the grinder are capable of causing serious injury. They are also more fragile than one initially thinks because of the vibration associated with the high speeds. Keep these safety precautions in mind at all times.
- ONLY GRIND MATERIAL ON THE WHEEL FOR WHICH IT IS INDICATED. See the warning callout above.
- Always keep material seated against the tool rest. If you hold it free hand you, can lose control of your material due to the strong downward forces. Hold material with vise grips if necessary.
- Ensure that the gap between the tool rest and the wheel is 1/8” or less. The downward motion of the wheel can pull your part in and shatter the wheel or launch the part causing serious injury if this gap is too big
- Hold the material firmly, and take light, steady passes against the wheel
- Do not feed part into wheel aggressively. Initial contact with the wheel should be slow and constant
- Keep spark shield down at all time
- Visually inspect wheels before starting the motor for uneven surfaces, chips or knicks, and any residual material stuck in the surface of the wheel
- Stand aside as the motor comes up to speed
- Do not wear gloves when using this machine. They could pull your hand into the wheel
- Do not grind on the side of the wheel. Always use the front face of the wheel
Adjustments
Adjusting Tool Rest Distance and Angle
It is important that the distance between the table and the grinding wheel is no greater than 1/8” because the force of the spinning wheel will pull your material into the gap. This could cause the wheel to jam and possibly shatter at a high speed.
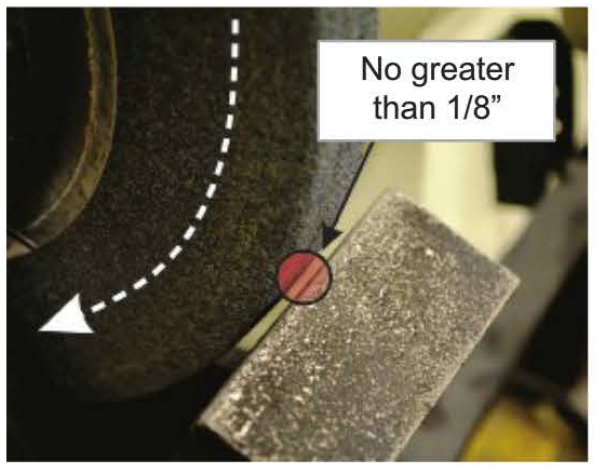
Seek a shop tech for adjustment of the tool rest if you find the gap is larger than 1/8”, or if you need to change the angle at which you are grinding.
Adjusting Deflector Guard Angle Angle Adjustment
The deflector guard shields you from sparks and particles thrown during the grinding process.
- To adjust the distance of the guard from the wheel loosen the bolts on the interior side of the wheel housing.
- To adjust the angle of the deflector guard loosen the friction lock at the top of the guard assembly. Retighten after adjusting.

Basic Operation
- Turn the motor on, and allow the wheel to spin up to its maximum velocity while standing clear to the side of the machine.
- Firmly hold your workpiece — use vise grips if needed — on or just above the rest.
- Push the work slowly into the wheel.
- Keep the work moving so as not to wear out one spot on the wheel.
- Grind with a light hand and frequently cool material in water.
- When finished grinding move material away from wheel surface.
- Turn motor off and allow to it to spin to a stop.
- Clean up work and surrounding floor area.
- Remove all scraps from your cut, and clean chips from table and surrounding floor area.
Notes
- Your workpiece will get hot enough to change the temper and heat treat the metal if you do not take light passes and frequently pull the metal away from the wheel to cool. You can use a cup of water to douse your part to quickly cool it.
- If the wheels do have excess material in them or have an irregular surface ask a shop tech to dress them for you.
- When grinding stainless, do NOT allow it to get red hot. This will make it too hard for further work and presents a risk of off-gassing of the compounds from non-ferrous additives in the alloy (esp. hexavalent chromium).
No Comments