
Tool Tutorial
Natural Gas Soldering Torch
This article is incomplete.
A natural gas/oxygen torch produces carbon-free flames, (5120°F for natural gas), which is a good all-purpose system to solder metals together.
Tool Anatomy

RED = GAS
GREEN = OXYGEN


A. Natural gas line opener valve - turns on the gas
B. Bronze gas valve - allows gas to flow to the torch
C. Oxygen tank valve - turns on the oxygen
D. Bronze oxygen valve - allows oxygen to flow to the torch Striker
Tool Safety
Personal Protective Equipment
Clothing and closed-toed shoes (preferably boots) must be of natural materials that will burn quickly and not melt to skin (i.e. cotton, denim, leather).
Common Hazards
Fire & Burns
PROHIBITED MATERIALS
TODO
Operation
Inspection & Set Up
Turn on the gases
-
Turn on ventilation hood
-
Turn yellow knob (A) on gas line that's mounted on the wall from perpendicular (off) to parallel (on)
-
Open bronze valve (B)corresponding to the torch you want to use. The big torch has big hoses, the mini torch has small hoses.
-
Turn the grey Oxygen tank valve (C) to “Open”. It's the valve on top of the oxygen tank.
-
Open bronze valve (D) that connects to the oxygen tank.
Light the torch
-
On the torch, turn on the GAS (RED) knob ¼ turn.
-
Light the gas with a striker, do not use a lighter.
-
Then introduce the OXYGEN (GREEN) by opening the valve slowly.
Note: If you open either the gas or oxy valve too much, it will blow itself out. Go slow, start small.
Turn off the torch
-
Close GREEN OXY valve on the torch FIRST
-
Then close RED GAS valve on the torch
-
Make sure both valves are closed when not in use!
Turn off the gases
-
Turn yellow knob on gas line (A) from parallel (on) to perpendicular (off)
-
Turn grey valve on top of the oxygen tank (C) to “Closed”
-
Bleed out all gas and oxygen from the hoses by opening the valves on the torch.
-
Watch the oxygen gauges. When they both read “0”, close both valves on the torch.
-
Close all bronze valves (B & D)
-
Turn off ventilation hood
Soldering
-
Make sure your piece is clean and free of debris
-
Light your torch
-
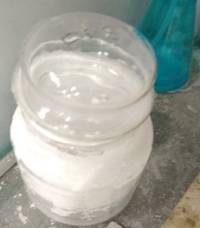
Dip your piece in firescale protection solution (FPS) (boric acid+alcohol)
-
Burn off the alcohol in the firescale protection solution with torch
-
Clip a chip of solder and use your flux and flux brush to paint it onto your solder seam
-
SOLDER

If your piece has more than one solder joint, use HARD solder first, Use MEDIUM solder second, Use EASY solder last. (Hard solder tarnishes the least and has the closest color to the metal you are working with, so use hard if you just have one seam.)
Consumables
Some solder is located at the station, but users should be prepared to bring their own.
Cleanup
TODO
No Comments