
Tool Guide
This tool guide is incomplete; these sections were taken from the manual.
Safety
1. Always bolt down your rolling mill to a secure bench or secure stand for stability and safety. Also ensure that the bench or stand is securely
fixed to the floor.
2. Ensure guards are in place at all time. The guards are the black plastic covers, covering the gears.
3. Do not lift the mill by the hand wheel, only lift from the base. Always make sure at least 2 people carry the mill.
Care
1. When the rolling mill is not in use, apply a thin coating of ruse preventative liquid. Using a clean and dry paint brush (approximately 12mm
wide) apply the rust preventative across the rolls. Turn the rolls as you do this. Make sure the rolls are nearly closed. This w ill spread the
liquid evenly over the surface. It is very important that your rolls are always protected, especially in moist/wet/hot conditions or where
temperatures are changing. Once your rolls ae marked/rusty/corroded they will be like this until you have them removed and r eground.
(However, please note that it is almost impossible that you will end up with perfect rolls. Over time and use they will get slightly marked but
will still work perfectly well). When using your mill again remove all rust preventative and ensure your rolls are clean and dry before you start
to roll material. See “removing rust preventative” at the beginning of this manual.
2. It is also recommended that you cover your mill when not in use. This is to prevent the rust preventative from collecting dust and dirt.
3. Keep the rolls clean. Do not touch the rolls. Oils and acids from your body can damage the rolls, leaving behind small marks and eventually
rust.
4. Make sure all material is dry before rolling.
5. Do not use your mill with the rolls completely closed.
6. Do not roll ferrous metals such as iron or steel through the mill.
7. Always release pressure on the rollers after you have completed your job.
Sheet Rolling
1. Anneal the piece of sheet or ingot, pickle it, and rinse it with clean water. Now dry it.
2. Feed the dry metal into the mill, applying snug (but not overpowering) pressure on rollers.
3. After rolling the metal through the mill, flip the piece end to end before you roll it through again. You will get a more even roll.
4. Before passing metal through the rollers, lower the rollers until you have a snug fit (as in step 2).
5. If the metal becomes hard to roll, it must be annealed again. Then roll the piece through the rollers, repeating as necessar y until the desired
thickness is achieved.
6. When rolling silver sheet, it may be necessary to anneal the sheet after rolling it from 3mm to 1mm thickness. For 14ct gold, the annealing
may be necessary after rolling from 3mm to 2mm.
Wire Rolling
Reduce the wire by rolling 2 or 3 times in each groove rotating the wire 90 degrees on each pass. Rolls should be nearly
closed for the last pass before moving to the next groove. Depending on the material, passes of up to 30% can be
achieved. The material should be annealed as often as necessary to avoid excessive force when rolling. Indications of
excess hardness are frayed edges, wrinkling of surface, surface cracking or excessive force needed to turn the rolls
Special Technique - Rolling Mill Printing
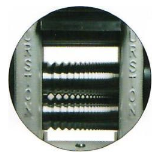
The Rolling Mill
The rolling mill is a machine designed to product thinner gauges of sheet metal and wire. Most studio jewellers use a hand cranked
mill (although automated mills are used as well). Each mill consists of two smooth, highly polished hardened steel rolls, mo unted
in the housing parallel to each other. The rolling mill is used for reducing the thickness of sheet metal. The rolls for wire are cut
with ‘V’ shaped grooves arranged in decreasing sizes, allowing for gradual reduction of wire diameter and producing a square cross
section of wire. Most studio jewellers choose a ‘combination’ mill – half of the roll is smooth (for sheet metal) and half is grooved
(for wire). This limits the width of the metal to be rolled (averaging about 50-60mm).
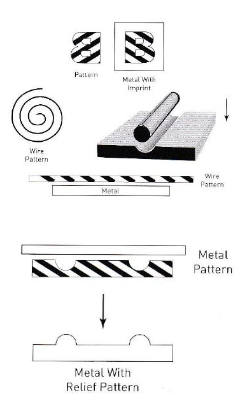
Introduction to Printing
Metal which is passed through the rolling mill under pressure with another material will
become embossed with a pattern exactly the same as the material being used. Any small
particle trapped between the metal and roll will ‘imprint’ on the metal. If you are attempting
to roll a perfectly smooth piece of metal, this is not desirable. But the principle can be put
to use to create embossed patterns and designs on metal.
The best way to imprint metal is to create a ‘metal sandwich’ with two pieces of metal (to be
impressed) on the outside (the ‘bread’ in the ‘sandwich’) and the material being used as
pattern between them (the ‘filling’).
One-Sided vs. Two-Sided Imprinting
If you wish to imprint on one sheet of metal only, roll the metal together with the imprinting material, using the roll as the other
side of the ‘sandwich’. This technique is preferable when using expensive materials (gold and sterling) but has its drawbacks, as
there is more possibility of damaging the rolling mills if materials that are too hard are used for imprinting. It is best to make a
‘metal sandwich’ whenever possible – it produces two pieces of usable, imprinted metal with mirror image imprints (especially
useful for earrings, being symmetrical, but reversed).
Process
Metal to be imprinted must be annealed, dry and clean. Depending on the use
of the metal after being imprinted, you may wish an emery finish or Tripoli
rouge polish. Usually the metal that is the pattern (the ‘filling’ in the sandwich)
should not be annealed – if it is hard metal you will get a better imprint and
may be reusable.
2. The pattern imprinted will be a reverse of the design (important to remember
if using letters and numbers in the design).
3. An object placed between the two pieces of metal will create a recess in the
metal (intaglio; a mechanical ‘etching’ effect). As the ‘metal sandwich’ passes
between the rolls and is compress, the imprinting material is pushed into the
metal. Be careful not to roll the imprint so that the metal becomes too thin.
4. Make one pass only! Carefully adjust the gap by attempting to roll the first ½
inch (1cm) or so. Trial and error and experience, along with written notes, are
all part of this process. Once the correct gap is calculated, roll the whole piece
in one continuous roll. Try not to stop part way through the pass.
5. To emboss: use a plate with negative spaces so that when rolled the metal
plates push into the recessed shapes on the pattern.
Troubleshooting
| Problem | Cause | Solution |
| The edges of the metal are cracking. |
When the metal was poured, the ingot is not uniform in shape or the metal was rolled too much without annealing |
Remove the part of the metal with the crack (by sawing), anneal, and them hammer out the metal around the missing section until the edges are even. Anneal again and then re-re-roll. |
| The surface of the metal is flaking and/or cracking. |
1. When the metal was poured, the ingot mould was cold. 2. There may be too much old metal in the ingot. 3. The ingot was annealed too much. 4. There may be foreign metal in the ingot. |
Melt the ingot and reform in the ingot mould. Roll it out again. If the problem persists, it may be necessary to refine the metal before you use it again |
| When wire is rolled out, it is wavy or bent. |
There was not enough tension applied to the free end of the wire. 2. Too much pressure is being exerted by the rollers. |
1. Hold the free end of the wire tight with one hand. 2. Remove sheet, anneal it, planish the distorted sections and re-roll. Apply less pressure to the rolls. |
| When rolling sheet, it buckles. | Sheet was pushed through rollers after flipping end to end without annealing. |
Remove sheet, anneal and re-roll. |
No Comments