
Jewelry Torch Tool Tutorial
A natural gas/oxygen torch produces carbon-free flames, (5120°F for natural gas), which is a good all-purpose system to solder metals together.
Tool Anatomy
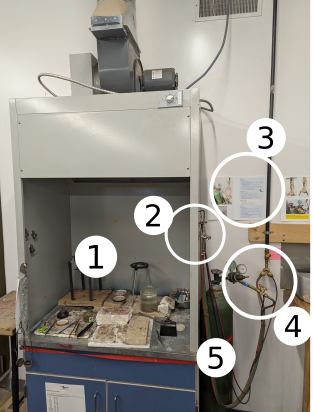
- Flame cabinet
- Torch & holder (outside of cabinet)
- Gas startup/shutdown instruction guide
- Oxygen and natural gas valves & regulator
- Oxygen tank
For all cables: RED = GAS, GREEN = OXYGEN
A. Natural gas line opener valve - turns on the gas
B. Bronze gas valve - allows gas to flow to the torch
C. Oxygen tank valve - turns on the oxygen
D. Bronze oxygen valve - allows oxygen to flow to the torch Striker
Tool Safety
Clothing and closed-toed shoes (preferably boots) must be of natural materials that will burn quickly and not melt to skin (i.e. cotton, denim, leather).
There are many burn hazards - hot work, contact with the hot torch, and latent heat stored in the fire bricks, table, and items on the table. Keep extremities and clothing clear of the torch and avoid dangling clothes/accessories.
Fire and toxic fumes may come from from combustion gases and materials that are unsafe to heat (e.g. galvanized metal). Always use ventilation when the torch is lit.
Improper technique can lead to equipment damage (dropping fire bricks, torching the cabinet).
Failure to properly close oxygen and gas lines after use risks a gas leak or explosion. Carefully follow the posted instructions on the wall when closing and bleeding gas lines.
Operation
Inspection & Set Up
Turn on the gases
-
Turn on ventilation hood
-
Turn yellow knob (A) on gas line that's mounted on the wall from perpendicular (off) to parallel (on)
-
Open bronze valve (B)corresponding to the torch you want to use. The big torch has big hoses, the mini torch has small hoses.
-
Turn the grey Oxygen tank valve (C) to “Open”. It's the valve on top of the oxygen tank.
-
Open bronze valve (D) that connects to the oxygen tank.
Light the torch
- Hold the torch in your non-dominant hand, with the hose over your arm.
-
On the torch, turn on the GAS (RED) knob ¼ turn towards you (counterclockwise) until you hear a slight hiss.
-
Hold the striker near the tip and make a spark (do not use a lighter).
-
Then introduce the OXYGEN (GREEN) by opening the valve slowly.
- Adjust the flame as desired, turning the screw toward you increases the flame, down and away from you decreases it and then turns it off, usually with a popping sound which is a safety feature that ensures that extra gas in the torch is burned off.
Note: If you open either the gas or oxygen valve too much, it will blow itself out. Go slow, start small.
Turn off the torch
-
Close GREEN OXY valve on the torch FIRST
-
Then close RED GAS valve on the torch
-
Make sure both valves are closed when not in use!
Turn off the gases
-
Turn yellow knob on gas line (A) from parallel (on) to perpendicular (off)
-
Turn grey valve on top of the oxygen tank (C) to “Closed”
-
Bleed out all gas and oxygen from the hoses by opening the valves on the torch.
-
Watch the oxygen gauges. When they both read “0”, close both valves on the torch.
-
Close all bronze valves (B & D)
-
Turn off ventilation hood
Annealing
- Heating metal to the prescribed temperature for that metal, you can reduce the stress within the metal that has accumulated due to overworking it.
- Work hardening occurs when the metal is hammered or bent until the point where it is no longer malleable. If it continues to be hit and compressed, it can snap, fracture or crack.
- In order to continue working/forging a piece of metal, you must anneal it whenever it shows signs that it is no longer flexible.
- Copper and Bronze are heated to a bright red, 1400F and quenched in water immediately until cooled and then placed into the pickle.
- Brass and Nu-Gold, are heated to a bright red, 1400F but must NOT be quenched, when it is cool, it is then carefully placed into the pickle pot.
- Sterling should be heated to about 1100F which is the first dull red. It is then quenched in water. Flux can be brushed on the piece as an indicator. Heat the piece with the torch and when the flux melts and turns clear, the silver should be annealed.
Soldering
- Prepare your metal pieces by cleaning them with a degreasing detergent and rinse thoroughly with water, dry with a clean cloth or paper towel.
-
Make sure your piece is clean and free of debris (optional- Dip your piece in firescale protection solution (FPS) (boric acid+alcohol) This mixture is extremely flammable and has been removed from the soldering enclosure)
-
Flux the joint to be soldered and add chips of solder
-
Slowly warm the whole piece till the flux takes on a crusty appearance, then evenly heat, lastly focus on the area to be soldered. The hot solder will move in the direction of the flame, so positioning is key.
-
(alternate method) Pick up a chip of solder with your flux brush to paint it onto your solder seam once the seam is hot. (more advanced) You risk moving parts out of position and just burning a bunch of brushes.
Soldering Tips
- Before soldering, make sure that the metal is completely clean with no grease or oxidation (tarnish) on its surface to impede the process.
- The pieces to be joined should fit tightly together without any visible gap between them. If you can see light between the two pieces, the capillary action that causes the solder to flow will be impeded by the gap.
- Metals combine with oxygen in the air, forming a scale on the surface and the process is accelerated by heat. This scale gets in the way of the solder penetrating the metal. Flux is used to coat the metal and keep the oxide layer from forming which allows the solder to flow.
- Jewelry solders are very different than what you can buy in a hardware store. The solders that are available in a hardware store are NOT for jewelry making and will most likely ruin your piece and turn it black,
- Solders are available from most jewelry suppliers and come in different types which have varying melting temperatures. The most common are Hard, Medium and Soft. The solder you choose, depends on the metal you are using, there is silver, gold, and base metal wires such as copper solder.
- Jewelry solder comes in wire, sheet, chips or strips. The thinner and smaller that you cut the pieces of solder, the easier you will get them to flow, even though you will need to use more pieces. Solder chips are a great convenience although the cost is higher.
- The number of joints that you are making affects your choice as to the melting points/hardness of the solder. If you have multiple joints to solder, you may start by using Hard solder, then move on to medium and then soft. This is a way to avoid melting your first joints while soldering subsequent ones.
- Hard silver solder melts at 1425 F, Medium at 1390 F and Easy at 1325 F.
- Hard solder tarnishes the least and has the closest color to the metal you are working with, so use hard if you just have one seam.
- When closing jump rings and bezels, keep in mind that metal expands when heating so use it to your advantage and start the flame opposite the solder joint and move the heat towards the joint alternating from both sides.
- It is necessary to heat the entire piece of metal, even when only one end is being soldered, otherwise the heat will move to the unheated areas and not build high enough to melt the solder.
Quenching
After soldering, wait for 10-15 seconds before dropping the piece into a non-flammable bowl containing water. Do not quench if your metal is brass or Nu-Gold. If your goal is a flame patina, let the piece air cool or you will lose your patina.
Quenching in pickle is discouraged. The acid spray can harm you, the people around you and definitely ruin your clothing!
Consumables
Silver solder in easy, medium and hard is available at the front desk for purchase. You can also buy your own (see Resources)
Cleanup
- Follow the instructions on the wall to safely bleed and shut off the oxygen and natural gas lines:
-
Turn on ventilation hood
- Bleed the lines ONE GAS AT A TIME ONLY.
- Turn off the tank valve by turning it clockwise all the way.
- Find the knob(s) of that same gas on the torch and crack them open until both needles on the gauges fall counterclockwise back to the pin. Close the knobs.
- Turn the adjusting screw of that regulator counterclockwise until it becomes noticeably looser and you can turn it with one finger.
- Repeat with the other gas.
-
- Put away all materials fetched from the jewelry cabinet as well as all personal supplies.
No Comments