
Turret Punch Tool Tutorial
The turret punch provides a fast, accurate and flexible method of punching holes in sheet metal up to 16 gauge thickness. Twelve
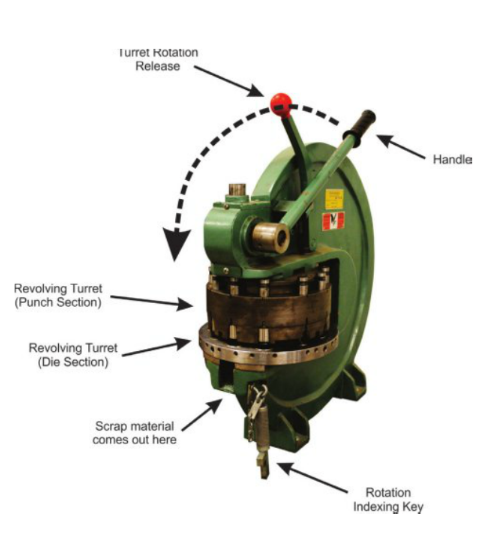
replaceable punch and die sets are located in two turrets, which can be positioned by a special spanner wrench that synchronizes the rotation of the turrets. Each punch and die set is labeled alphabetically. A single lever action lock pin mechanism locks the turrets in place during punching operations and permits quick reset of the turrets between punching operations. Each revolving turret punch and die can be replaced separately.
Each punch and die station will accommodate a variety of special punches that are made available by the manufacturer.
Safety Precautions and Features
- Always line up the same sized punch with the same sized die. All punches and dies are lettered.
- Keep your hands clear of the punching area when operating the machine
- Do not have your fingers under material when punching. Your fingers could get crushed
- Do not operate the machine in excess of its rated capacity (16 gauge steel or 1/8” aluminum)
- Beware of protruding machine elements or assemblies
- Avoid any pinch-points created by the movement of the machine’s components
- If normal pressure applied to the punch handle fails to punch through the material, do not use additional leverage techniques to make further attempts. Either the punch and die are misaligned or you have exceeded the machine’s capacity
Adjustments
Setting the Hole Size
- Push back on the turret rotation release lever.
- If the punch and die letters are not aligned move either the punch or die turret until the letters align.
- Insert the rotation indexing key to align the punch and die turrets.
- Move to the desired sized punch and die set.
- Release the turret rotation release lever.
- Move the indexing key left and right slightly until the turrets click or lock into place (if the indexing key does not move either way the turrets are already locked).
- Check to see if the punch and die letters match.
Basic Operation
- Set up the machine so that the desired punch and die set is located in the punching area on the machine.
- Place material into the gap between the two turrets.
- Make sure your fingers are safe from pinch points.
- Smoothly pull the punch handle towards the front of the machine to its maximum extent.
- Return the handle to its resting location.
- Remove your material.
- When all operations are complete clean up scrap material on the machine and surrounding floor area.
Notes
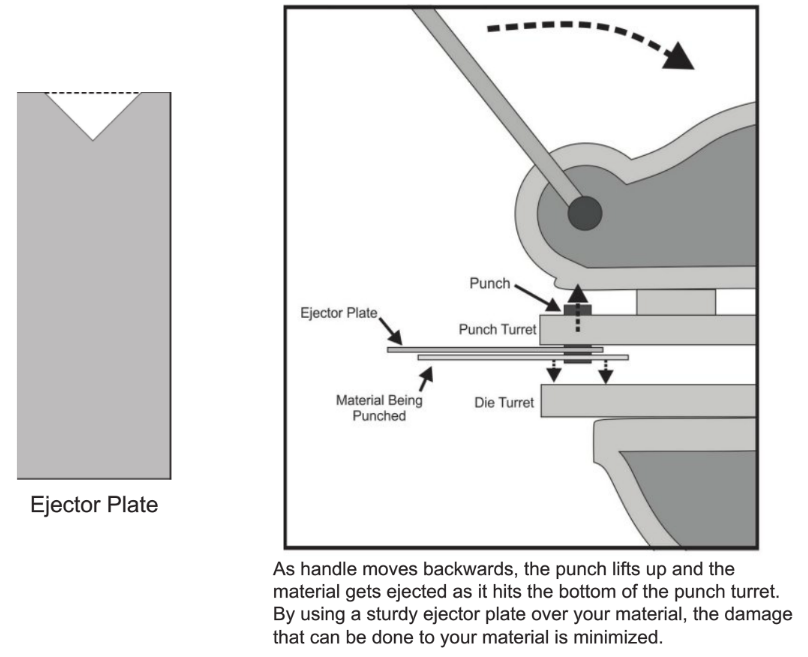
To remove material without warping the surface of thin materials use an ejector plate. If none is present one can be made easily using the corner notcher and a piece of scrap.
- Cut a 90 degree V piece out of scrap sheet metal.
- Place this piece over your material.
- Push the handle back to its resting position. As the punch retracts, the ejector plate will serve as a stop and eject your material without damaging it.
No Comments