
Vinyl Cutter Tool Tutorial
A vinyl cutter is used to cut vinyl of varying thicknesses. With the vinyl cutter you can make professional looking signage, stencils, banners and vehicle signs. You can also make paint or sand blasting masks. You will import your designs from a variety of different graphic and text tools like Adobe lllustrator, CoreIDRAW or simple Text tools, and apply the cut vinyl to other surfaces.
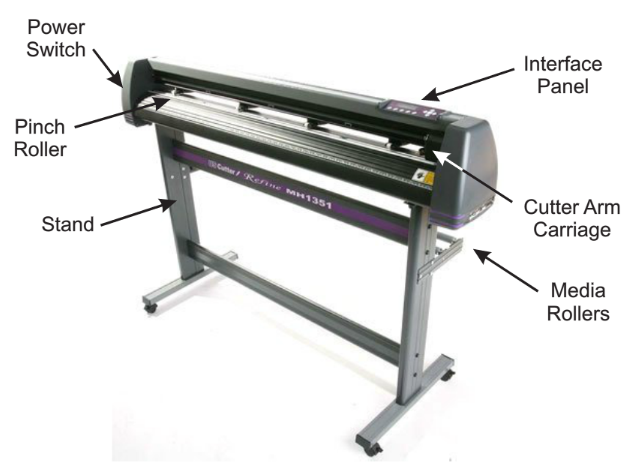
Basic Operation
Setup
- Turn the vinyl cutter on — the switch is on the left side of the machine.
- Unlatch the pinch-roller levers by pulling them downward.
- Insert the vinyl from behind, face up, between the two media rollers and push the pinch-roller levers up to lock the vinyl in place, allowing 1” at the top of the piece of vinyl. Make sure to leave a distance of 1”-2” from the untextured section of the roller.
- Set your origin to the lower right hand corner of the vinyl by selecting pressing the OFFLINE/PAUSE button, moving to the desired location with the arrow keys and pressing the ORIGIN button to set the current location as the origin. Make sure the blade height is set correctly by running a test pattern on the vinyl cutter (see "Performing a Test Cut" below).
Avoid moving the cutting head by hand; this back-drives the motor and can damage the internal electronics of the cutter.
Cutting
- Open Sure Cuts a Lot software (see below) to load and edit your design.
- When you've finished adjusting your design, Press the Send button to cut the vinyl.
- Unload and weed your vinyl, then apply it to your project using transfer paper
Cleanup
- Place any reusable scraps of vinyl in the box and dispose of all other scraps
- Put all tools away where you found them
- Make sure your area is clean. A broom and dustpan are located nearby at a rolling trash can.
Adjustment
Adjusting the Blade Height
The blade holder holds the blade that cuts the vinyl. The blade magnetically locks within the housing which allows it to swivel while cutting. There are two screw rings which adjust and lock the blade height.
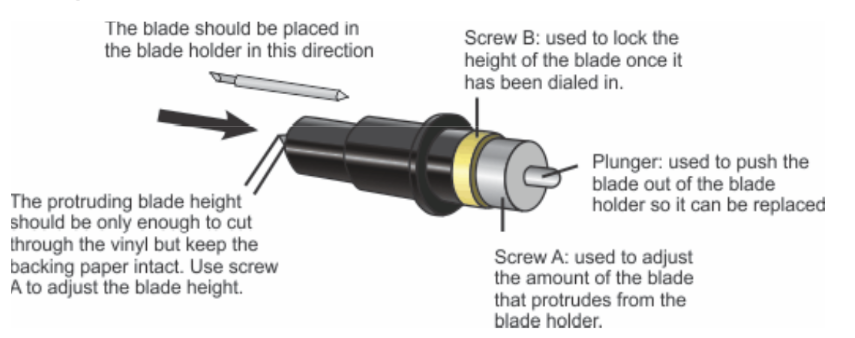
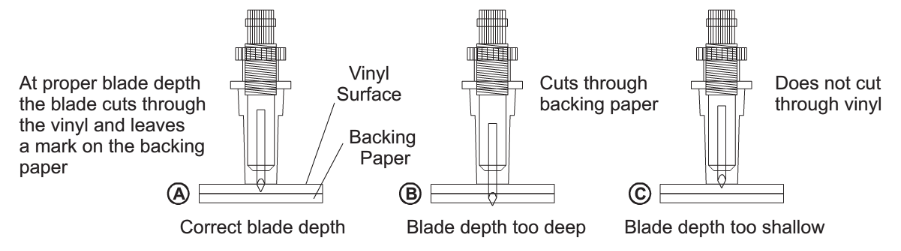
To test the blade depth, scratch the blade holder on a scrap piece of vinyl. If the blade goes through the entire thickness of the vinyl then you need to reduce the protrusion of the blade. Readjust the blade until your result resembles Example A below
Installing the Blade Into the Carriage Assembly
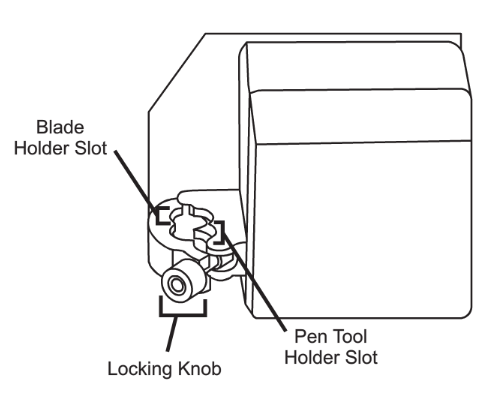
The carriage assembly moves from left to right along the cutting area of the machine. The carriage will hold the blade holder
for cutting vinyl or the pen tool holder for drawing. Take great care to use the rear slot for the blade holder. Using the front
slot for the blade holder will not produce desirable results. To insert the blade holder, loosen the locking knob and place
the blade holder in the slot. Make sure the blade holder is seated all the way in the slot. Tighten the lock knob until the tension becomes moderate. Do not over tighten.
Loading the Vinyl
You can use rolled vinyl or single cut pieces:
- For rolled vinyl, place the roll on the two aluminum rollers with the vinyl coming off the back of the roller, vinyl side up.
- Unlatch the pinch-roller levers by pushing upward gently.
- Insert the vinyl from behind, face up, between the two media rollers and make sure to push the pinch-roller levers down.
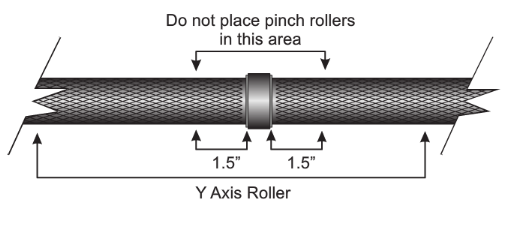
The cutting area on the plotter is 48” or 4'.
Do not clamp a pinch roller near an untextured portion of the Y axis roller; leave at least a 1”-2” buffer.
The Interface Panel
The interface panel is where all non-mechanical adjustments will be made to the machine. Operations such as changing the blade pressure and speed, moving in the X and Y axes, and resetting the origin location will all be performed within the interface panel.
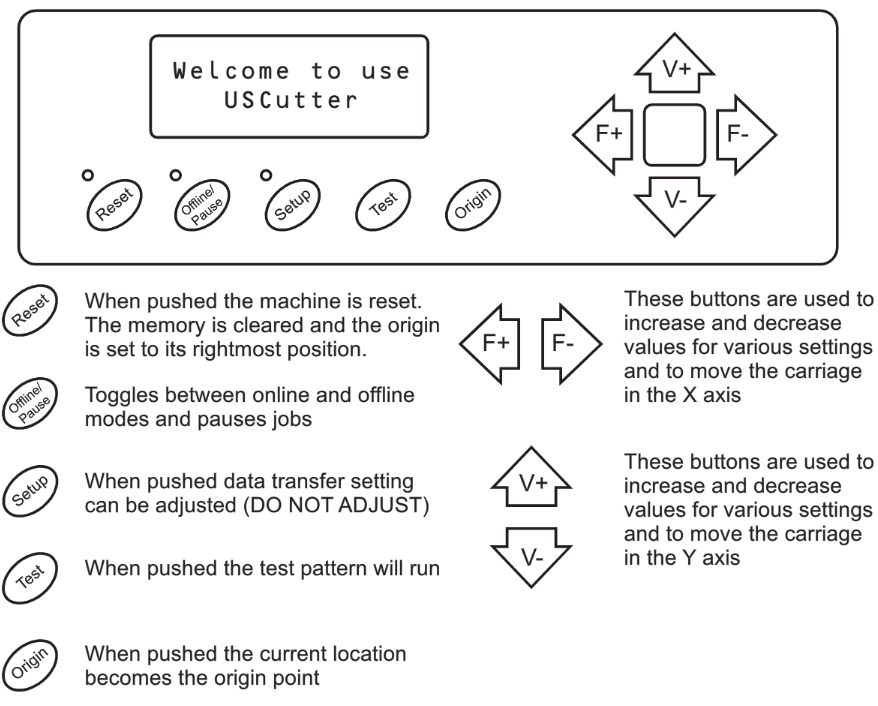
Setting the Origin Location

You will need to set the Origin Point each time you set up for a job on the vinyl cutter. To set a new origin location you will first push the Offline/Pause button. The offline mode allows you to move the position of the vinyl. You will then use the directional arrow keys to navigate to your desired location. Once you have reached the desired location you will press the origin button and the current location will be set as the origin.
Adjusting Cutting Speed

The cutting speed will determine the speed at which the job is completed as well as the level of quality of the cuts. Sixteen inches per minute is a good default starting point for good quality and medium speed. When on the main menu the V+ and V- buttons will change the cutting speed.
Adjusting Blade Pressure

The downward pressure of the blade can be adjusted. A blade pressure of 100g is a good general starting place to work from when trying to determine the force needed for a specific material. All materials will require testing to determine the amount of force to use. When on the main interface menu the F+ and F- buttons will adjust the cutting speed.
Performing a Test Cut

Press the test button to cut a small test shape to test the current force and speed settings. This can used to determine the proper cutting speed and force settings needed for different materials without wasting time and material by cutting full designs.
SCAL3 Vinyl Cutting Software
We use Sure Cuts a Lot 3, which is a software program that takes image files and turns them into commands which are sent to the vinyl cutter to cut your material.
SCAL3 offers several useful video tutorials; we are also working to develop our own software guide for SCAL3.
Weeding
Weeding is the process of removing the extra vinyl around the graphic. This is not much of a challenge with large graphics, but can be trickier with letters. For example, if you are weeding the words “P-R-O-T-O-H-A-V-E-N,” you are removing the unnecessary vinyl that surrounds and flows in between each letter, like the centers of the P and the O. The smaller the letters, the more difficult the weeding process will be.
The biggest mistake made during the weeding process is trying to go too fast. The secret is to use the best possible equipment and take your time. If your pick or knife is dull or you did not set the force to cut deep enough, you won'’t get a clean cut and weeding is more difficult.
Using a pointed tool, like a dental pick or a box knife, carefully peel away the excess vinyl around your project.
Tips for Successful Weeding
- Work on a clean, flat surface
- Work slowly. Patience is important here!
- Peel the material off a little bit at a time
- Rock the material back and forth and try to get a good angle as it comes away from the top and bottom of the individual letters
- Try turning the piece around and working from another side if it will not release at the angle you are working
- It is easy for the vinyl you are removing to get stuck back down in undesirable places like the middle of your work, so, try dividing the piece into sections. The weeding cut lines in the vinyl to allow you to isolate sections for easier removal
The Transfer Process
The vinyl you just cut has an adhesive back; however, it is often difficult to keep text and complex graphics aligned properly if you just peel the vinyl off of the backing and place it one by one onto the receiving surface. To make this process easier, you will use transfer paper, a lightly sticky-backed semi-transparent paper that you place on the face of the piece to transfer it to the receiving surface in one whole piece.
- Cut a piece of transfer paper a little larger than your cut vinyl piece.
- Place the transfer paper on the face of your object and smooth it out with the squeegee.
Be sure to press firmly on each letter and remove all bubbles. - Peel the paper backing away carefully, picking up your cut vinyl on the transfer paper as you go.
The back of the vinyl is very sticky and is not forgiving when you stick it down. Using RapidTac, an adhesive solution that allows you to move your piece around on the final mounting surface for a minute or so before it sticks in place, works great on smooth surfaces like glass, painted metal, etc.
- Spray RapidTac on your receiving surface and place the vinyl cut piece approximately where you want it. Move it quickly to the final location and smooth and press firmly with a squeegee, removing all bubbles.
- Carefully pull away the transfer paper using a squeegee behind the transfer paper. Pull at a sharp angle away from the vinyl letters.
Tips for Success
- The vinyl cutter likes curves and dislikes sharp corners in small objects
- Vinyl sheets need to be wrinkle-free
- Use vinyl sheets that are whole rectangles. It's OK to use small pieces (min. 6” x 6”), but don’t use pieces that have sections cut out from prior jobs—this can present a problem as the sheet is fed back and forth
- Test LOTS before creating your final piece
- Check the back of the sheet for pressure lines or cuts after your test piece
- Make sure the origin is set away from the traction rollers
- Blades get dull and vinyl brands differ, so, you will need to test often and adjust the cutting speed and cutting force
No Comments