
Rabbit Laser Tool Tutorial
Class Handout
The class handout for basic laser operation: laser_101-basic_operation.pdf
Old Tutorial (Possibly Out of Date)
A laser cutter is used to mark, engrave, or cut a wide variety of materials. They work a lot like printers do, where you send a graphic to print. Instead of ink, the laser uses heat to transfer the image onto the material.
Do not use prohibited materials in the laser (see Material Safety for allowed and prohibited materials)
Stay by the laser while it is running!
Class Handout
The class handout for basic laser operation: laser_101-basic_operation.pdf
Tool Anatomy
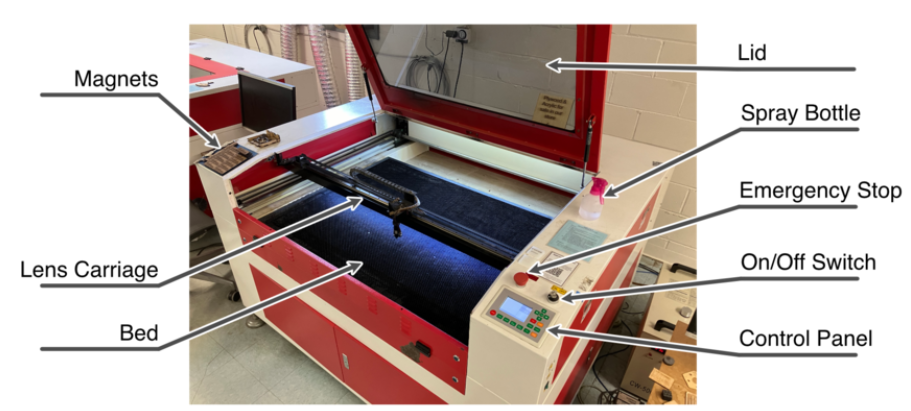
-
Lid - Absorbs the laser radiation and must be closed when running a job
Exhaust - Allows for the efficient removal of fumes and particulateMaintenance Tag - Manually tracks the usability status with Green/Yellow/Red cards- Lens Carriage - Houses the mirror, lens, and air assist
-
CuttingBed - 1200 x 900mm (~47” x 35”) Consists of a removable, magnetic honeycomb tray. Seated properly, it should feel stable & secure -
Emergency Stop - Reserved for emergencies. To deactivate and reset, you must twist the spring-loaded knob.
-
PowerOn/Off Switch - Key switch turns the machine on and off -
Control Panel - LCD interface with commands to operate the laser
- Spray Bottle - filled with water; use to put out any smoldering fires / flare ups
- Magnets - use these to hold down your stock material
Control Panel
-
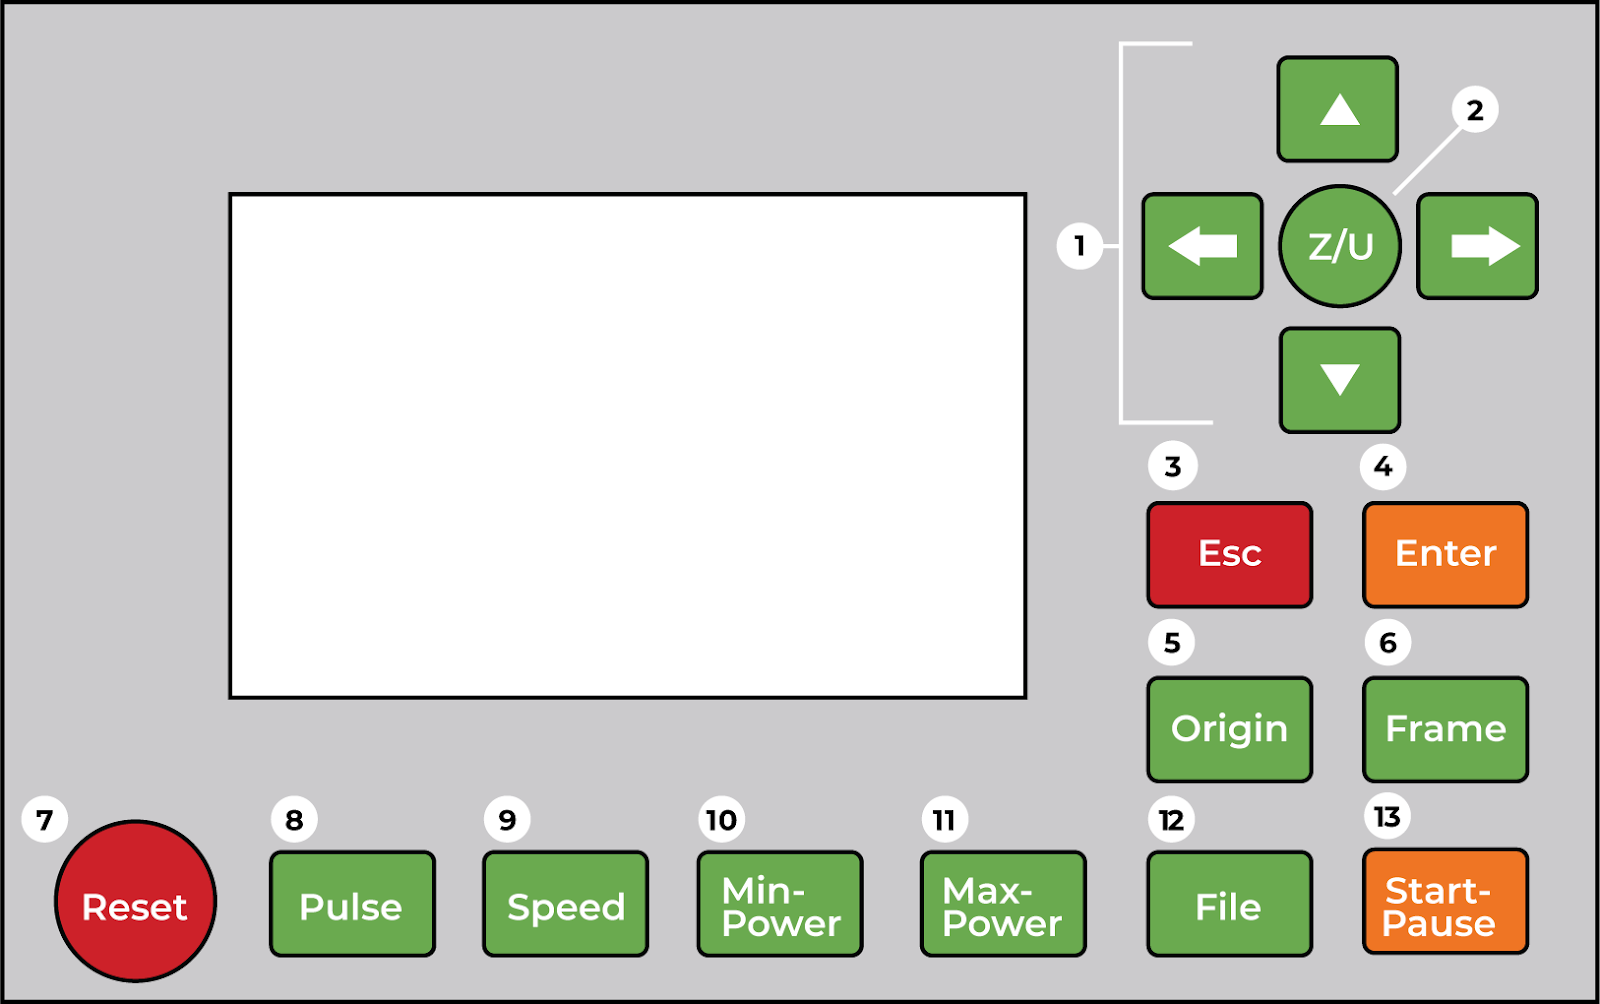
Jog X-axis and Y-axis
-
Adjust Z-Axis
-
Exit Menu/Return to main screen
-
Select menu item
-
Set Job Origin
-
Trace the footprint of a job to check its size and placement
-
Reset machine, Abort Job
-
Pulse the laser to mark its precise location
-
Adjust speed (mm/sec)
-
Adjust power (0-100%) for the areas the laser approaches a node/edge
-
Adjust power (0-100%) for the areas where the laser is mid-cut/mid line
-
Retrieve file sent to the machine (job queue)
-
Start job, pause job, resume job
Tool Safety
Do not leave the laser running unattended. Lasers can cause fires. If your workpiece catches fire and the fire is not handled promptly, the fire can get out of control, and create an extreme hazard. Always keep watch over your running job, and be ready to extinguish any small fires with the nearby spray bottle, and/or hit the emergency stop if the laser goes out of control.
Keep the laser door closed during normal operation. The door protects those nearby from any possible eye damage or skin burns should the laser hit any reflective material.
Make sure the fan is running before cutting or etching. Running the laser on certain materials can produce gasses and make the studio environment unpleasant: the fans will pull the gasses outside.
Common Hazards
Some
Some materials may produce toxic gas when cut or etched. Make sure the | or ||
Depending on the | material, Care
Use care when | |
Alwaysfreely pauseonto the chassis has damaged the laser tube in the past; members will be held liable if youa needslid slam causes the tube to step away from the machine!break.
Prohibited Materials
Do not use prohibited materials in the laser (seeSee Material Safety for allowed and prohibited materials)materials.
Basic
Inspection
Set Before you start usingUp the toolLaser
you
- Turn
expectedon the large format laser. - Make sure chiller is powered on and working. Look for the green status light on the front of the chiller.
- Make sure the exhaust fan is running.
- Carefully open the lid. The lid is heavy; letting the lid slam closed will damage the laser.
- Secure the workpiece to
dotheangrid.initialUseinspectiontheandprovidedassessmountingitsmagnetsreadinesstoforholduse.the workpiece in place. - Position the laser
willheadscanover theartworkworkpiece.onUseathescaledirectionalfrom blackbuttons towhite. The laser will vary the number of dots it fires depending on the tone of each pixel.Common file formats like .jpeg, .gif, and .png are all rastered data.Vectored data is made of paths that form lines and shapes. They contain mathematical data that allowsmove the lasertoheadtraceacross the bed.
Setup
RASTER VS. VECTOR Rastered data is an image that is made of pixels. Much like an inkjet printer,
Workholding
Use magnets to secure the workpiece to the grid.
Make sure that the laser’s path likewon’t following coordinates on a map. This allowscause the laser to cut the magnets, or scorefor the laser head to crash into the magnets.
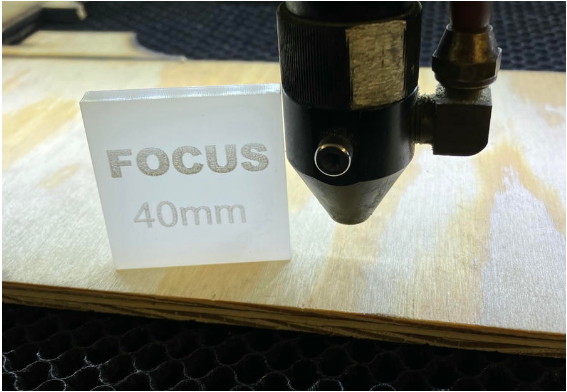
Focus the Lens
Use a linefocus as well as etch a filled shape.
Common file formats like .ai, .dxf, and .svg are all vectored data.
- workpiece to set the height of the lens and bring it into focus.
Powerblock on thelaser
- Press the Z/U button to change to bed height control.
The screen will display a menu with Z move highlighted in blue. - Press LightBurn, and using that file to run a job with the laser. LightBurn is capable of much more: with LightBurn, we can load, manipulate, and compose multiple images into one job. For more about LightBurn, please
Importthe ← (right arrow) and → (left arrow) buttons to align the focus gauge to the second ring of the lens carriage.
The right arrow lowers the bed, and the left arrow raises the bed.- Press the Esc button to return to the main screen.
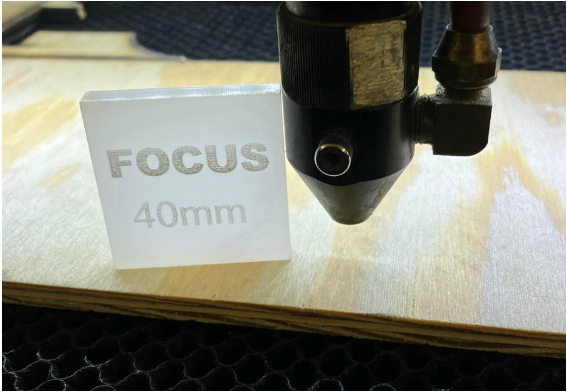
Set the Origin
- Position the laser head over the workpiece at the location you want to set as a boundary for your art.
Use the directional buttons to move the laser head across the bed.
Optional: Press the Pulse button to verify the exact location. - Press the Origin button to set the origin point for the job.
Set up the Job in LightBurn
These steps detail loading a single vector art file into
Lightburn
see the Software section further down.
Import the Art
- Open LightBurn on the computer connected to the large format laser.
- Click File > Import.LightBurn
- Select the art file to import.
The art will be automatically placed on the LightBurn canvas. You may need to zoom and/or pan the view to see all of the art.
(Optional) Manipulate the Art
LightBurn is a capable image editor, and has many features that a specific to preparing artwork for the laser.
Work that is commonly done in LightBurn prior to cutting or etching:
- Duplicating the art to cut multiple copies.
- Putting portions of the art into layers, for different cuts and/or ordering the cuts.
Set the
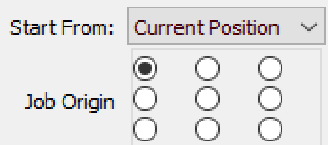
jobReference OriginSet the reference origin in
Lightburn - Select the art file to import.
- will
Checkwith the Job Origin tool: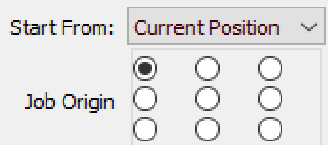
Set the Speed and Power
In the Cuts/Layers panel, each layer
modehave - a settings:
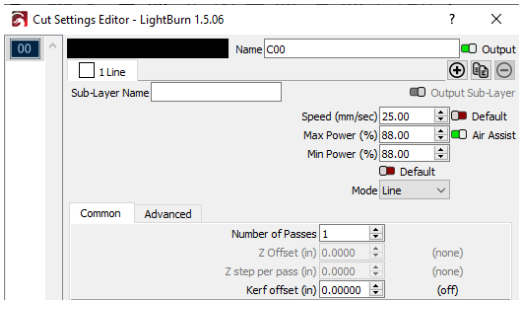
Adjustlisted speed and power in the Spd/Pwr column. These settings must be adjusted for the material (wood, acrylic, natural leather) and purpose (cutting or etching). To adjust the speed and powersettings
- Click on the value in this column to bring up the Cut Settings Editor dialog box.
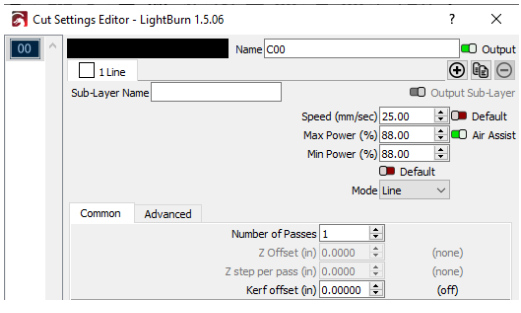
- Use Speed and Max Power settings for the cut.
Sendthisyourdialogfilebox to adjust theLaser - Click OK
- Click on the value in this column to bring up the Cut Settings Editor dialog box.
- Press the Z/U button to change to bed height control.
See
Lightburn Setup
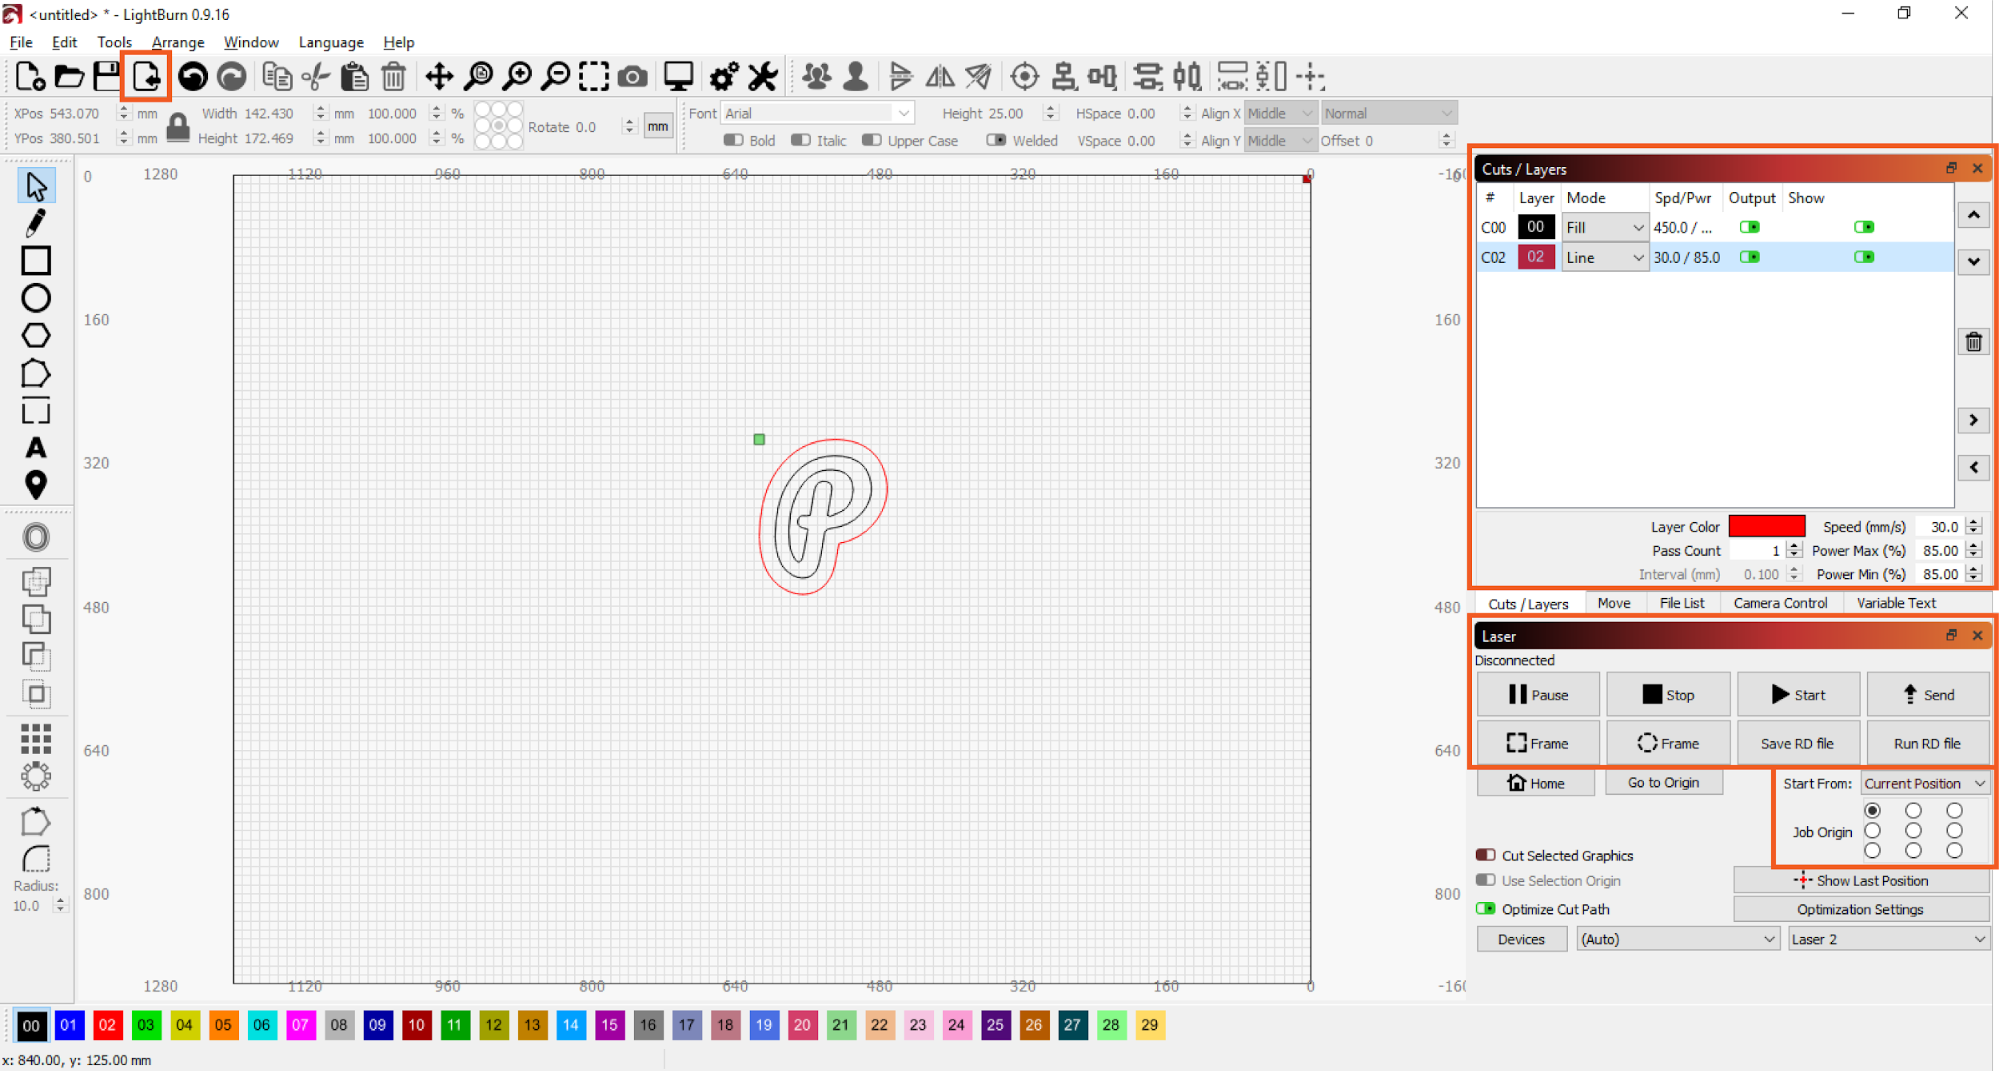
Lightburn accepts a range of file formats.
Supported vector files: .ai .pdf .dxf .svg .lbrn
Supported image files: .jpg .jpeg .png .tif .tiff .bmp
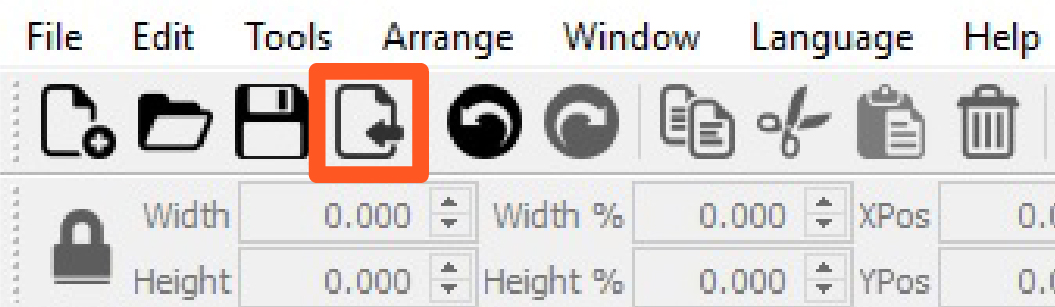
Import your file into Lightburn.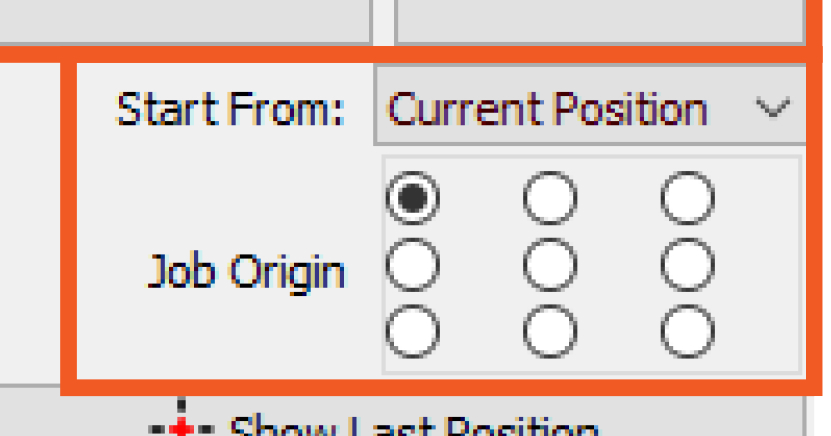
Set the job origin.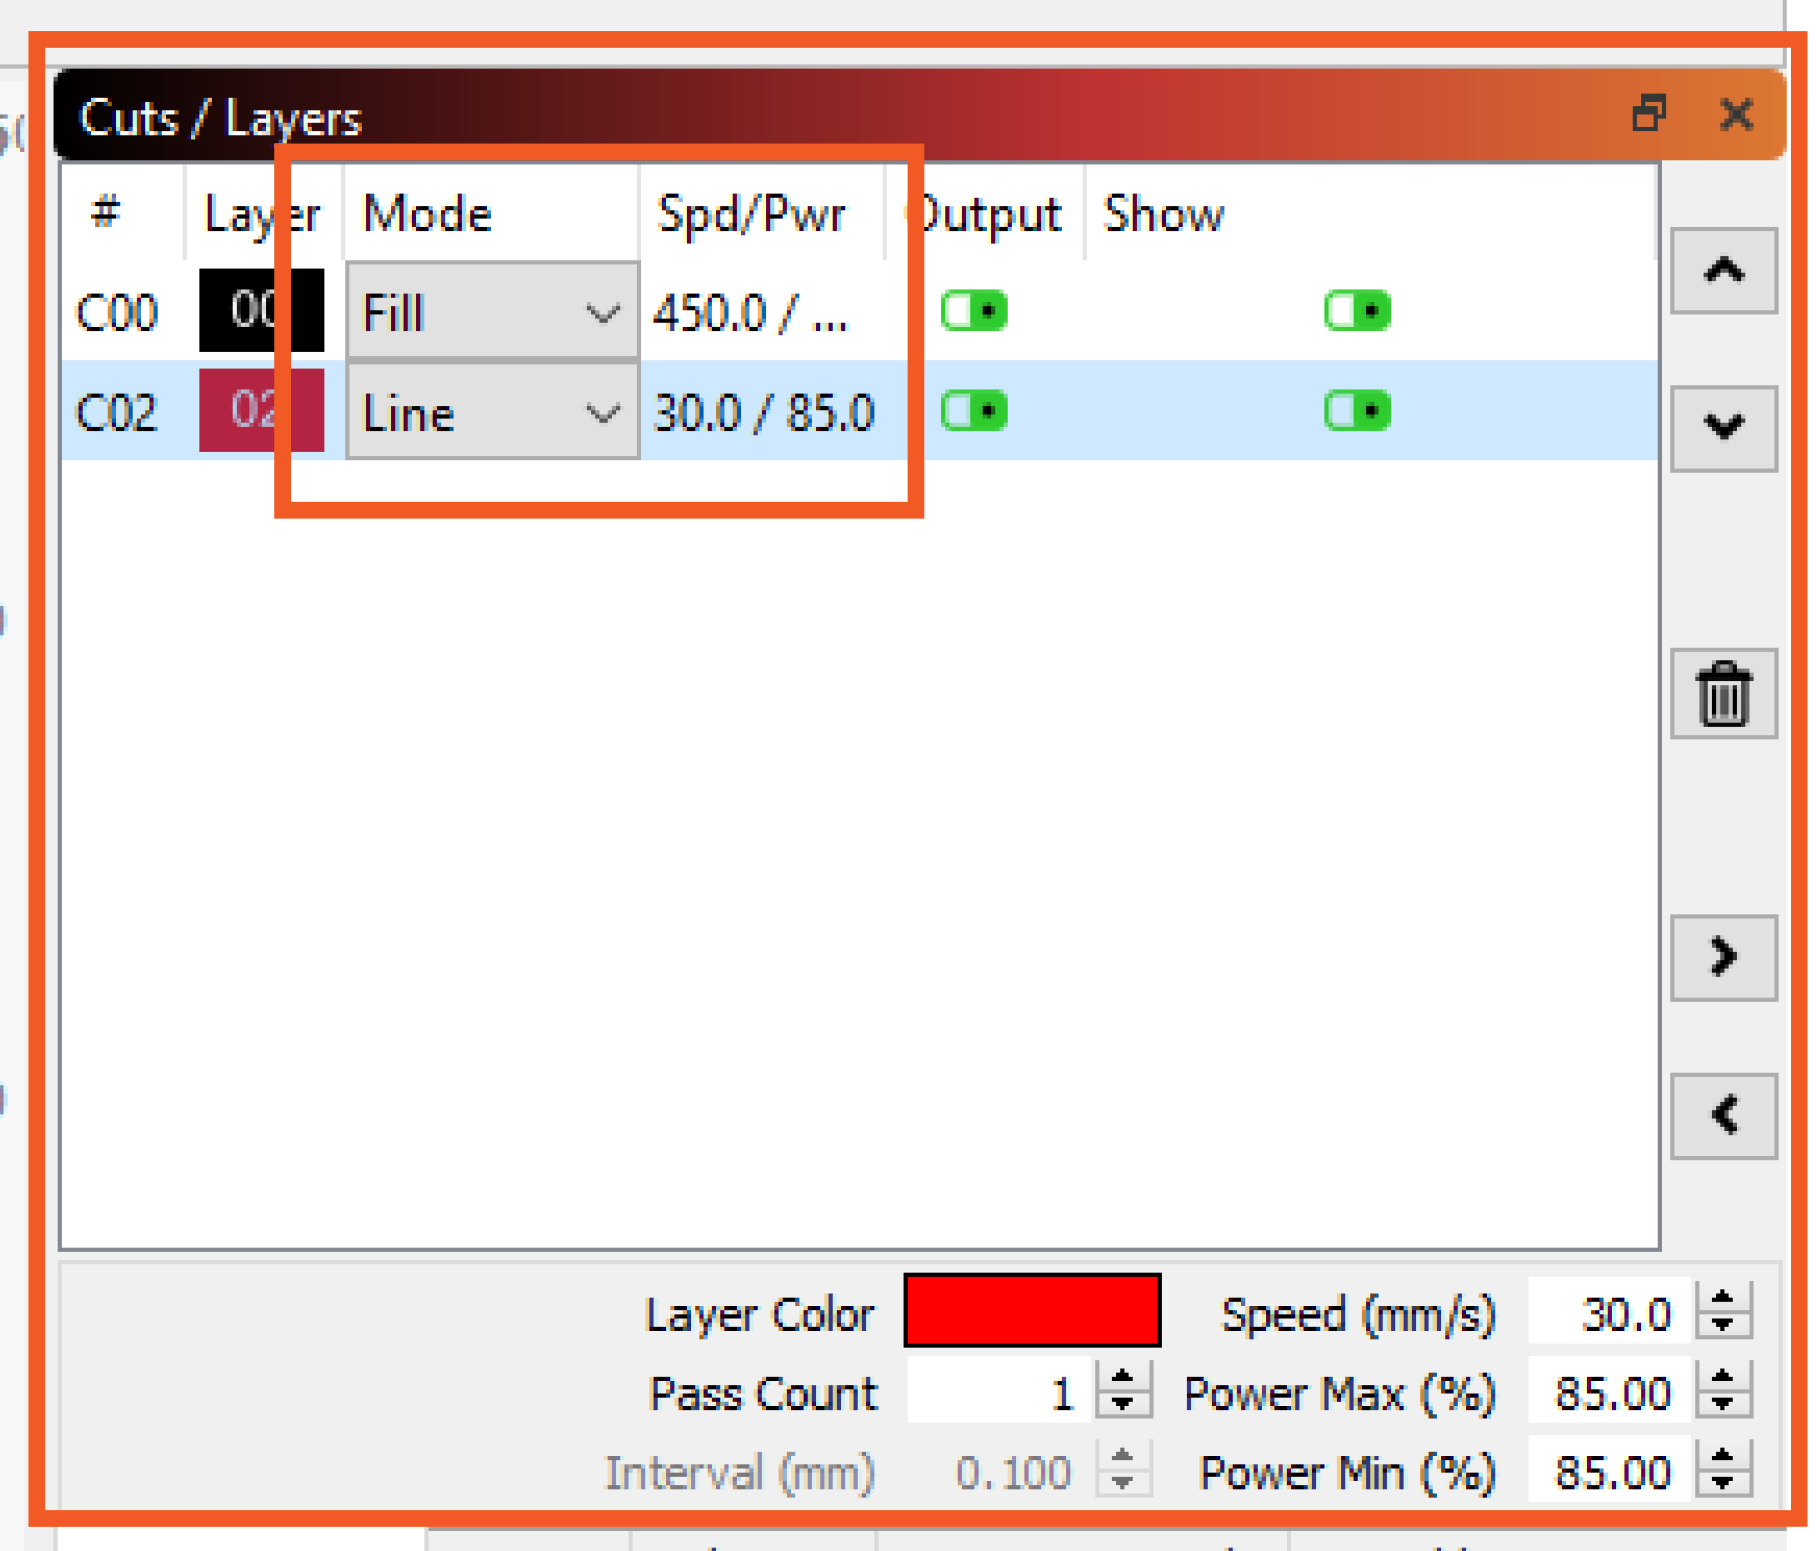
Check the layer mode:fill—fills a vector shape to etchline—traces along a vector lineimages—will only etch and optimizeforagoodrastered photo
- values
Adjust thestarting speed and powersettings.for - both
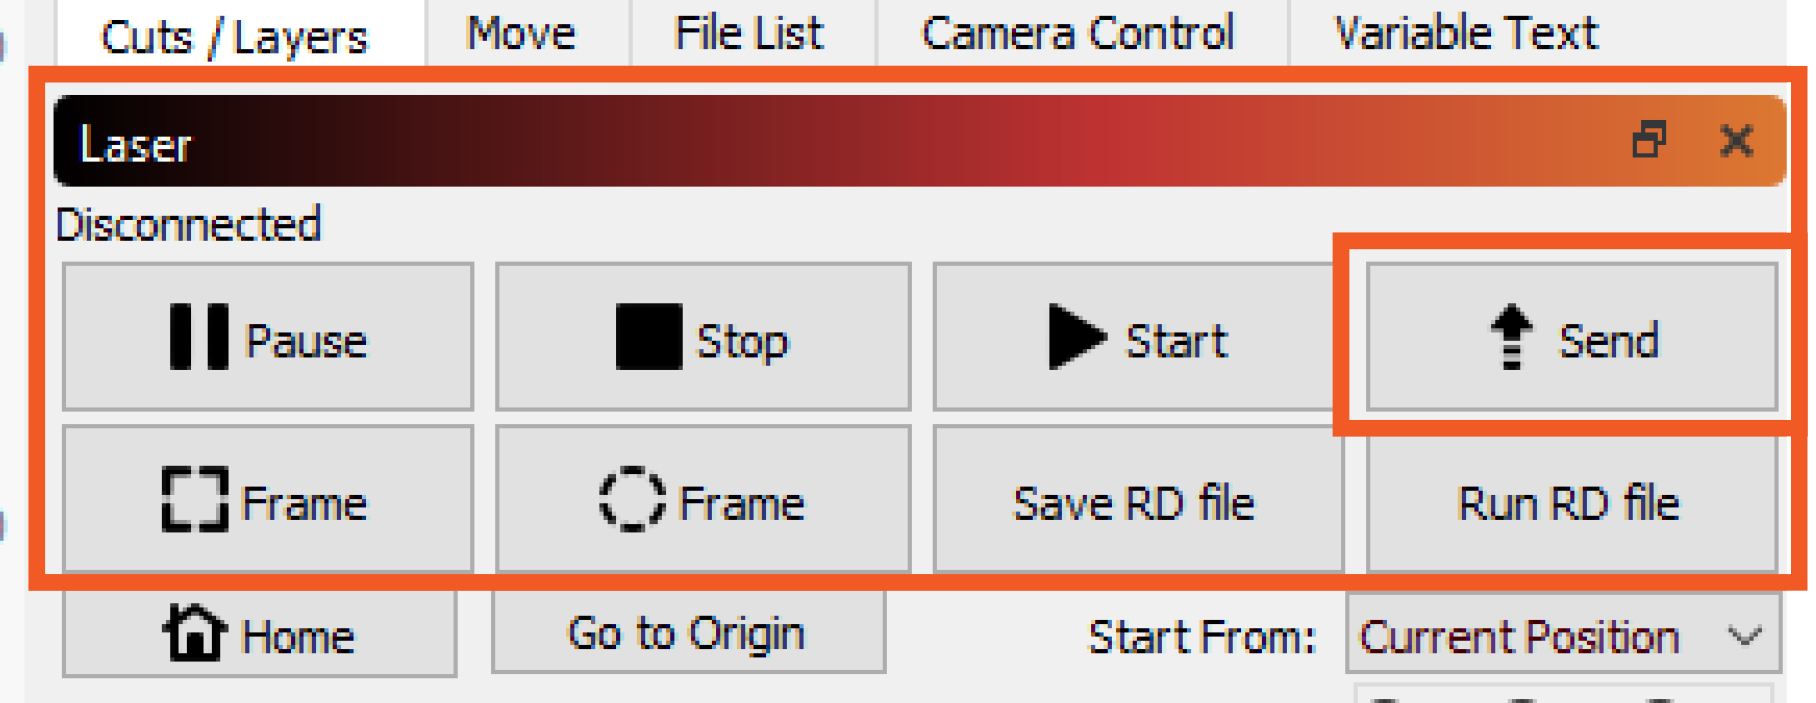
Sendcutting and engraving.Run the
file to the laser, keeping the filename “LIGHTBRN”. This saves over old job files and helps maintain a manageable memory in the machine’s job queue.


Common Cut Settings
Common Cut Settings
Operation
Listen for the exhaust to ensure that it is onCheck that your material is safe to cutLoad materialFocus the lens on your material- Laser
Set the originJob on thelaser
- Check the footprint of yourjob.
job
In LightBurn, press the Rectangular Frame button to command the laser to trace out the
box boundary of the job, or the Circular Frame button to trace out the exact boundary of
the job. The laser will trace out the area of the job. Make sure that the traced path does
not leave the media, or run over any of the hold-down magnets. - Press
Starttheyourstartfile - Monitor the machine until the job isjob is running, remain nearby the laser to make sure nothing goes wrong.
completecomplete.
Whileandthecleanup
Cleaning
Focusing the LensUp
Select Z (Control Panel 2) to change to bed height control.Use ↔ (Control Panel 1) to align the lens carriage to the focus gauge (Right raises bed, left lowers)Select Esc (Control Panel 3) to return to the main menu.
Setting the Origin
Use the directional arrows (Control Panel 2) to jog the lens carriage to the desired location.Optional: Press Pulse (Control Panel 8) to verify the exact location.Select Origin (Control Panel 5) to set the OriginSelect Frame (Control Panel 6) to check the footprint of job. (framing can also be managed from Lightburn control)
Cleanup
- Power off the
Laser - Reset any modified computer settings to
default - Vacuum the interior so material does not build up beneath the
honeycomb Note any maintenance needs or concerns on the tag and at protohaven.org/maintenance- Recycle waste in the single-stream scrap
bins Empty the bin when full
Report
alerting a shop tech on duty.
If the single-stream scrap bins become full, alert a shop tech
Scrap Breakdown
There areis twoa black scrap binsbin reserved for laser waste. Maintaining thesethis is a shared, communal responsibility.
When you notice the scrap binsbin areis full, it’s time to take it to the dumpster out back. Feel free to enlist a helping hand.
If you notice valuable material while emptying the bins,bin, use your judgement to selectively save a few pieces or take it home for your personal use.
Troubleshooting
| Problem | Likely Cause | Potential Solution | |
|---|---|---|---|
| Cut does not go through the material | The speed is too fast or the power is too low | Use a scrap piece of the same material to make a series of tests with incremental adjustments until you find the sweet spot | |
| The lens or mirror is fogged | Alert the staff or volunteer on duty to the issue | ||
| Slop in the frame | The origin in Lightburn is not set appropriately | Adjust the origin point in Lightburn | |
| The artwork is too large for the cutting bed: 1200 x 900mm (~47 x 35”) | Adjust the overall artwork size | ||
| Burn marks on the back of the material | Hot debris is scorching the edges of the cut lines | Lay a sheet of paper beneath the material and the bed or line it with a laser-safe vinyl free tape | |
| No visible cutting happening | Lid safety switches not engaged, or software issue | Confirm the lid safety switches click when the lid closes. Turning the machine off and on again may also help if that isn't the problem. |
Special Setups
Notes
-
Register your material on the cutting bed using magnets or tape when doing a production run.
-
Use the front pass-through door for extra long pieces.
- Use surface treatments like Cermark or paint to etch designs onto metal surfaces.
Software
Inkscape
Inkscape is software for creating and editing vector graphics: https://inkscape.org/
Inkscape is a valuable tool that’s useful in many parts of the shop.
A common use of Inkscape is to prepare art for import into the software that drives
various tools around the shop. Protohaven members use Inkscape to create and edit
designs for use with:
- Large Format Laser (LightBurn)
- CNC Embroidery (Artistic Designer)
- Vinyl Cutter (Sure Cuts A-Lot)
- CNC Router (Vcarve)
Inkscape can be used to prepare art for the Large Format Printer.
Inkscape is also a good general purpose tool for creating visuals: drawings, infographics, logos, title blocks, icons.
Download
Inkscape is freely available to download and use for Linux, Windows, and MacOS: https://inkscape.org/release/
Help and Tutorials
Manual
The Inkscape project maintains a comprehensive manual: https://inkscape-manuals.readthedocs.io/en/latest/index.html
The manual is updated regularly, and available for both online (HTML) and offline (PDF, ePub) reading.
Video
A short tutorial to get started with Inkscape:
- Inkscape Tutorial: Complete Starter Guide for New Users (with chapters) https://www.youtube.com/watch?v=fzk-suGcqrc
A comprehensive tutorial series for Inkscape is available from TJ Free:
https://www.youtube.com/playlist?list=PLqazFFzUAPc5lOQwDoZ4Dw2YSXtO7lWNv
Some videos from the series that are good places to start:
- Inkscape Lesson 1 - Interface and Basic Drawing https://www.youtube.com/watch?v=8f011wdiW7g
- Inkscape Lesson 10 - Trace Images with Bezier Tool https://www.youtube.com/watch?v=sagrkdmC_BI
- Inkscape Lesson 11 - Trace Bitmap Tool (Convert Raster to SVG) https://www.youtube.com/watch?v=E7HwLTQu2FI
LightBurn
LightBurn is layout, editing, and control software for the large format lasers: https://lightburnsoftware.com/
LightBurn is only available on the desktops dedicated for use with the lasers.
LightBurn is capable of handling all stages of a laser project, from art design through to running the job on the laser.
LightBurn can also import vector and raster art from other sources: you can work on your project in other software and then import it into LightBurn when you’re ready to run the job.
Help and Tutorials
LightBurn software has a YouTube page (https://www.youtube.com/@lightburnsoftware
7189/) with lots of content to help with projects. For those new to laser cutting and etching, these videos are a good place to start:
- Getting Started With LightBurn: Set up & First Project https://www.youtube.com/watch?v=v3RDzOrlCTM
- LightBurn UI Walkthrough https://www.youtube.com/watch?v=uzFsrUwONbw
- LightBurn Cut Settings https://www.youtube.com/watch?v=nybhYtjElQU
Concepts
Image Types
For computers to work with image data, the image data needs to be encoded in some way so that the computer can understand it. There are many approaches to encoding visual data, but most of them fall into two categories:
- raster images, where the image is encoded as a grid of dots
- vector images, where the image is encoded as a collection of objects
Raster Images
Raster images are composed of lots of dots: a rectangular grid of points, each point encoded with color information. If we zoom way in on a raster image, we’ll see that it’s made up of this grid of dots. In the following image, we can see from the zoomed in portion of the image that it’s made up of lots of tiny dots of color:
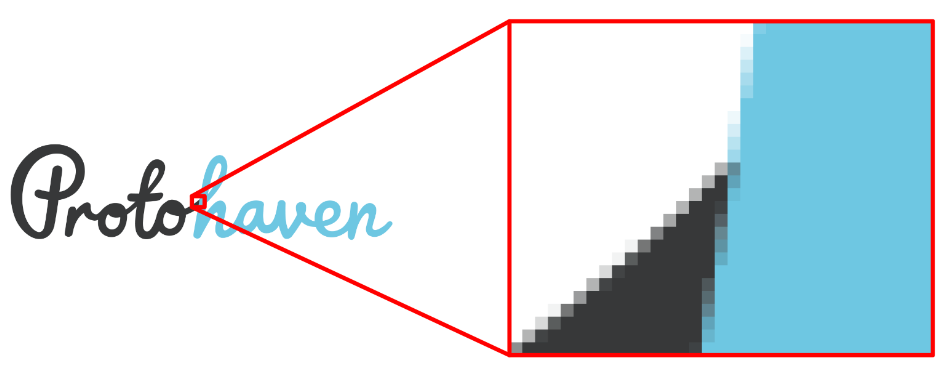
These dots are often referred to as pixels.
The number of pixels we have in an image partially determines its quality. The more dots in the image, the better the image will look (to a degree) and the more we’ll be able to adapt it for a variety of uses: we can, for example, scale up an image with lots of pixels and still have it look reasonable for most applications.
Raster images are useful for rich graphics: photographs, non-technical line art, etc. Raster images are particularly good for photographic material. Raster images are a poor choice for transmitting text (particularly if scaled), or vector art like line drawings, schematics, etc.
Common file formats like .jpeg, .gif, and .png are all image raster data.
Vector Images
Vector images are built from logical instructions. In a raster image, a line might be encoded as a string of dots on the grid. In a vector image, a line is encoded as a logical connection between two points. A nice property of vector images is that they scale very well: they can be re-rendered with precision at any size. In the following image, we can see in the zoomed in portion of the image that there is no loss in precision or quality of the image:
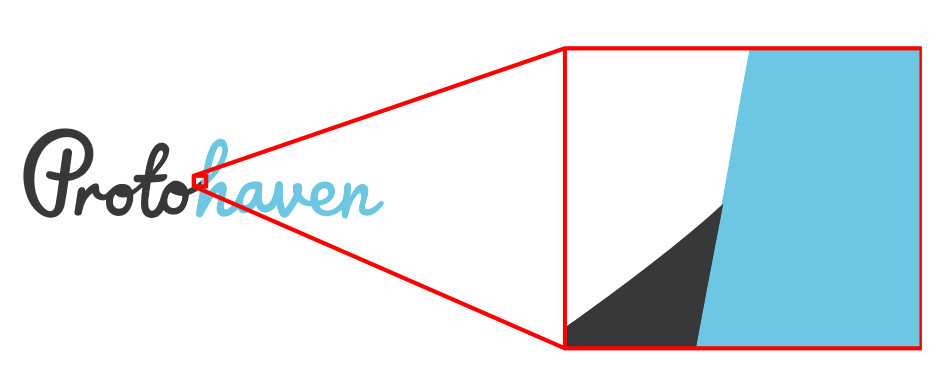
Vector graphics are made of objects.
The objects in a vector graphics file logically describe the visual contents of the file. For example, the file my specify that at a particular coordinate on the canvas there is a square, filled in with a particular color. The information is not encoded in dots, like a raster image: the image contents are described instead by a collection of objects that describe an image.
Vector graphics are useful for any image that requires precision: vector formats are good choices for infographics, technical line drawings, schematics, and similar art. Vector graphics are also useful for any art that has a text component: labels, legends,
titles, etc. With a vector graphic, the text is also stored as vectors (the glyphs of the font, or objects derived from it), and the image can be scaled without any loss of quality for the text or the art.
Common file formats like .ai, .dxf, and .svg are all image vector data.
Most vector file formats can also contain raster images, but raster formats cannot contain vectors.