
Tool Tutorial
Jet 1610 Vertical Metal Bandsaw – Safety & Operation Overview
Introduction
BeforeThe operatingJet 1610 Vertical Metal Bandsaw is a manually fed cutting tool for cutting metals such as aluminum and mild steel. Unlike horizontal bandsaws, this machine allows users to guide the bandsaw,workpiece by hand, making it well-suited for contours and non-linear cuts.
This saw operates at relatively low blade speeds, which makes it effective for softer metals but unsuitable for hardened materials and stainless steels. Proper cutting technique, especially feed rate, blade speed, and use of cutting fluid is critical to prevent blade damage and ensure you'vesafe readoperation.
Because the operator’scut manualis thoroughly.controlled Makemanually, sureusers must rely on feedback such as sound, chip formation, and temperature to maintain proper cutting conditions.
Notes
- Always use cutting fluid. Bottles for aluminum and steel are labeled nearby the machine.
- Do not adjust the high/low speed lever
- The speeds marked on the machine
isforstablesteel andall guardsaluminum aresecurelystartinginpoints;place.youInspectmay need to adjust thebladespeedfordependingwearon yourworkpiece.
Safety
- Wear safety glasses or a face shield, ear protection, and non-slip footwear.
- Remove gloves, loose clothing, or jewelry that could catch in the moving blade.
- Always adjust the blade speed
according towith thematerialmachineyou'rerunning.
Set
Common sawHazards
- Contact
crank handle to adjust a pulley system to change blade speeds. Only turn the adjustment wheel while the motor isONandwith the bladeisduespinning.toUseimproper technique or sudden movement of thespeedworkpiecechartduringoncutting - Catastrophic failure of the
sawbladeinsideduring operation - Burns from hot metal due to improper feed rate and/or blade speed
- Cuts from sharp edges
- Fumes from contaminants
- Embedding of metal chips
- Pinching/crushing of fingers/hands in between parts of the
uppermachine,dooror the machine and the workpiece - Entanglement due to
determinecatching of fabric or worn gloves/accessories
Materials
The 18 TPI blade is best for cutting materials between 5/32" to 1/2" (4mm to 13mm). Using thinner material than recommended can result in stripping teeth from the correctblade.
Bi-metal band saw blades are sufficient for cutting a wide range of materials. However, the Vertical Metal Band Saw has a minimum blade speed of approximately 150 feet per minute (SFPM)45 meters per minute), which limits what materials can be used for blade longevity.
Prohibited Materials
The following materials likeare mildprohibited to prolong life of the machine and blades:
- Hardened metals
- This includes plasma cut edges on any material.
- Stainless steel
- Non-metals
Parts doof the Tool
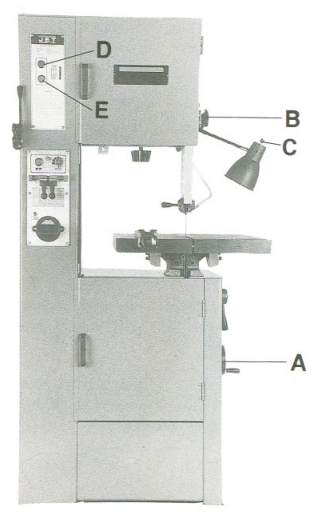
Figure 1: Vertical Metal Bandsaw Basic Anatomy
Figure 1-A: Blade Speed Adjust Hand Wheel - located below work table on right side of machine base. Turn clockwise to increase speed and counterclockwise to decrease speed. Caution: Do not needturn handle while machine is stopped. Adjust speed only when machine is running.
Figure 1-B: Upper Blade Guide Lock Knob - located on right side of upper arm. Turn counter-clockwise to move the high/low lever, it should always be in low speed.
Before cutting, adjust the blade guides just above the workpiece. Support the material firmly on the table or with a jig,loosen and use push sticks for smaller parts. Feed material slowly—don’t force it—allowing the bladeclockwise to dotighten. theLossening work.allows Keep your hands clearadjustment of the blade pathgaurd at all times. Use a little WD40height for cutting aluminumthicker or thinner stock.
Figure 1-C: Work Lamp Switch - on top of lamp shade; turns lamp on and off.
Figure 1-D: Start Switch - located on upper front column. Press to start the whitebandsaw.
Figure 1-E: Stop Switch - located on upper front column. Depress to stop bandsaw.
Basic Operation
- Determine the appropriate blade speed for the material and stock size to be cut using the chart posted on the inside of the upper pulley housing door (Also in: Setup Up).
- Adjust the blade guard to minimize exposed teeth for the stock to be cut.
- Turn on the lamp.
- Adjust fence as required for the cut.
- Press the Start Switch to start the bandsaw.
- Set the previously determined blade speed using the Blade Speed Adjust Hand Wheel.
- Apply the appropriate cutting fluid depending on the material using the labeled bottles nearby.
- Perform the cut (See: Using The Tool section below).
- Press the Stop Switch to stop the bandsaw.
Setting Up
Before cutting the material, the appropriate blade speed should be determined considering both the material and the thickness of the material. The blade speed chart is shown below:
If the material is not listed in this chart, see the section titled "Prohibited Materials".
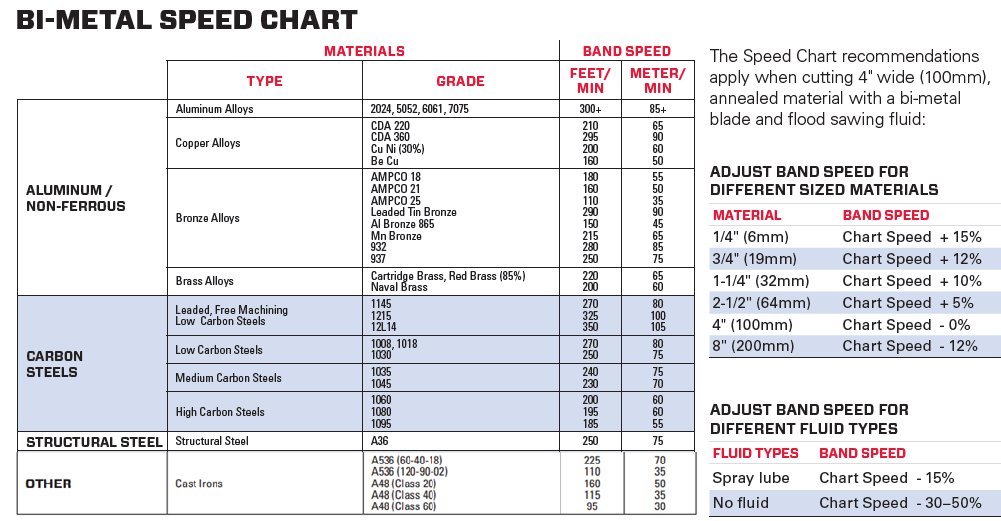
Note that these speeds should be increased for steel.thinner Thesematerials, fluidsas shown on the right.
Using the Tool
Because the stock is fed by hand, feedback is critically important to ensure life of the tool and blade. Here are some things to look out for while making cuts:
1. Noise:
- The cut should be fairly quiet with a consistent "shhh"-ing noise, and should not feel like the blade is trying to grab the piece.
- Rubbing or squealing of the blade usually means you are feeding too slow.
- Blade chattering usually means you are feeding too fast.
2. Chips:
- For thinner workpieces, chips can be
foundmisleadingin squeeze bottle inbecause themetalchipsshoparearea.small. - Ideal
achipstechareifthinmoreand curled without color change. - Dust-like / small gritty chips usually mean you are feeding to slow
- Thick chips usually mean you are feeding too fast. For steels, these chips will usually be straw (yellow) or blue colored.
- A quick reference chip guide is
needed.postedAfter use, clean metal chips from the table and guides, and inspect the blade for wear. If you notice excessive vibration, wandering cuts, or unusual noise, stopat the machine andalertis visible during operation.
3. Temperature:
- It is expected that the workpiece heats up during a
shopcut,tech.butNeveritcutshouldmaterialsneverbeyondget too hot to touch. - Heat indicates that proper chips are not forming during the
ratedcut. - The workpiece getting excessively hot means that you are feeding either too fast or too slow.
Cleaning Up
- Clean all metal chips and
avoidcuttingmodifyingfluidsafety features. Familiarize yourself withfrom thelocationtable,ofblade guides (above and below table), and dispose in a trash can. - Turn off the
emergencylamp.
Cutting Notes
Always use cutting oil.
A good starting speed for mild steel 60 meters per minute; adjust as needed.