
Tool Tutorial
(Link
Safety
- The needle is capable of going through your finger. Keep your fingers away from the needle when the machine is running. This can and does happen, even with experienced operators
- Always manually check to
PDFmakeToolsureTutorial)your
soundsTODO:materialfactorisoutsewable.contentLowersharedthewithpresser foot and spin the handwheel manually to see if the needle will pass through the material easily If the machine makes any loud grinding or thumping noises, or any othertextilesunusualmachines
orWarnings🚫smells, STOP the machine and alert a shop tech. - Ensure the machine is threaded correctly by examining the first few stitches after starting. If the stitch does not form correctly, it is possible for the thread to knot up and break the machine
- Use an appropriately sized needle for your fabric
- Let the machine do the work of feeding your material. Use your hands to guide the fabric through the machine but do not push or pull the fabric while sewing. This is the primary reason fingers get caught in needles and can also bend needles or pucker your fabric
- Do not push or pull material while stitching.
- Power off the machine before threading, inserting the bobbin, or handling the needle.
⚠️
⚠️ Keep fingers away from all moving parts!
See the Safety Section for more information.
Tool Anatomy
BASIC MACHINE ANATOMY
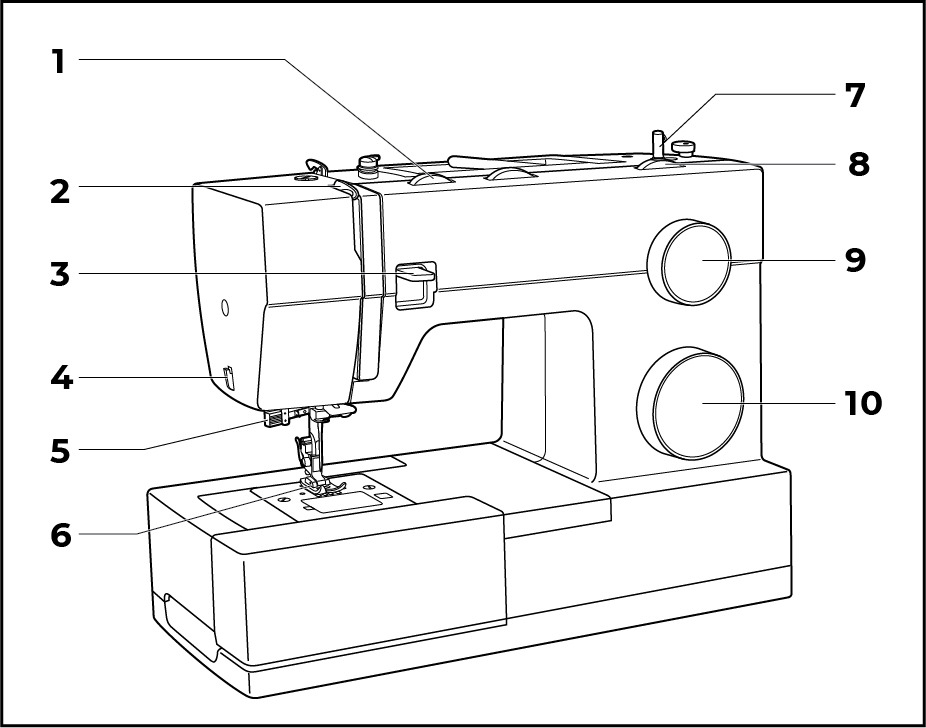
-
Thread tension dial - regulates the tension of thread from the spool
-
Thread take-up lever - part of the thread feeding mechanism that pulls thread off the spool
-
Reverse sewing lever - engages the machine to sew in reverse
-
Thread cutter - an attached tool to cut threads after stitch has been completed
-
Presser foot - holds materials to be stitched to the bed
-
Bobbin winding spindle - pin that holds the bobbin during bobbin winding
-
Stitch width dial - adjusts the width of a stitch
-
Stitch length dial - adjusts the length of the stitch
-
Pattern selector dial - adjusts the type of stitch
-
Automatic threader - needle threading tool
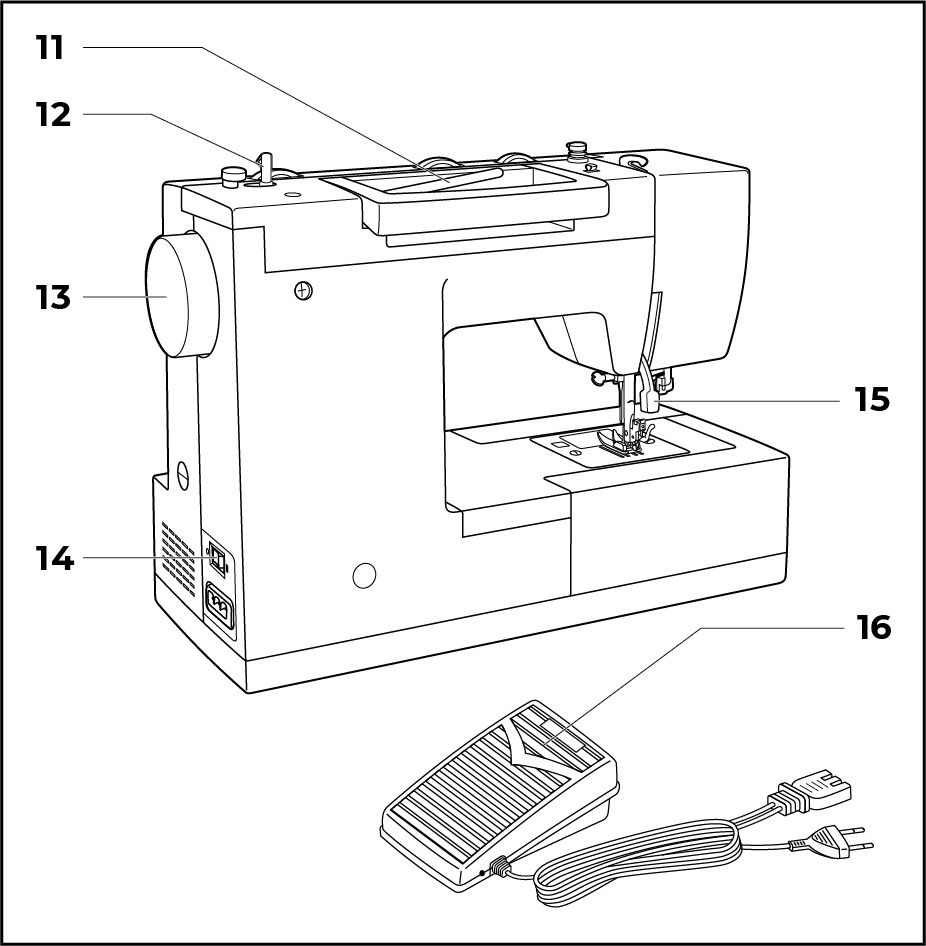
-
Horizontal spool pin - holds the spool for the top thread
-
Bobbin winding spindle - pin that holds the bobbin during bobbin winding
-
Handwheel - manually advances the machine (turn counter clockwise only!)
-
Power and light switch - on/off switch
-
Presser foot lifter - lever that raises and lowers presser foot
-
Foot pedal - controls the speed
Tool Safety
Common Hazards
The most common hazards are thread jams and broken needles.
-
Watch for top thread and/or bobbin thread to bind up, jam, and birds nest.
-
Avoid pulling/pushing fabric, which may misalign needles and cause breakage.
The most significant hazard is injury
-
Always power off the machine before threading, clipping out jams, or replacing broken needles.
-
Keep fingers away from all moving parts.
-
Special care is required around the sewing machine needle.
Prohibited Materials
Thread Jams and needle breakage are critical concerns. Material that is too thick or rigid will lead to needle breakage. Material that is too slick (plasticized or otherwise “finished”) will slide against the presser foot and cause thread jams and/or needle breakage.
For those reasons, it is important to avoid:
-
Abrasives
-
Leather
-
Heavy Weight Canvas
-
Plastics
-
Rigid Material (non-fabric)
-
Rubber
-
Vinyl
If you’d like to work with material beyond what the Singer Heavy-Duty is rated for, please refer to our Industrial Sewing Machines.
Initial Setup
SETUP CHECKLIST
-
Wind the bobbin
-
Ensure the needle is usable, replace if needed
-
Thread the needle (aka top thread assembly)
-
Insert the bobbin
-
Select the stitch type
-
Set the stitch width
-
Align test fabric
-
Lower presser foot and begin operation
WINDINGWinding THEthe BOBBINBobbin
Appropriate bobbins (singer class 15) are available in the consumables section of our store front.
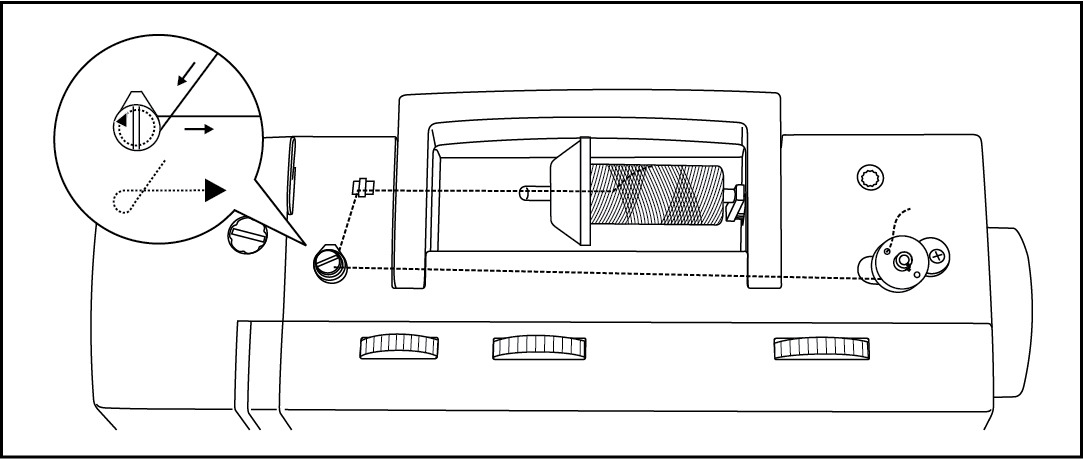

Load thread and corresponding spool holder onto the spool pin (1/2).
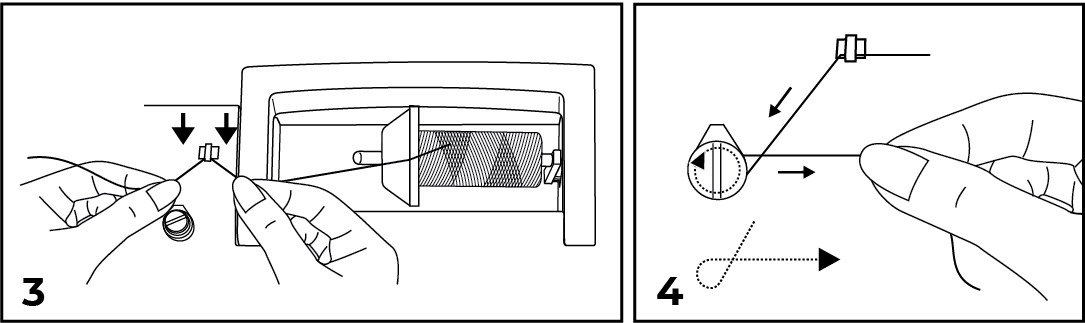
Gently snap the thread into the thread guide (3).
Then, wind the thread clockwise around the tension discs (4).
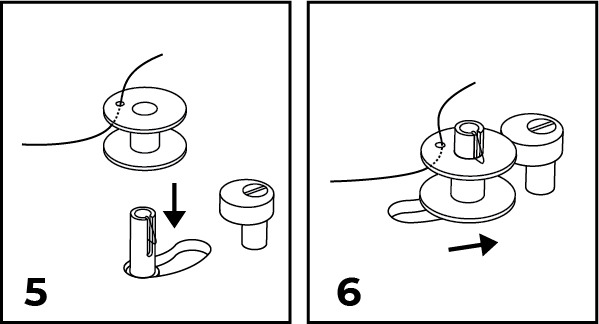
Thread the bobbin as illustrated (5) and place the bobbin onto the spindle.
Then, engage “bobbin winding mode” by gently pushing the bobbin to the right (6).
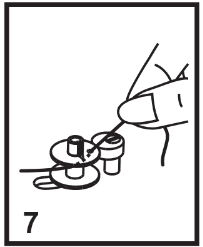
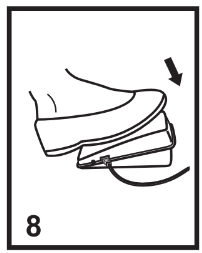
Hold the end of the thread (7) and step on the foot pedal (8) to begin winding.
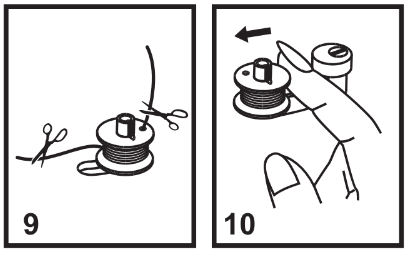
Cut the thread (9), disengage “bobbin winding mode” by pushing to the bobbin to the left (10), and remove the bobbin.
INSERTINGInserting THEthe BOBBINBobbin
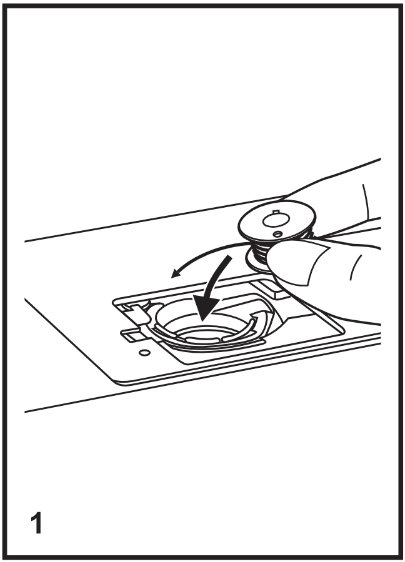
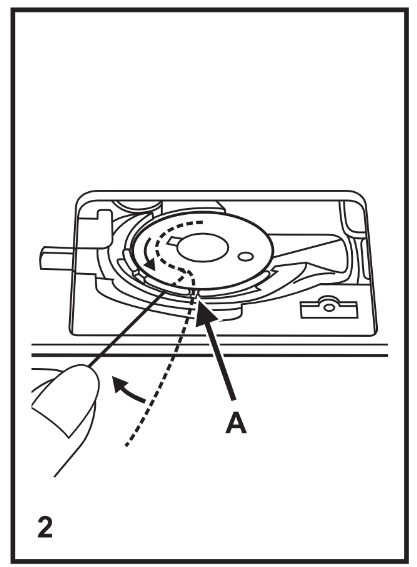
Ensure the power is off.
Turn the handwheel counterclockwise (1) until the needle is fully raised.

Insert the bobbin into the bobbin case (2) with the thread running counterclockwise.
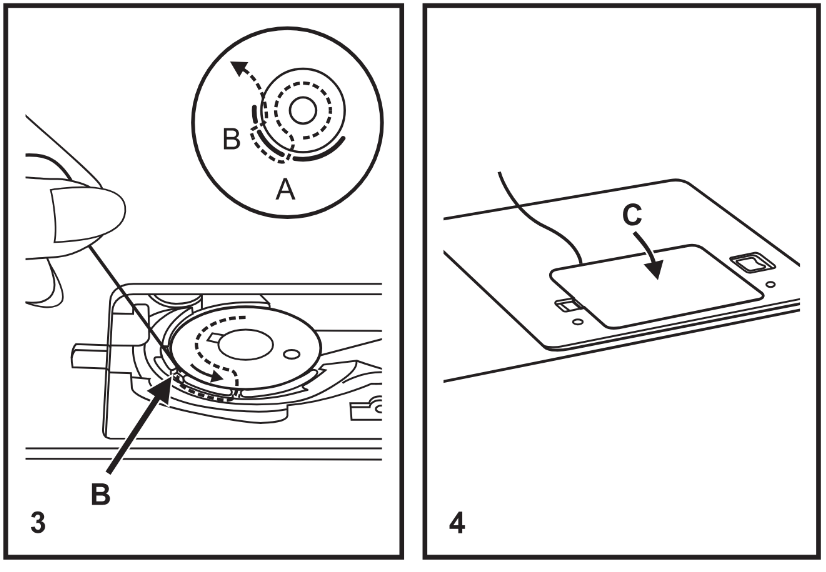
Then, pull the thread through slit “A” (3).

Draw the thread clockwise (4) until it slips into notch “B”.
Pull about 6 inches of thread and re-attach the bobbin cover plate.

Hold the upper thread with the left hand while turning the handwheel counterclockwise (1). This will lower and then raise the needle.
Note: If it is difficult to raise the bobbin thread, check to make sure the thread is not trapped by the hinged cover or the Removable Extension Table.

Gently pull on the upper thread to bring the bobbin thread up through the needle plate hole.
Then, lay both threads to the back under the presser foot.
If the thread is looping or birdnesting on the top of the fabric, this is an indication that the bobbin thread has not been threaded correctly.
REPLACINGReplacing THEthe NEEDLENeedle
Appropriate needles (singer 2020 9(70) or 18(110)) are available in the consumables section of our store front.
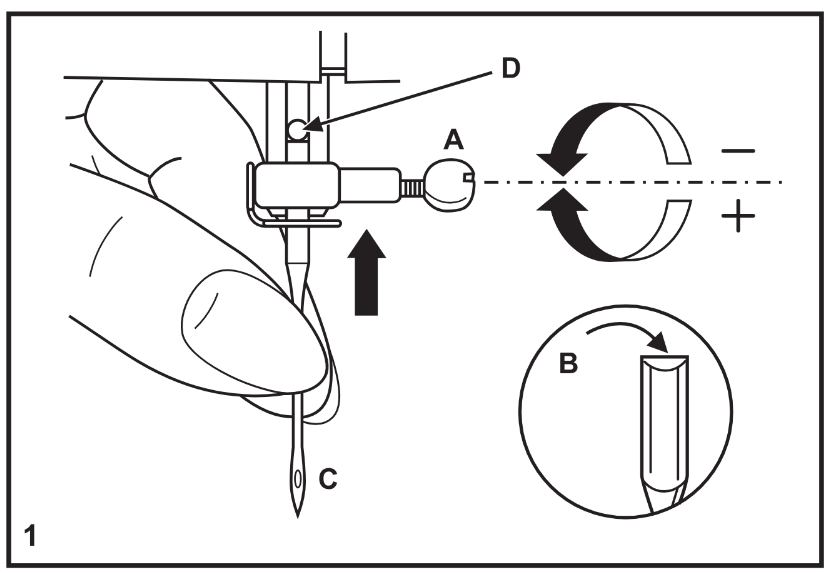
-
Power off the machine.
-
Loosen the needle clamp screw (A) and re-tighten after replacing the needle.
-
Ensure that the flat side of the needle shaft (B) is towards the back.
-
Insert the needle as far up as it will go (C/D).
Worn or Damaged Needles
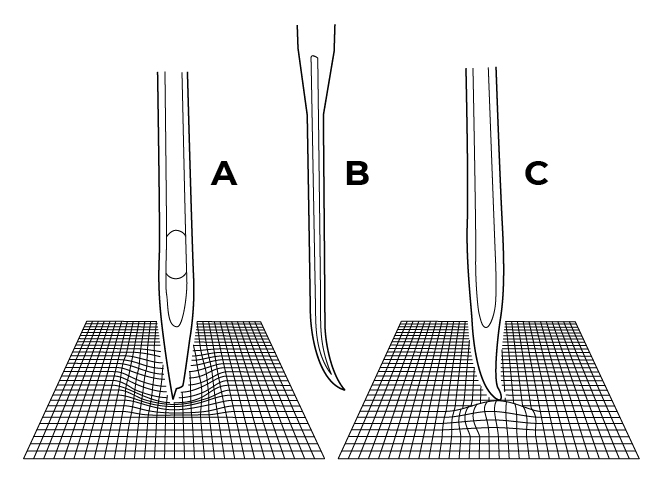
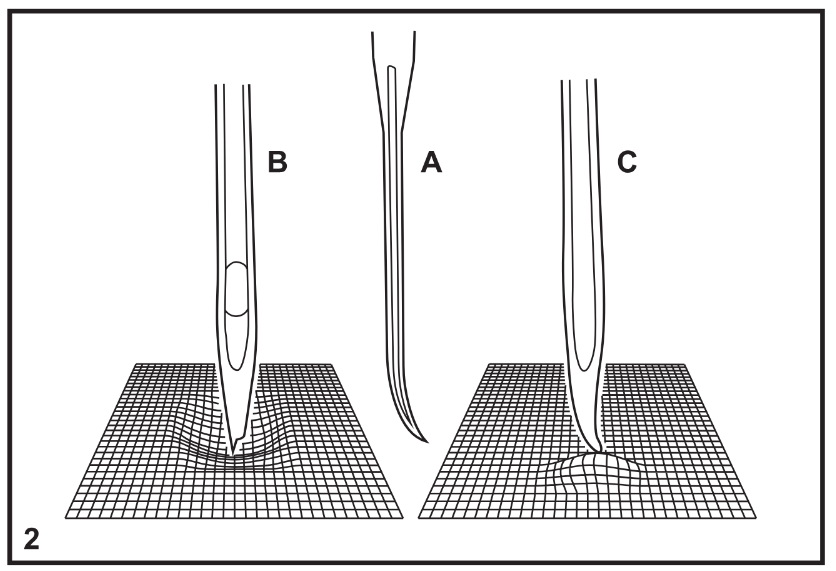
It is important to replace needles regularly. Problems can occur with:
A. Damaged points
B. Bent Needles
C. Blunt needles
Threading
the
THREADING THE NEEDLENeedle
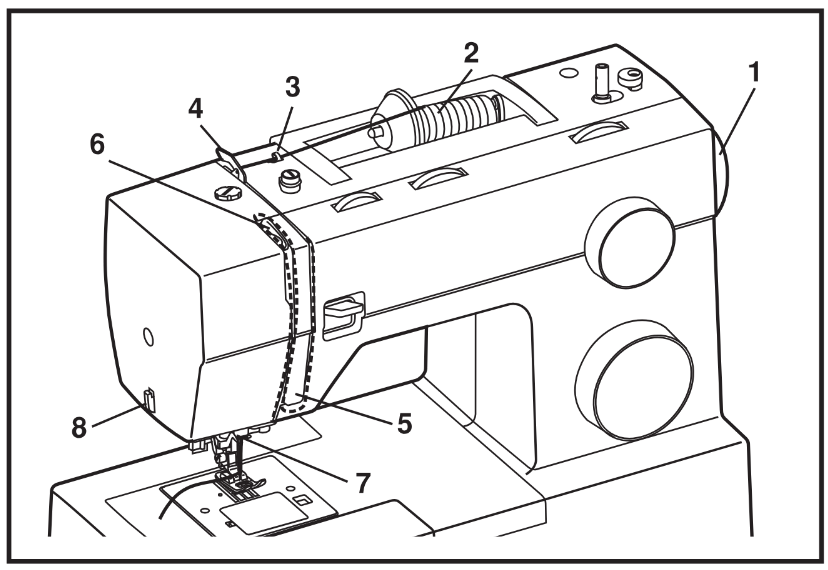
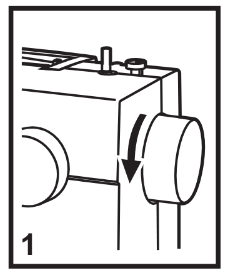
Ensure the power is off.
Turn the handwheel counterclockwise (1) until the needle just barely begins to descend.
Raise the presser foot to release the tension discs.
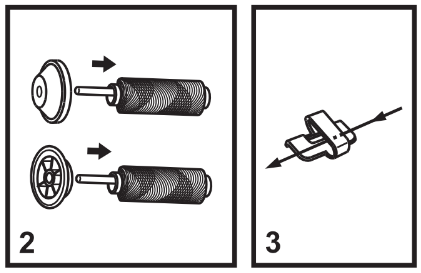
Lift the spool pin and place the spool of thread onto the holder (2).
Note: for small thread spools, invert the spool holder so that the small side is touching the spool of thread.
Pass the thread through the upper thread guide (3).
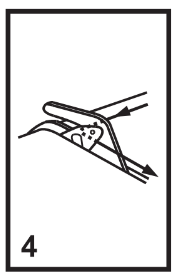
Then, pull the thread through the pre-tension spring (4).

Draw the thread down the right channel and, then, up the left channel (5) to wrap the thread into the tension module.
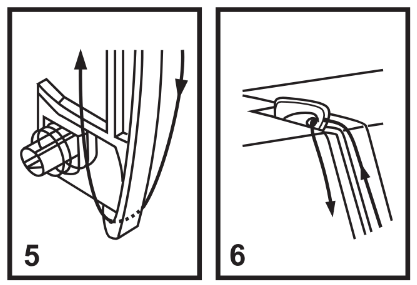
Pass the thread from right to left through the slotted eye of the take-up lever and then downwards again (6).
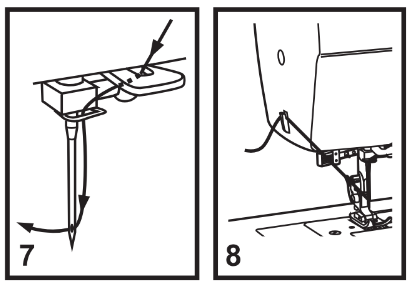
Pass the thread behind the thread guide and behind the wire clamp guide (7).
Then, pass the thread down and through the eye of the needle from front to back (7).
Pull about 6-8 inches of thread through the needle eye and trim (8).
Basic Operation
Once
Running a Test Stitch
- Place
Setup the machine Test the stitch on scrap or similaryour fabricto what you will be sewingAdjust the tension and stitch lengthRemove test and trim threadsAlign project fabricLowerunder the presser foot and lower the presser foot to hold the fabric in place.- Turn
Stepthe top of the handwheel towards you to move the needle up and down twice and create a stitch. If it takes a tremendous amount of effort to move the needle through the fabric, you should use a more robust machine, such as the Juki walking foot sewing machine (clearance required).
- Raise the thread take-up lever to its highest position, lift the presser foot, remove your fabric, and cut the threads.
- Inspect the stitch to make sure it is tight and looks good before sewing the rest of the seam.
Sewing a Seam
- To sew a seam, place your fabric under the presser foot and lower the foot.
- Turn the sewing machine on and position your foot on the control pedal. The control pedal works like a gas pedal in a car: The more you press it down, the faster the machine will go. The maximum speed of the machine can be set using the speed control slider on the front of the machine.
- Press the foot pedal down gently to begin sewing, sew a few stitches, and then release the control pedal to stop the machine. The machine automatically feeds the fabric through, so you'll only need to guide the fabric into the machine.
- Raise the thread take-up lever to its highest position, lift the presser foot, remove your fabric, and cut the threads.
- Press cut
Backthestitch/reverse stitch button and press the foot pedal down gently to sew a few stitches in the opposite direction. This helps to lock the beginning of the seam.
- Release the reverse stitch button and sew the length of the seam.
- When you reach the end of your seam, press the reverse stitch button and run a few stitches in reverse to
keephelp lock the end of the seam.- Raise the thread take-up lever to its highest position, lift the presser foot, remove your
stitchfabric,fromandunravelingthe - Release the reverse stitch button and sew the length of the seam.
Sew sew sew!Cleanup
Adjusting
ADJUSTING THE TENSION
Tension
Proper tension is critical for strong seams. The basic thread tension setting is “4”. 90% of all sewing will be between “3” and “5”, but each stitch type, thread, and fabric requires individual testing and adjustment.
To increase the tension, turn the dial to the next number up. To reduce the tension, turn the dial to the next number down.
|
|
 |
Normal tension for straight stitch sewing. |
Too loose for straight stitch sewing. |
|
|
 |
Too tight for straight stitch sewing. |
Normal tension for zig zag and decorative sewing. |
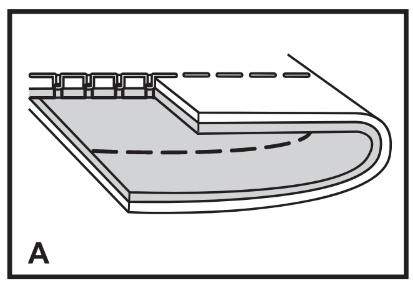
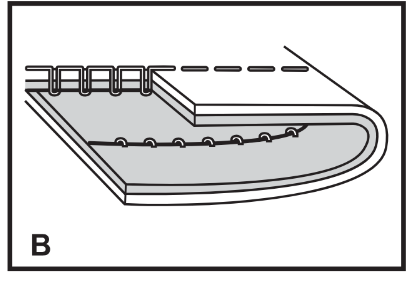
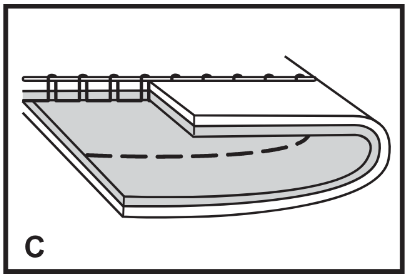
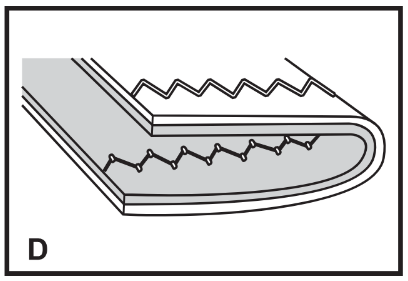
BACK STITCH/REVERSE SEWING

To secure the beginning and the end of a seam, press down the reverse sewing lever (A). Then, sew a few reverse stitches.
Release the lever and continue sewing forward.
Cleanup
-
Power off the machine and ensure all controls are set to the off (“O”) position.
-
UnthreadUn-thread top needle and spool -
Remove bobbin
-
Wipe down, vacuum, and blow out lint and stray thread clippings
-
Sweep up threads, lint and debris and deposit in waste bins
Maintenance Requests
Notify a tech and record issues at protohaven.org/maintenance. This informs our staff and volunteer maintenance crew of any issues.
Troubleshooting
Please note any maintenance needs or concerns on both the physical maintenance tag and protohaven.org/maintenance
| Common Issues | Possible Causes | Resolutions | |
|---|---|---|---|
| Thread is looping or birdnesting on the top of the fabric | Error in threading the bobbin. |
Remove all fabric and thread. Then, rethread the machine and start again. |
|
| Thread Jams | Error in threading top or bobbin thread | Remove all fabric and thread. Then, rethread the machine and start again. |
|
| Inappropriate tension | Remove all fabric and thread. Then, rethread the machine and adjust tension +/- (test on scrap material) |
||
| Decorative stitch is puckering fabric | Tension is too tight | Remove all fabric and thread. Then, rethread the machine and reduce tension |
|
| Broken Needle | Material is too thick | Remove all fabric and thread. Replace needle, rethread the machine, and reduce the amount of layers being sewn and/or use thinner materials. |
|
| Dull/Bent/Improper Needle selection | Remove all fabric and thread. Replace needle and rethread the machine. Then, start again. |
Special Setups
Button
BUTTON HOLESHoles & BUTTONSButtons
Stretch
STRETCH STITCHStitch
The stretch stitch patterns are indicated in blue on the pattern selector dial. To select these, turn the pattern selector dial to the desired pattern. Then, turn the stitch length dial to “S1”.
Additional Resources
Singer Tutorial: Threading the Bobbin
Singer Tutorial: Automatic Needle Threader
Sewing Master: Threading & Winding the Bobbin
Sewing Master: Selecting Thread
Everything Eboni: Troubleshooting Tension Issues
Check Out Kit

Foot PedalAll purpose footZipper footButtonhole footButton sewing footSeam ripper w/ lint brushEdge quilting guideScrew driverThread spool capsSpool pin feltAuxiliary spool pin