
Tool Tutorial
Drum Sander
The Grizzlydrum G1066Zsander Drumcan Sanderbe usesused twoto:
- Flatten a
smallboardamountface. - Smooth a board face.
- Reduce the thickness of
materialthinfromstock.
Notes
MaximumThe maximum depth of
cut:cut is a 1/4 turn=of the hight adjustment crank. A 1/64"4=turn of the height adjustment crank is equal to 1/64” (0.4mm4mm).
The
DrumminimumSandersafe size for workpieces is 9” x 2” x 1/8”.The drum sander and
Planerthe planer cannot be operated at the sametime,time: there is a switch on the wall to select which machineneedswillpower.use the - circuit.
Reduce snipe when sanding more than one board of the same thickness by feeding them into the sander with the front end of the second board touching the back end of the first board.
Run workpieces through at different positions left-to-right for even wear on the sandpaper.
General
A
planer may be a better choice if a lot of material needs to be removed from a thick workpiece.
Safety
Do not edge sand workpieces.
Do not stand directly in front of the
sander'sander’s infeed area.- Workpieces may be kicked out of the drum sander at high speed.
Do not sand boards
undersmaller9"than 9” x2"2” x 1/8"8”. - Small workpieces cannot be safely sanded. Do not sand more than one board at a time.
- Any slight height variation in any of the boards may cause one or some of the boards to be kicked out of the front of the drum sander.
Do not let the motor draw excessive power. If the sanding laod meter goes to 25 amsp or above, immediately hit the emergency stop button to shut down the machine, and alert a shop tech.
Use a dust mask, hearing protection, and safety glasses.
Common Hazards
"Kickback"Kickback is when a workpiece is propelled out of the machine by a spinning drum.
ItMake sure that you and other shop members are clear of the front of the machine to be out of the way should kickback occur. Kickback can be caused by:- Sanding more than one board at a time
- Taking too deep a cut
- Sanding a workpiece less than
9"9” x2"2” x 1/8" Sanding a8”
Fine dust left on the floor is a slip hazard.
- Always sweep the area after using the drum sander.
Excessively cupped, bowed, or twisted workpieces are unstable and unpredictable, and may be propelled from the machine.
Materials
Materials
Only wood should be used.
Nails,Do not put any other materials through the drum sander.Workpieces must be free of all metal. Any nails, screws, staples,
etcor other metal parts embedded in the wood can damage the machine.- A portable metal detector is available at the front desk.
Do not cut wet
woodwood.(Workpieces over 20%moisture)moisture - will clog the paper.
Do not
cutsand boards with finish orexcessive glue applied Finish, epoxy, oruncured gluecan quickly contaminate and clog sandpaper, especially in large amounts. If you plan to sand these materials, please be prepared to change the sanding strips to avoid machine downtime.applied. Use a sacrificial piece of sandpaperor firstto remove any uncured glue from the workpiece. Remove any layers of finishlayersfrom the workpiece with the resaw bandsaw.
Consumables
181.5" x 3" sandpaper for each drum. The general rule of thumb is to sand a workpieceboards withprogressivelyhighhigherresingritcontentnumbers,orwithappliedno one grit increase of more than 50. Avoid skipping grits; the larger the grit increase, the harder itfinishes willbequicklyto remove the scratches from the previous grit. Recommended grit combination: 36 + 80; 60 + 100; 80 + 120; 100 + 15036, extra coarse: rough sawn boards, thickness sanding, glue removal60, coarse: thickness sanding, glue removal80–100, medium: removing planer markscontaminate andinitialclogfinish sanding120–180, fine: finish sanding
3/4" strapping tape for securing the sandpaper to each drum
sandpaper.
Parts of the ToolDrum Sander
ManualViewcontains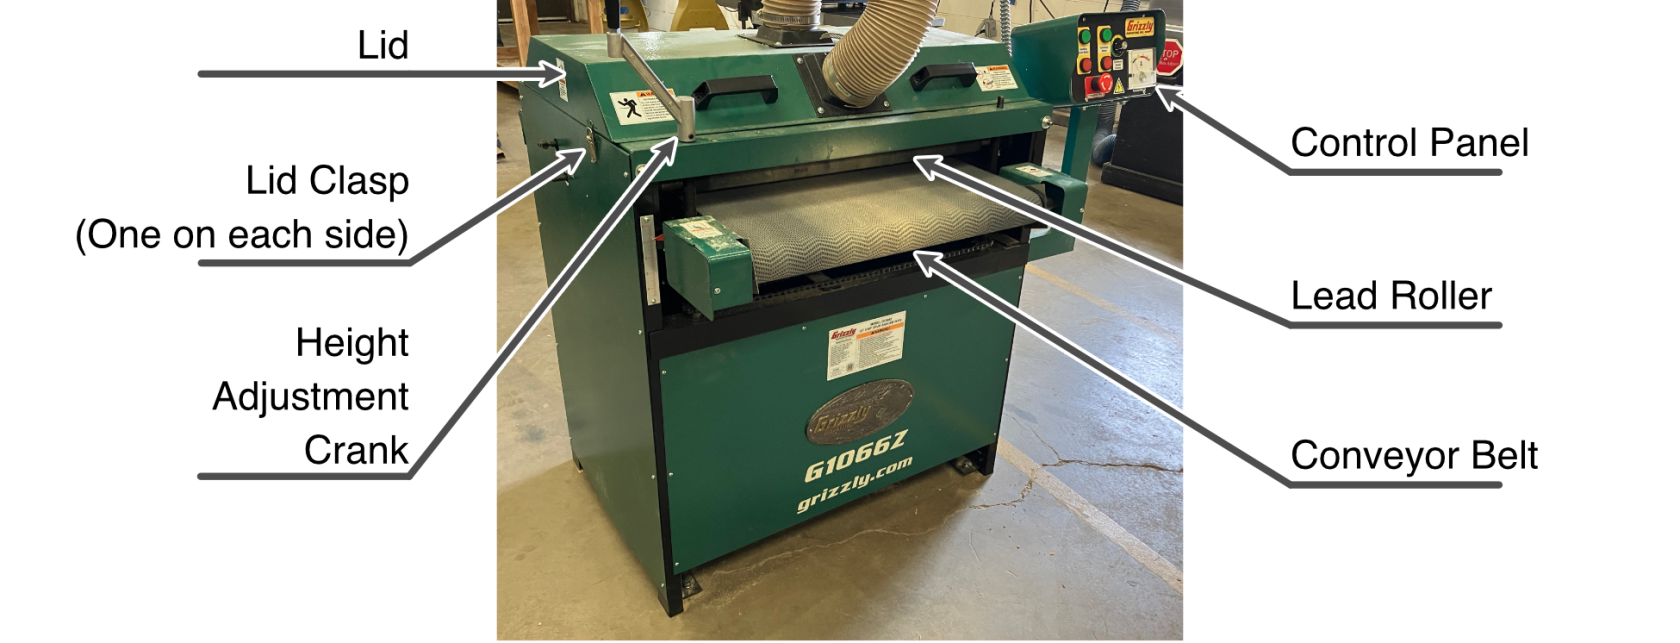
[]
An annotated
imagesfull
Full
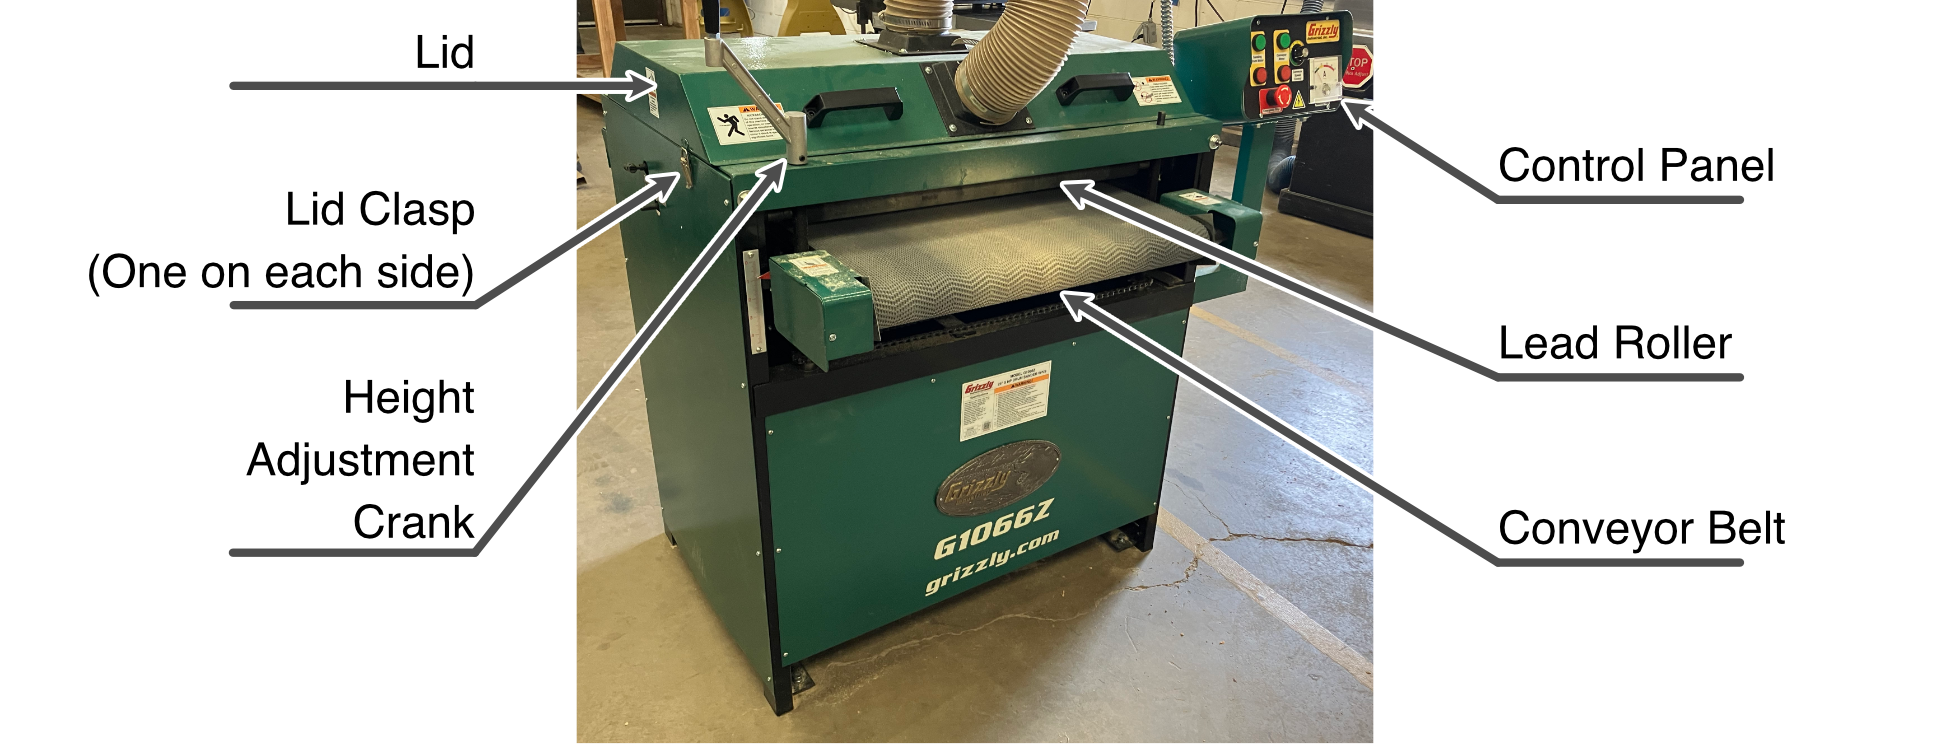
Control Panel
[]

An annotated full view of the drum sander.
Emergency Stop
Push in the emergency stop button to immediately stop all motors on the machine.
To release the emergency stop, twist the button clockwise until it releases.
Sanding Drum Motor Control
Press the green button to engage the sanding drum motor.
Make sure the drum motor is turned on before feeding a workpiece into the machine.
Conveyor Motor Control
Press the green button to engage the conveyor motor.
Conveyor Speed Control
Adjust the conveyor speed control to change how quickly a workpiece is fed beneath the sanding drums. Start cuts with the speed control set to low (in the green range, below 4).
Adjust the speed upward as needed. When increasing speed, monitor the sanding load meter the make sure that the power draw does not exceed safe operation.
Sanding Load Meter
The sanding load meter reported the draw on the motors in amps. Keep the load below 15 amps for normal operation.
Conveyor
The conveyor pulls the workpiece past the bottom of the sanding drums.
Height Adjustment Crank
The height adjustment crank raises and lowers the conveyor table, adjusting the clearance between the sanding drum and the conveyor.
Lid
The lid protects the top of the sanding drums, and helps with dust collection.
Only run the drum sander with the lid lowered and locked in place with the left and right clasps.
Lid Clasps
There are two lid clasps, one each on the left and right sides of the lid.
Only run the drum sander with the lid lowered and locked in place with the left and right clasps.
Sanding Drums
There are two sanding drums on the drum sander, using progressive grits (80 grit and 120 grit). The abrasives should be inspected before each use to ensure they are not clogged, torn, or loose on the drum.
Basic Operation
Setting Up
Open the top cover and inspect the drums for wear on the sandpaper.Make sureSet the wall-mounted power switchis setto"DrumSander"Sander.
Do not change the switch position ifnotheoneplaner isalreadyinusing the planer.use.MakeTurnsure the shopon dust collection.
Dust collectionismustturnedbeon.enabled.
Using the Tool
Adjust the conveyor so your workpiece can fit comfortably, to avoid taking a cut more than 1/64". Use the infeed roller at the front to gauge the height.Run the main dust collector the entire timeIf the drum sander isinuseduse.without dust collection, the sandpaper will be immediately ruined.
Inspect the Sandpaper
- Undo the latches on the left and right sides of the cover.
- Open the cover.
Hold the cover open: do not let it drop. - Inspect the sandpaper on both drums.
If there are any clogs or tears, file a maintenance report. - Close the cover.
- Latch both sides of the cover.
Sanding
- Use the height adjustment crank to set the height of the conveyor table.
The workpiece should fit comfortably under the lead roller. This will ensure that the sander will take a cut less than 1/64”, as required. - Turn on the
SandingsandingDrumdrumMotor first, to ensure work is loaded only whilemotor.
Ensure the sanding drum isspinning.spinning before loading work into the sander. - Turn on the
ConveyorconveyorMotor,motor, starting with a slow speed.
The green areas of the speed control are recommended starting speeds. - Make light test passes to find an appropriate conveyor speed.
- If the Sanding Load
meterMeter gets toohigh,highlower(into the yellow or red above 15 on the scale), decrease the speed or reduce the cut depth. - If the wood is burning, increase the speed or
decreasereduce the cut depth.
- If the Sanding Load
- Do not adjust the height of the conveyor table by more than 1/4 turn per pass.
Because of the"spongy"spongy nature of the sand paper backing, adjusting the handle is not needed on every pass. Several passes can be taken for every adjustment of the handle. - 6. Feed the workpiece through until desired thickness is reached.
Cleaning Up
SweepTurnor vacuum dust left onoff thefloorconveyoraroundmotor.- Turn off the
machinesanding drum motor. - Inspect the sandpaper for any clogs or
tears.tears (see Inspect the sandpaper, above).
If there are any clogs or tears, file a maintenance report. - Dust off and sweep up dust as needed.
- Return the wall power switch to the center position.
- Turn off the dust collection.
If other members are still using the dust collector, leave it on.