
Router Table Tool Tutorial
Protohaven
Table Router
Tool Tutorial
The Setup, Operation, and Cleanup Checklists of this guide are what instructors use to ensure that you can use the equipment according to community expectations.
Routers are used to cut curved profiles, pockets, slots, and add decorative trim profiles to the edges of wooden projects. Table routers provide superior support and control compared to handheld routers when routing small workpieces, and eliminate the need for clamping individual workpieces to a workbench when routing long pieces like trim molding.
Usage Highlights
Router Table Clearance or Class Equivalent Required Before Use
Personal Protective Equipment
Safety glasses must always be worn. Hearing protection is highly recommended in the workshop, especially when the dust collection fan is active.
Tool Anatomy
MACHINE ANATOMY
-
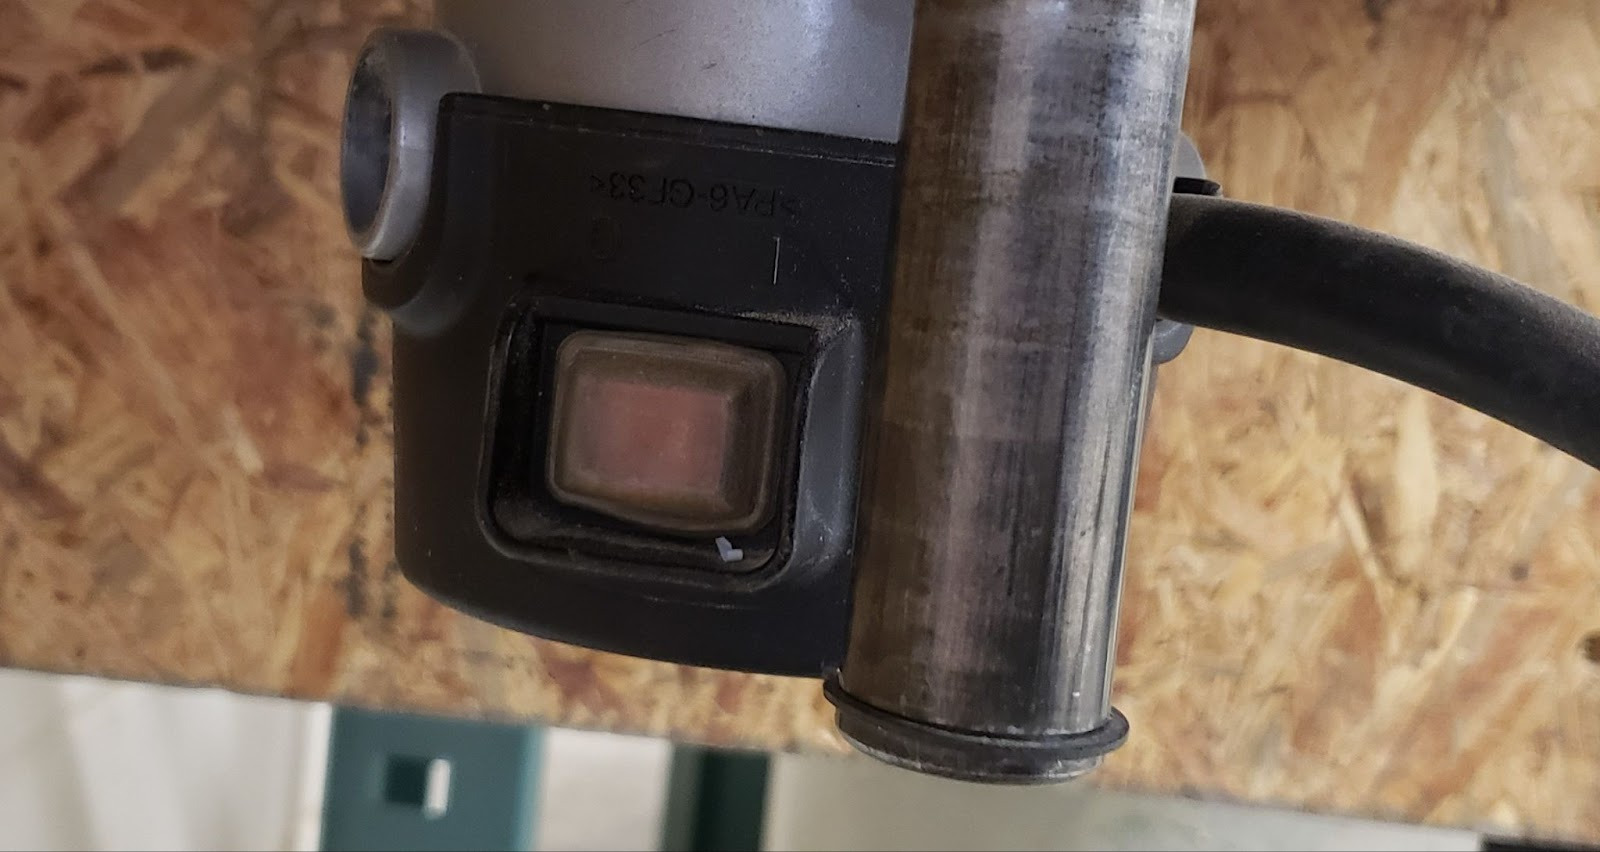
Power Switch - on/off switch. Found under the table on the back left of the body of the router.
-
Maintenance Tag - Manually tracks the usability status with Green/Yellow/Red cards
-
Router - The motor that drives the tool.
-
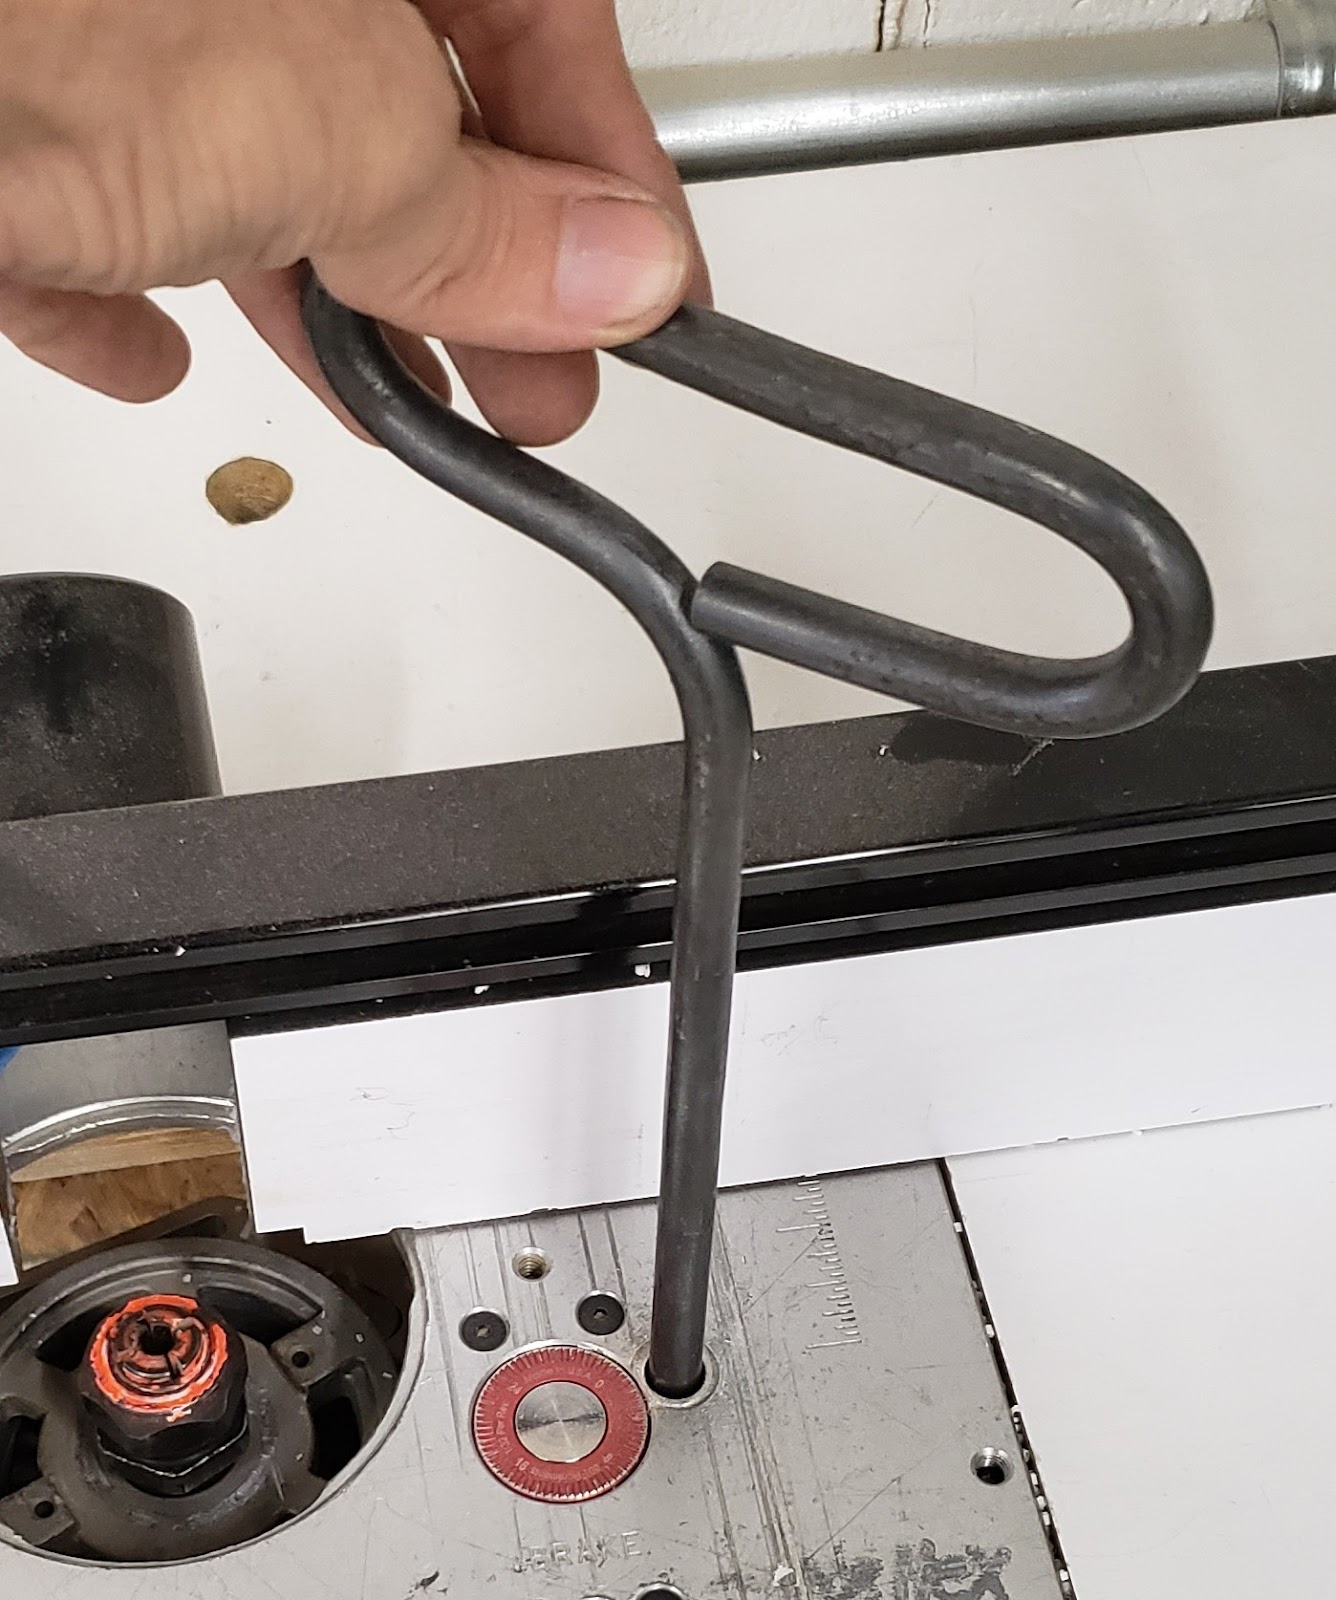
Coarse Adjustment Tool - Rod & handle that gives the user control over the coarse height adjustment of the router.
-
Coarse adjustment hole - The hole in the router table into which the Coarse Adjustment Tool is inserted.
-
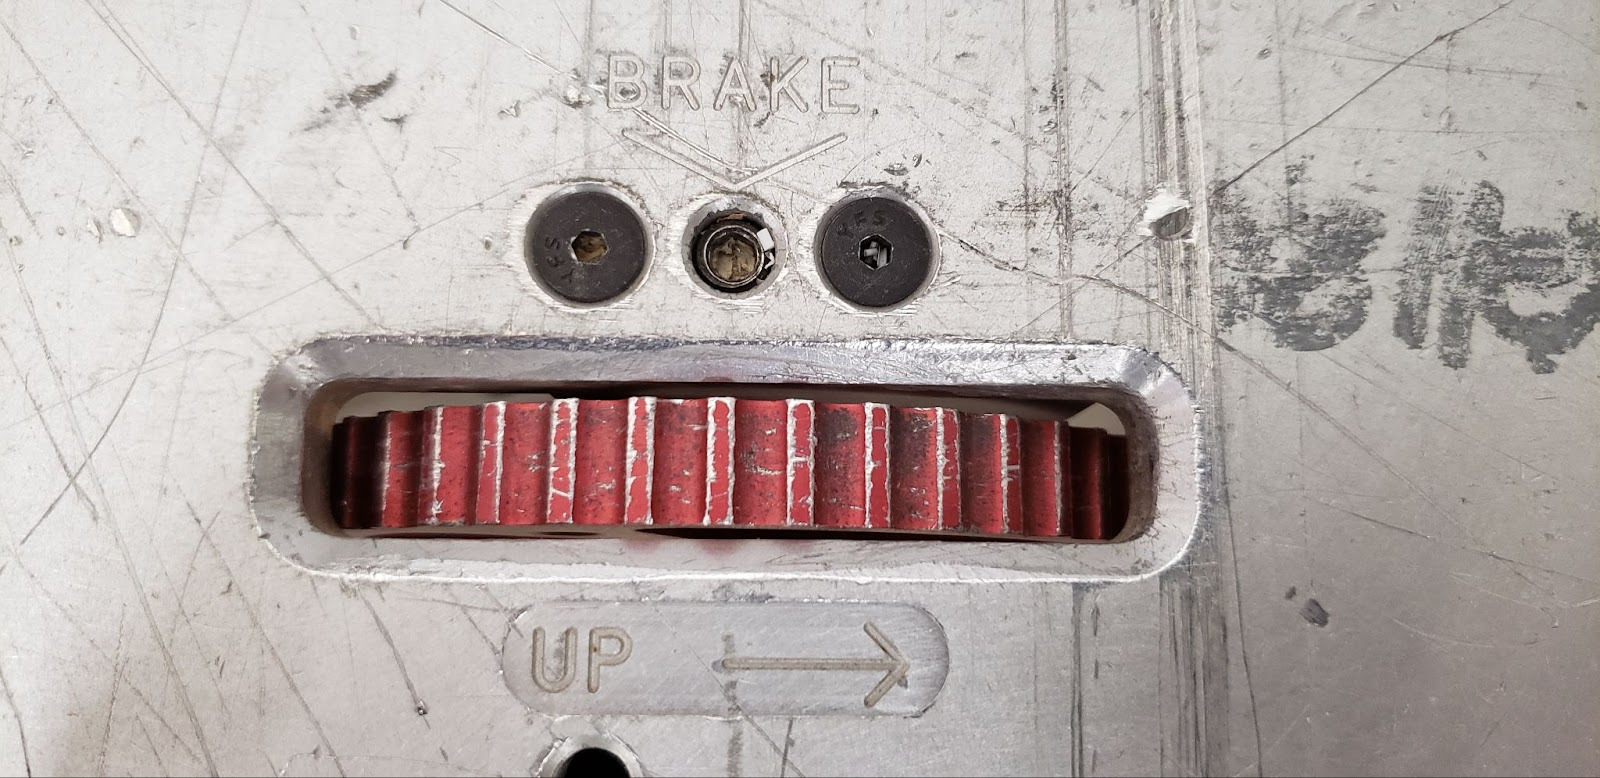
Fine adjustment knob - After setting a coarse height, this knob can be used to finely adjust the height of the router.
-
Fine adjustment dial - Shows the user how far the fine adjustment is moving the router.
-
Fine adjustment lockscrew - Locks the fine adjustment in place. Takes a ⅛” hex wrench.
-
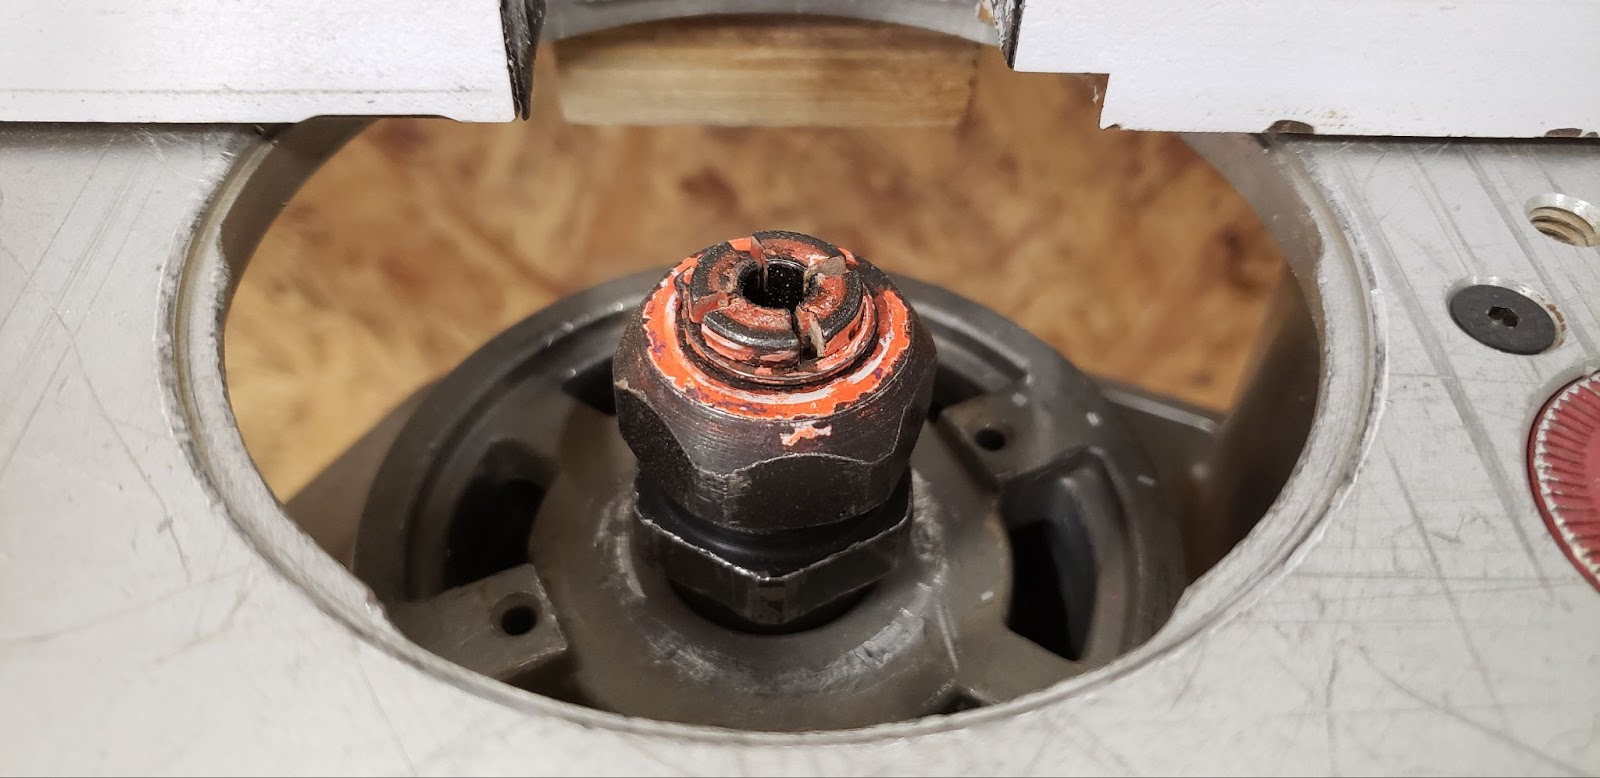
Collets - Holds the shank of the router bit.
-
Collet nut - Holds the collet and locks it to the router.
-
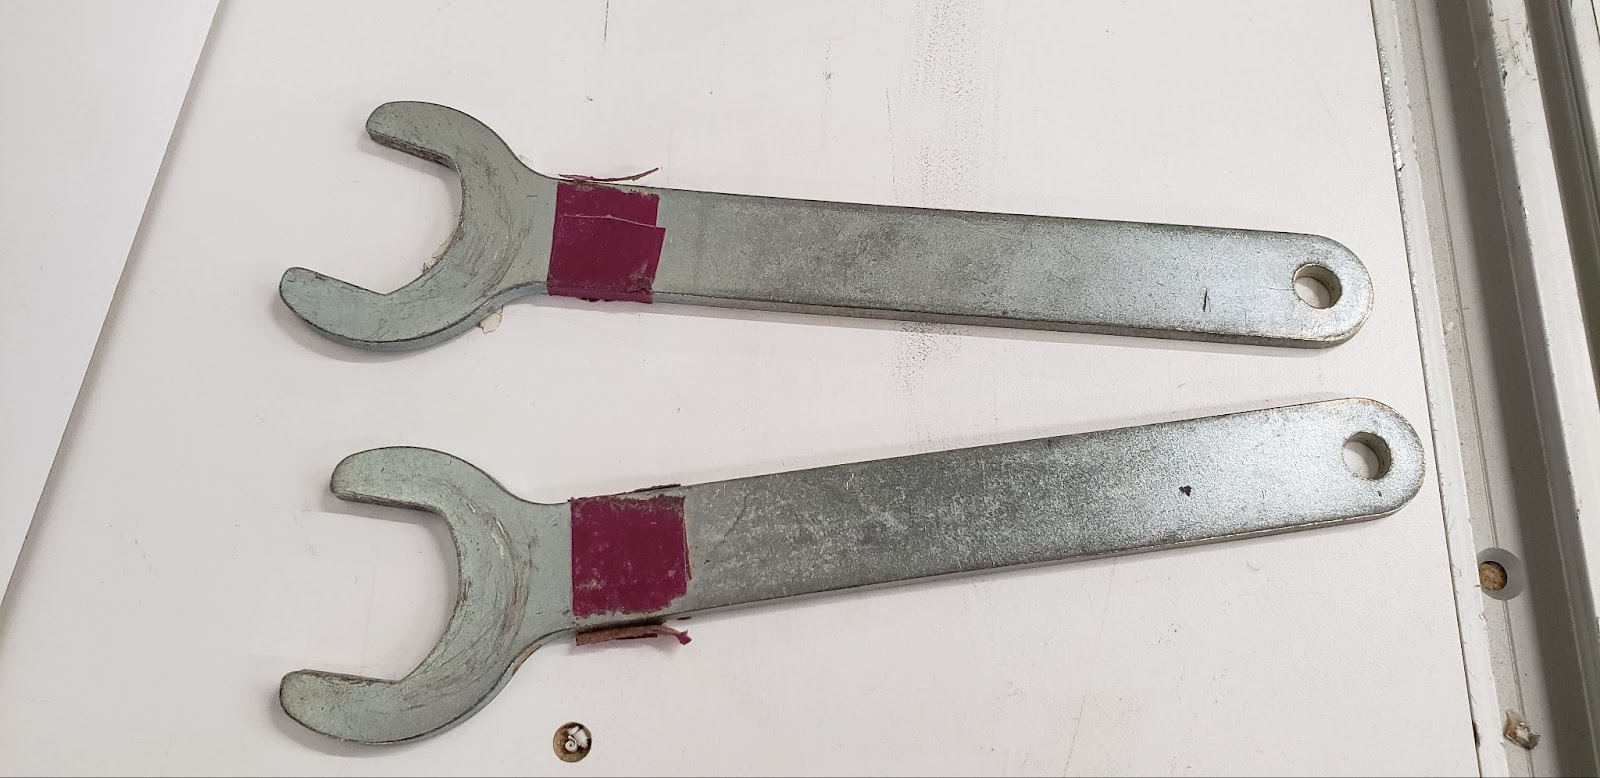
Collet wrenches - Used to tighten and loosen the collet nut. Some router models have a lock pin to hold the shaft in place while a single wrench loosens the collet.
-
Fence - Helps the user cut at a consistent depth in straight stock.
-
Throat Plates - Multiple throat plates with different sized holes provide support below the workpiece while allowing various sizes of bits to pass through the table. If the hole in the throat plate is smaller than the collet nut, the router will need to be lowered below the table before the throat plate can be installed.
-
Throat Plate Spanner - Tool for unlocking and removing throat plates.
Tool Safety
COMMON HAZARDS
Kickback
Special consideration must be made with regards to what direction a workpiece is being fed past the router bit. When installed in a table, the router bits will spin counterclockwise when viewed from above. This rotation will naturally want to pull anything that contacts the bit in that same direction, so anything pushed straight into the bit will be deflected towards the right side of the table. As the workpiece is forced to the right by the bit, that exposes new material to the bit, which is then also pushed to the right. This is called kickback, and can easily rip the workpiece from the user’s grasp.
In order to prevent this, you should always feed against the direction of the cutting action. For normal edge routing, this means pushing the work from right-to-left as the cutting edge tries to push the piece to the right. The bit will cut away a portion of the work, and will leave a void in it’s path. If the work were to momentarily get caught by the bit, the void will be pulled rightward around the bit, leaving nothing more to pull against.

Finger contact with bit
Many of the operations performed with the router table involve the router bit being completely buried in the workpiece and invisible to the user most of the time. Be especially aware of where the bit will exit from the workpiece as you approach the end of a cut, and make sure your fingers are nowhere close. Use a push stick or push block when appropriate.
Flying debris
Due to the high rotary speed of the bit, any splinters that may break off of a piece, or even the whole workpiece itself, may be thrown forcefully from the machine. Always wear eye protection, and stay away from the path of any potential kickback.
PROHIBITED MATERIALS
No lead-painted materials are allowed due to toxic dust.
Initial Setup
SETUP BREAKDOWN
Move the table
If milling a profile on the edge of a long or bulky workpiece it may be necessary to move the table away from the dust collector in order to feed the whole piece past the router bit without interference. Make sure you have sufficient space both on the infeed and outfeed to accommodate your work.
Find a shop vac in the wood shop and attach it’s hose to the dust port in the fence. Even if you do not intend to use the fence to guide your work, keep the fence as close as you can to provide air flow and collect whatever amount of particulate you can.
Disconnect power
If the router is plugged in, unplug it to prevent accidental powering of the motor while installing the bit.
Select a router bit
While there may sometimes be router bits available at the shop for emergency use, it is expected that members will bring their own bits so they can be assured to have a sharp, undamaged bit that is the right size and style for their project.
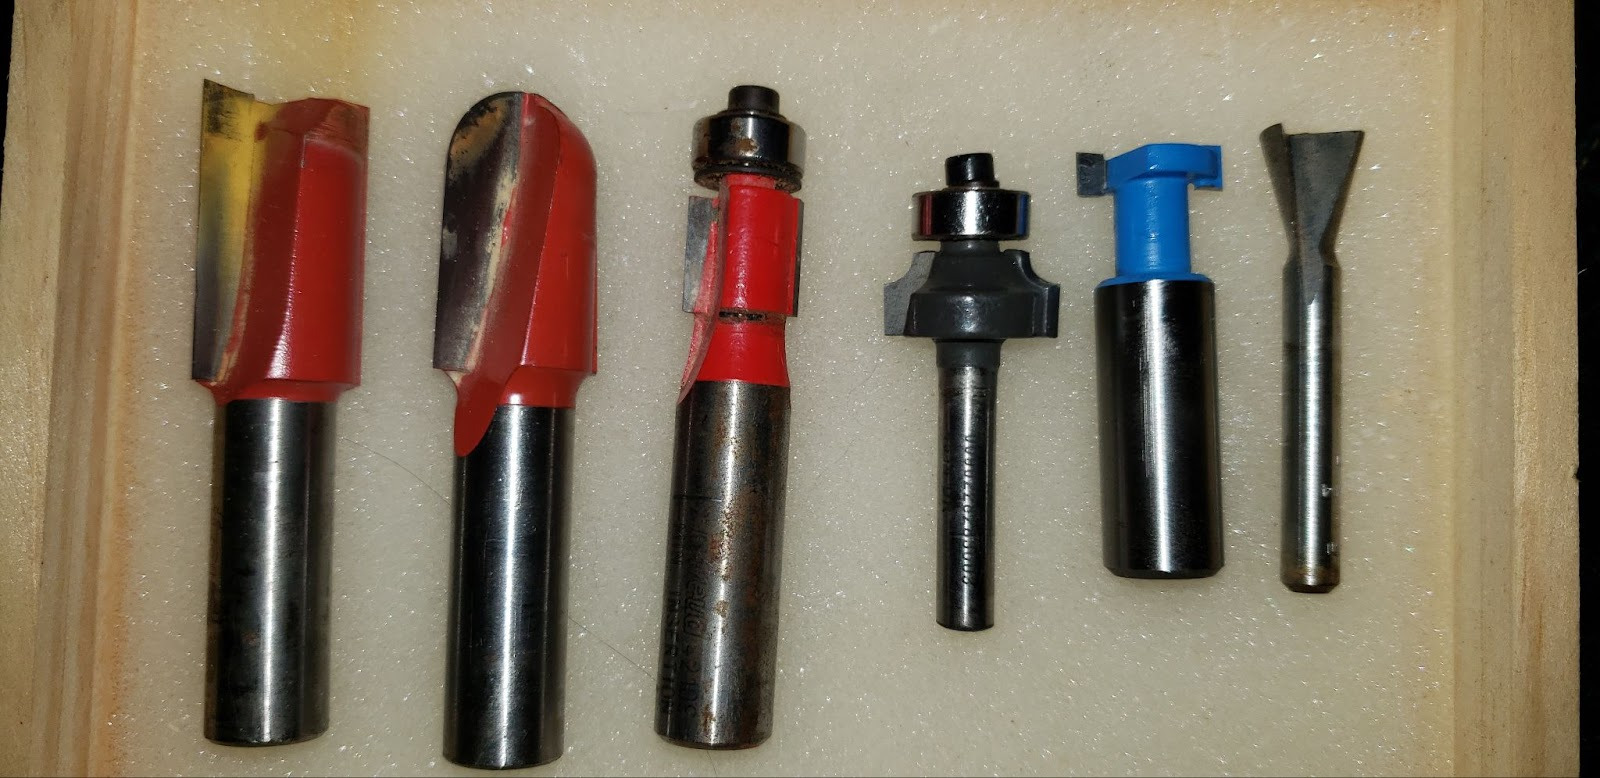
There are many types of router and can be used in many different ways.
Bits with bearing guides are designed to ride along the profile of an edge, while bits with no bearing are used with the fence to cut trim profiles, grooves, and slots, or can be used for free-hand shaping.
Straight bits are often used for free-hand shaping, but can also be used in conjunction with a bearing following a template to create accurately repeatable parts without relying on CNC.
Many styles of profile bits exist, and can range from purely decorative like the ogee, to providing complex joinery solutions like tong-and-groove and raised panel sets.
Install the router bit
Select the collet that matches the shank size of the bit you have chosen. Most bits will be ¼”, but some larger bits may be ½”. Screw the collet nut lightly onto the router spindle.
Insert the shank of the bit into the collet. The goal is to have as much of the shank gripped by the collet as possible, while not pushing the shank into the collet past where the polished surface is. You should be able to see a hair’s width of the polished shank protruding from the collet.
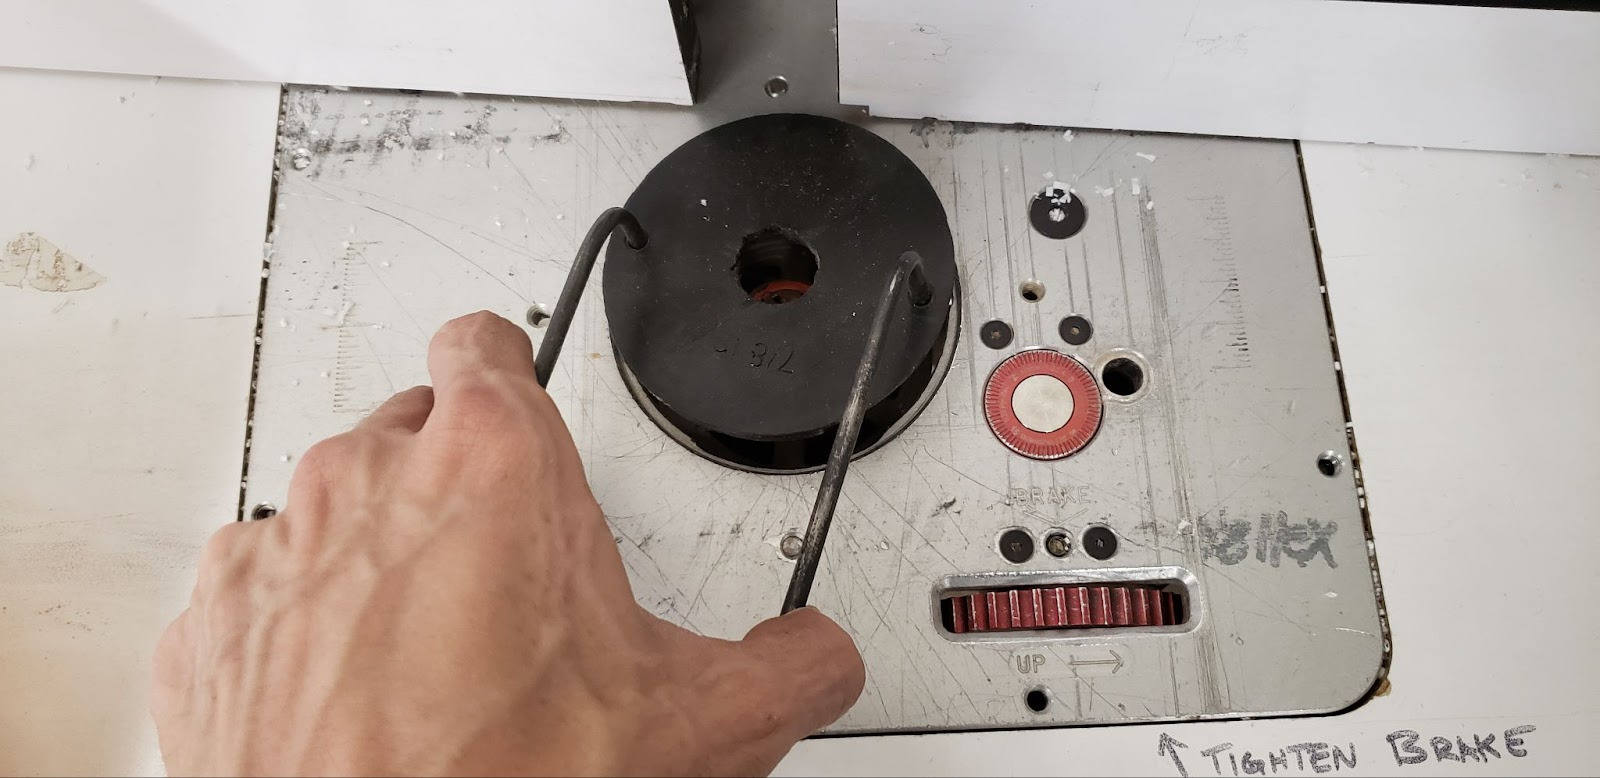
Tighten the collet nut onto the router spindle as much as possible by hand. This just minimizes the amount of fiddling with wrenches that you have to do. Once the nut is snugged in place, use the two collet nut wrenches to simultaneously hold the spindle still and tighten the nut firmly in place. Finding the right angle for this can be tricky. Sometimes lifting the router to it’s highest position and using the wrenches from above the table is easiest, and sometimes dropping the router to it’s lowest point and accessing the nuts from below is more convenient. Care should be taken not to let the wrenches slip off of the nuts, as this will round off the edges of the nuts and wrenches making it increasingly difficult to get a good grip on the nuts.
Install the appropriate throat plate
Choose the throat plate that most closely matches the diameter of the cutter of your router bit. The router bit should pass freely through the throat plate, but there should be very little clearance between the cutter and the opening. It is critical to support the workpiece as close to the cutter as possible to help keep the workpiece level, and help mitigate catches at tearout.
The router must be slightly below it’s highest position in order to make room for the throat plate. Place the throat plate into the throat and, using the throat plate spanner in the two small holes, lock the throat plate in place by turning it clockwise until it is seated and locked in place.
Connect power
If one is not already at hand, find an extension cord in the wood shop, often hanging behind the tool crib. Plug in both the router and the shop vac.
COMMON SETTINGS
N/A
CONSUMABLES
Each member should be responsible for sourcing and maintaining their own router bits. Bits will dull over time, get lost or chipped, and cannot be relied upon to be in good shape when shared among many members.
Basic Operation
OPERATION BREAKDOWN
Set the bit depth
Adjust the height of the bit. We will refer to this as the depth of the cut. You will likely need to utilize a ruler or a gauge block in order to determine the proper distance above the table the bit needs to be in order to match the depth of cut indicated in your plans.
Determine the width of the cut
Having set the depth of cut, you must determine how far into the wood you want to cut. We will call this the width of the cut. Generally you do not want the width of your cut to be wider than half the cutter diameter, meaning the router bit will be at most half-way exposed out of the fence face. Wider cuts will generate more pulling forces on the wood fibers and lead to catching, chattering, and splintering. You will often make several shallow passes in order to achieve the full width of the profile. The exception to this guideline would be when you are cutting slots, where you must expose the entire width of the cutter profile to the wood. A good rule of thumb is to not cut more than ¼ square inches per pass.
If using a fence to make straight cuts, set the fence so the appropriate amount of the bit is extending from the face of the fence.
If you are not using a fence, you will need to control the width of each pass manually, and must take care not to cut too much at a time or risk the bit catching on the piece instead of cutting it. When using bits with guide bearings, you may need to make several free-hand passes until the bearing can meet the profile it will roll along.
Initiate the cut
In a slow, controlled manner, bring the workpiece into contact with the bit. When working the edge of a workpiece, the bulk of the work should be to the left of the bit, and you should touch the bit to the workpiece about a quarter-inch away from the corner of the work, if there is a sharp corner like is found on all rectangular stock. The purpose of this is to avoid introducing a sudden wall to the approaching cutter. If the cutter impacts the workpiece at a 90 degree angle, it will be a forceful impact and can splinter the workpiece and throw it from the table, or pull the perpendicular edge of the workpiece into the cutter.
Once you have established a cut at the appropriate width in the edge of your stock, slowly draw the workpiece to the right to cut away whatever is left of the quarter inch that was to the left of the bit. This small amount of cutting is done while feeding the stock in the same direction as the rotation of the cutting faces, and is known as ‘climb cutting’. Climb cutting is extremely risky in hand-fed operations (non-cnc), and should not be done on long faces as you can easily get into a runaway situation where the piece kicks violently in the direction the cutter is moving. Care should be taken not to feed from left to right except when there is no risk of the router running along the surface of the stock. In this situation, only a very small amount of wood should be to the left of the cutter, and if kickback were to occur, it would be a very low-force event.
Feed the workpiece past the bit
Reverse directions, now pushing the bulk of the work from the right of the bit towards and past the bit. You are now feeding against the direction of the bit in a feed style known as ‘conventional cutting’, since it is the traditional and most common method, being safer and more controllable than climb cutting. If working freehand, be sure not to take too wide a cut as you feed the stock past the cutter. Maintaining solid control over the workpiece, keeping it flat to the table and feeding at an appropriate speed are key to getting a good cut. Chattering and bucking can indicate that the feed speed is too high, or that the bit is no longer sharp enough to produce a quality cut. Burning and scorching can indicate that the feed speed is not high enough, and the friction of the cutter riding on the surface of the wood instead of cutting it is building up unnecessary heat.
Do not reverse the feed direction in the middle of an edge, even just to clean up a small mistake, as the bit can grab and kick violently when climb cutting. It is much safer to make a second pass using conventional cutting to clean up any inconsistencies in a profile.
When completing a pass, take special care to keep your hands clear of the trailing edge of the workpiece. A common injury is to have your thumb or palm pushing on the wood at the point where the cutter emerges from the stock.
Repeat the cut to full depth
After completing a pass, determine how wide your next cut should be. If using a fence this may look like sliding the fence a quarter of an inch further back, exposing more of the router bit’s cutting profile. If free-handing, you will need to pick a new point of visual reference to keep track of how much of the bit is buried in the workpiece. A roller bearing can serve as a great visual indicator of how deep a bit is until you have cut far enough for the bearing to roll along the profile at the full cut width.
Cleanup
SCRAP BREAKDOWN
N/A
MAINTENANCE REQUESTS
Update the physical Maintenance Tag at the machineGreencan be used without issueYellowcan be used with cautionRedcannot be used without hazard to either the user or the equipmentRecord issues atprotohaven.org/maintenance. This notifies our staff and volunteer maintenance crew of any issues
Troubleshooting
Special Setups
N/A
Additional Resources
Where can one find materials, tools, or other consumables (either local or online vendors)?
What helpful video tutorials are there where one can dive deeper into operating this tool?
If this is a CNC tool, where can one learn more about the CAD, CAM or CAD software?
Staff-Use
AUTHORIZED MAINTENANCE CREW ONLY
If you are part of the maintenance group please log on to the #maintenance channel of our Discord server to:
Perform a Maintenance ActionRequest a Maintenance PurchaseReview complete Maintenance Logs for each machineGenerally chit-chat about maintenance
What preventative maintenance areas does the manual indicate? For example, a regular oil schedule, how often to tension belts/blades, and when to change a filter.
This is the area to simply name the topic, frequency, and page number where more information can be found in the manual.
Links to helpful videos or additional resources would be a helpful secondary source.