
Powder Coating Oven Tool Tutorial
Small
We Ovenprovide
Thea large and a small powder coating oven shouldfor becuring powder coated metal parts. The small oven is used for any powder coating job that will fit, to avoidsave firingtime upand electricity as the large oven unnecessarily.takes a long time to heat up.
Warnings
This tutorial focuses on operation of the ovens. For more details on the powder powder coating process, see the Powder Coating Booth Tool Tutorial
Tool Anatomy
Small Oven
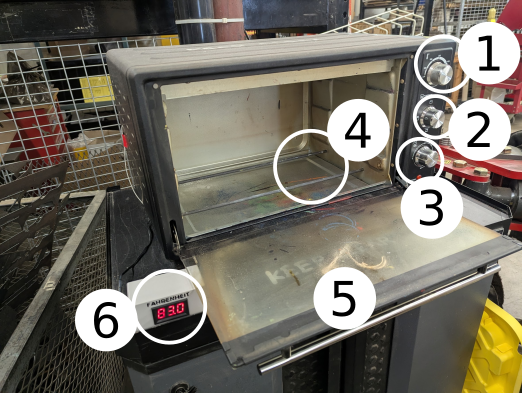
- Thermostat dial
- Selector dial
- Timer dial
- Heating elements
- Glass Door
- Temperature Display (Fahrenheit)
Large Oven
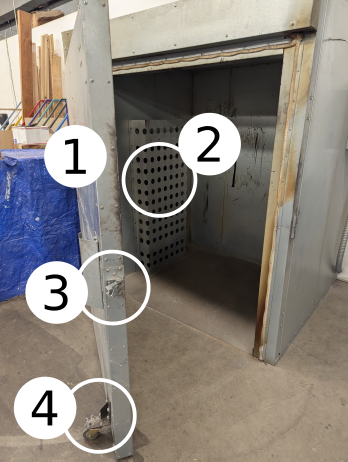
- Door
- Heating elements (behind the perforated metal screen, on both sides of the interior of the oven)
- Door latch
- Door caster
Large Oven Controller
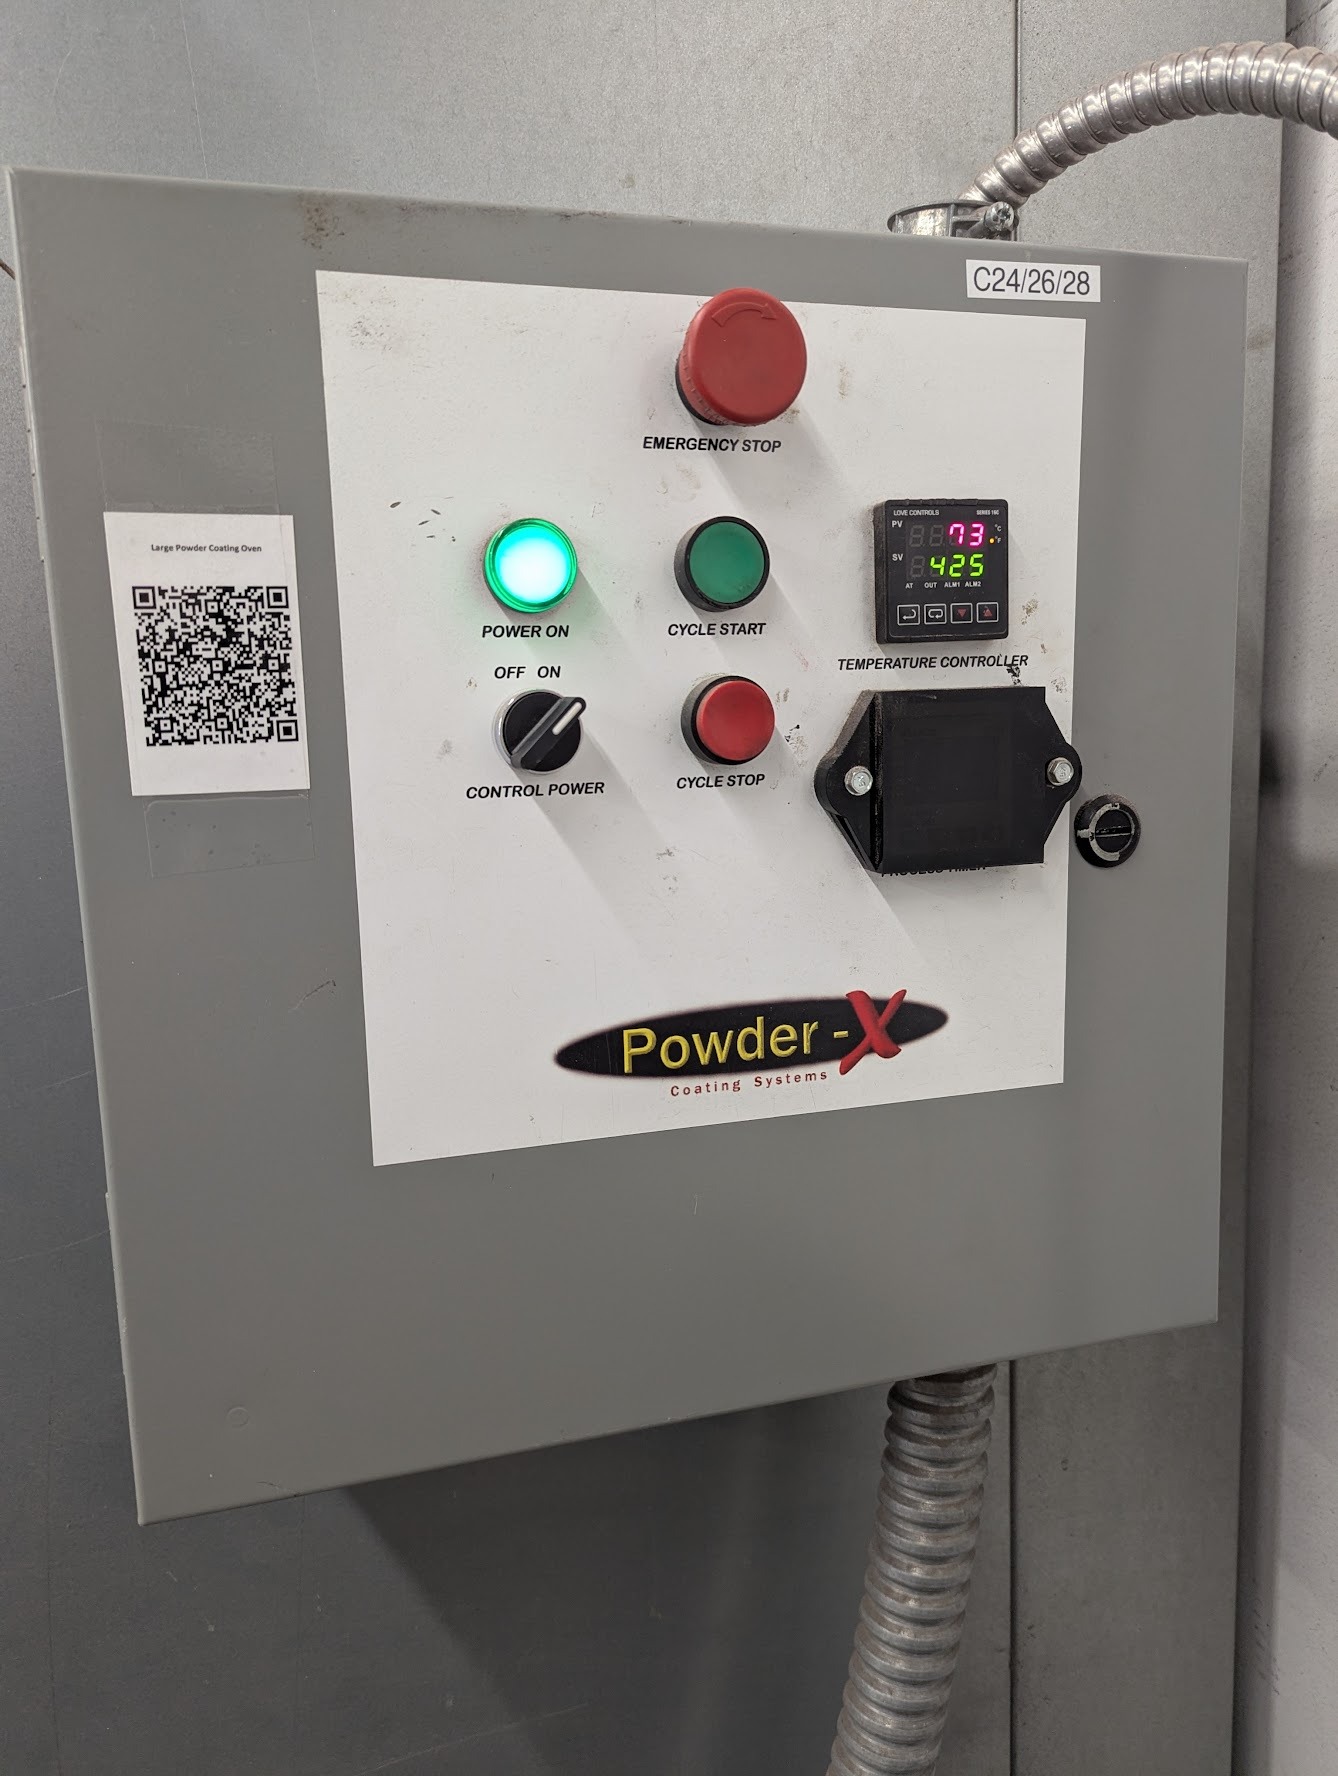
- Emergency Stop Button (rotate counter-clockwise to release)
- Power On Indicator
- Cycle Start Button
- Cycle Stop Button
- Control Power Switch
- Temperature Controller
- Timer Indicator (bottom right, below temp controller)
Safety
- Always wear protective insulated oven gloves when inserting or removing items from the hot oven.
- Unplug the small oven from the outlet when not in use and before cleaning. To disconnect, turn the control to OFF before removing the plug. Always hold the plug - never pull the cord.
- Clean,
safety gogglesdry, andauncoatedNIOSH-approvedconductiverespiratormetals that can withstand curing temps arerecommendedpermittedwhen(e.g.powdersteel,coating.aluminum,Tool AnatomyThermostat dialbrass)Selector dialIndicator lightTimer dialGlass doorBake trayWire rackBake tray handle
For more details, seeManuals.Tool SafetyAlways wear protective insulated oven gloves when insertingFlammable orremovingtoxicitemsmaterialsfrom(orthecoatingshotonoven.top of metal) are prohibited
ToolBasicCareOperationCleaningStartup
- &
Unplug the appliance and allow to cool before cleaning.Clean appliance interior with a damp cloth.The crumb tray can be removed for easier cleaning by pulling out from the front under the door.To clean the appliance, wipe with soft cloth or sponge dipped in neutral cleaning solution.
Do not use a hard brush or abrasive cleaners like thinner or solvent on oven surfaces.InspectionBefore you start using the oven you are expected to do an initial inspection and assess its readiness for use.Ensure that there is enough ventilation around the oven (at least four inches of space on all sides).Ensure that the oven is completely dry before use.
UsageOperationTypical curing temperatures are around 400 degrees F. Anything that cannot handle such temperatures (rubber seals, grease, paint, etc.) must be removed before putting it in the oven.
- Twist the Emergency Stop button to ensure it is in the "out" position.
- Rotate the Control Power switch to the ON position
- Using the up-down chevron buttons on the temperature controller, adjust the green temperature set point as desired (usually around 400F)
- Press the green "Cycle Start" button. You should hear a "kerchunk" sound as the controller switches on power to the heating elements.
- Monitor the oven as it comes up to temperature. When the red value (measured temperature) on the temperature controller is a few degrees away the green value (set point), you can use the oven.
- Carefully open and swing the latch bar free of the door - it can catch on the frame and prevent the door from opening.
- Quickly roll the door open, insert your project, and close and latch the door.
- When finished, take out your part in the same manner and follow the Cleanup steps below to turn off the oven.
- Ensure that there is enough ventilation around the oven (at least four inches of space on all sides).
- Ensure that the oven is completely dry
- Turn the thermostat dial clockwise to the desired temperature.
- Turn the selector dial to the desired position.
- Turn the timer dial clockwise to the desired cooking time.
- The indicate light will light up until the desired temperature is reached.
- Transfer the whole rack in and out - allow parts to cool before putting them on or taking them off, and before cleaning.
- When the cooking procedure is done, turn the timer back to turn off the oven.
Large Oven
Small Oven
AFTERCleanup
USELarge Oven
- Move the control power switch to the OFF position
- Press the Emergency Stop button
- Double check inside the oven and remove any project materials or debris
- Leave the oven door closed and latched
Small Oven
- Turn off the oven to allow it to cool off.
- Set the selector dial to off position.
- Unplug the
applianceoven - Once the
outlet.oven is cool, clean the interior with a damp cloth or paper towel
fromDo not use a hard brush or abrasive cleaners like thinner or solvent on oven surfaces.
Dustproof