# Tool Tutorial

### Class Handout

The class handout for basic laser operation: [laser\_101-basic\_operation.pdf](https://wiki.protohaven.org/attachments/195)

### Old Tutorial (Possibly Out of Date)

A laser cutter is used to mark, engrave, or cut a wide variety of materials. They work a lot like printers do, where you send a graphic to print. Instead of ink, the laser uses heat to transfer the image onto the material.

<p class="callout danger">Do not use prohibited materials in the laser (see [Material Safety](https://wiki.protohaven.org/books/tool-guides/page/materials) for allowed and prohibited materials)  
</p>

<p class="callout warning">Stay by the laser while it is running!</p>

### Tool Anatomy

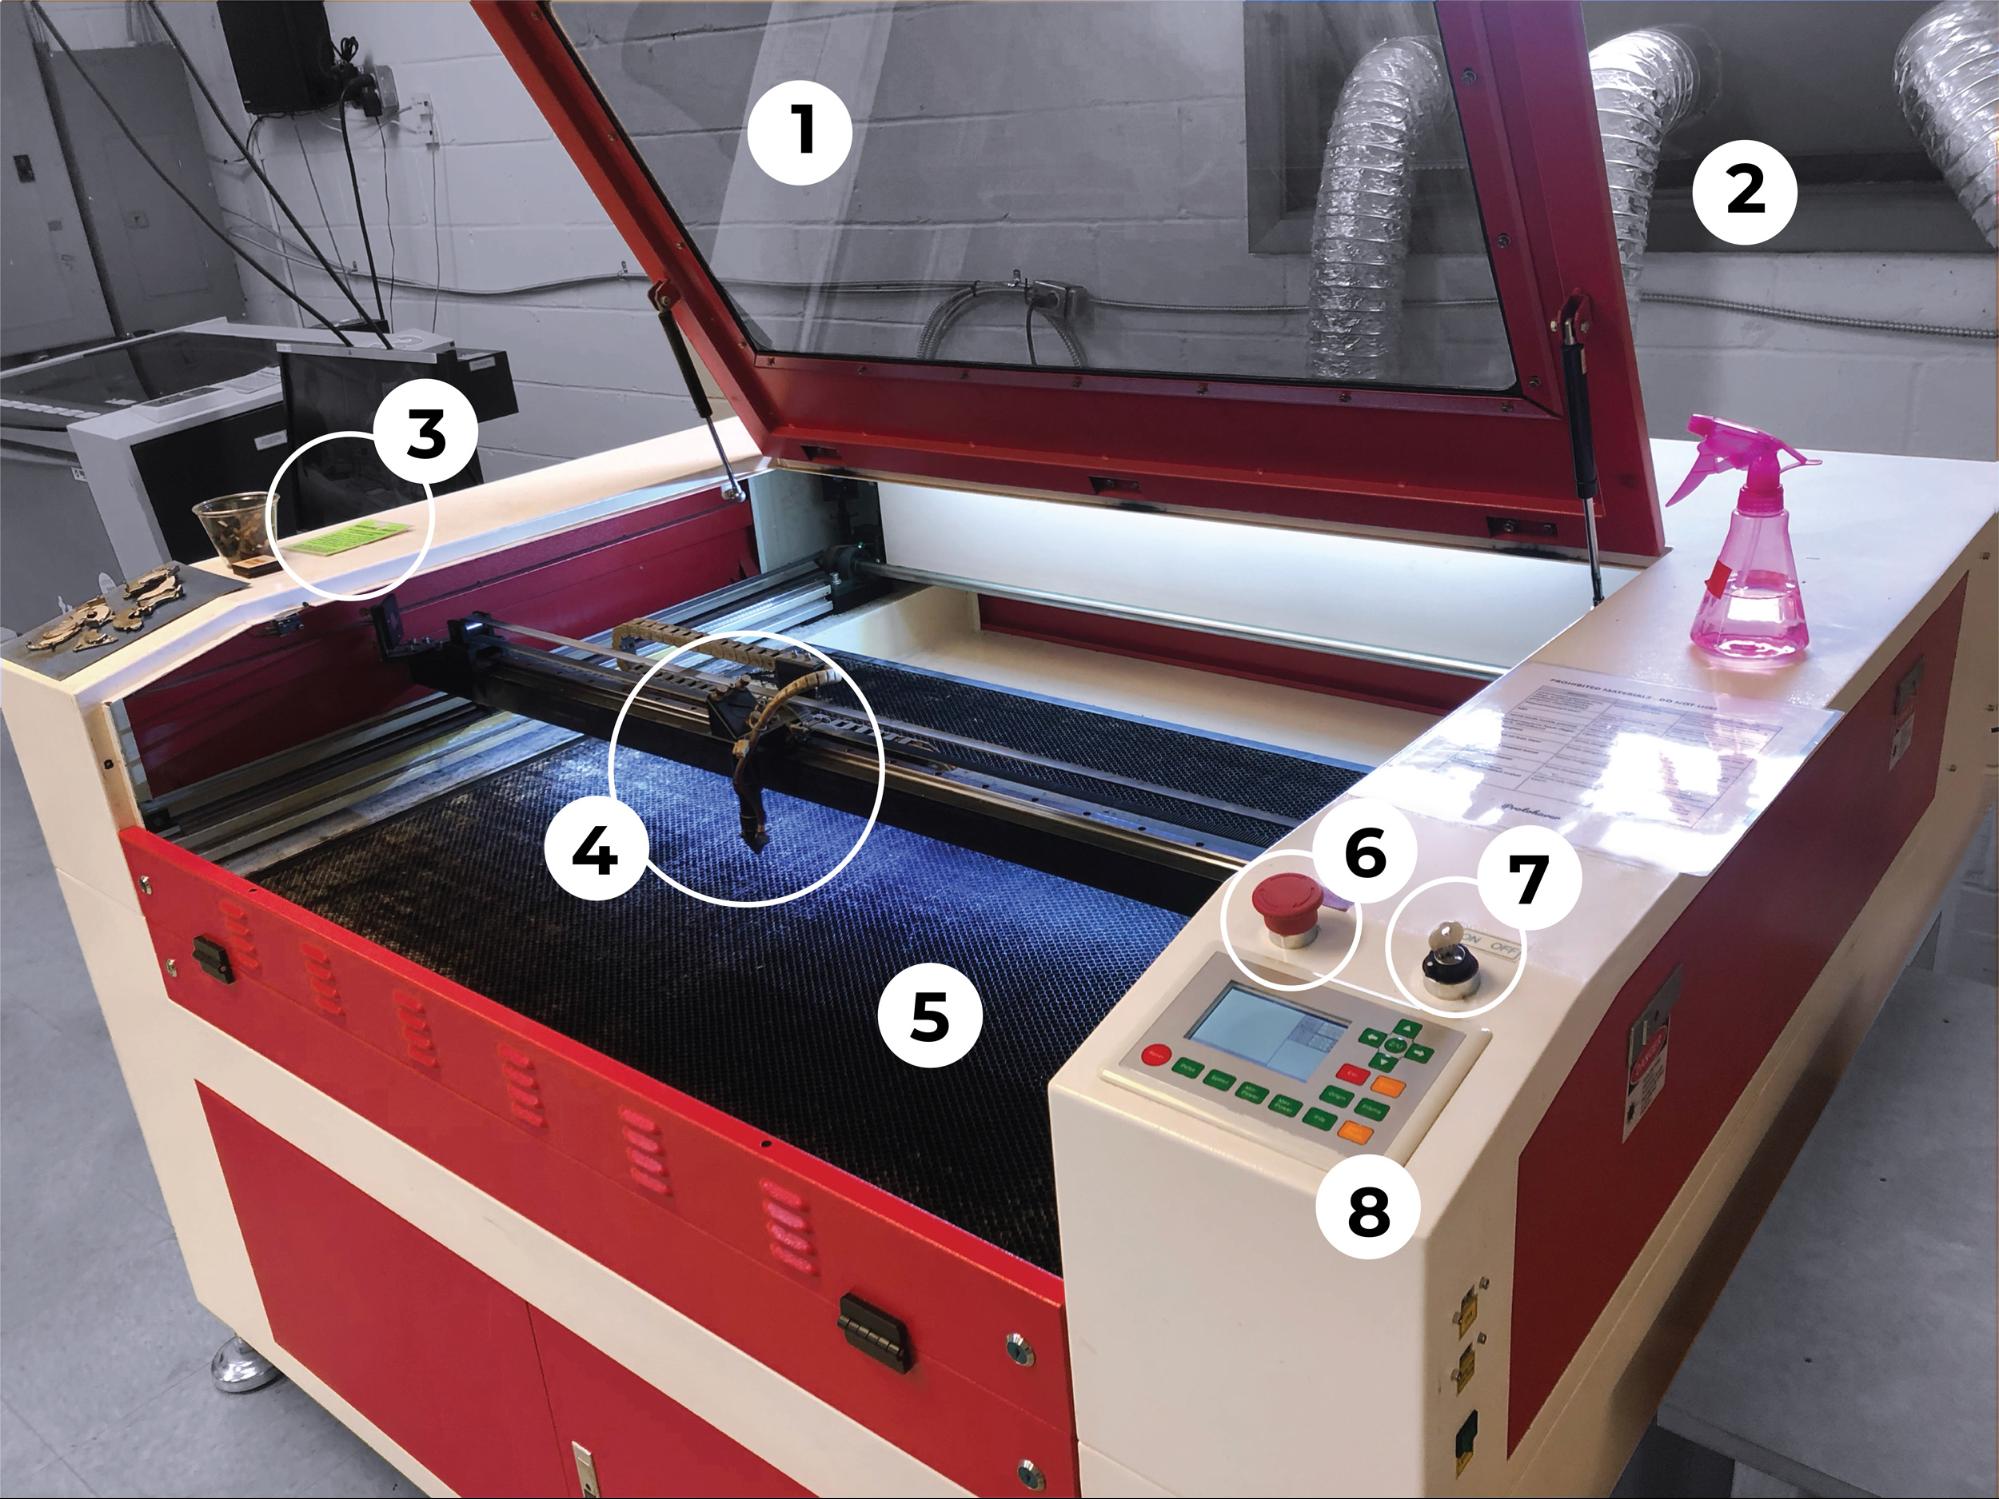
[![large_format_laser_tool_tutorial_image14.jpg](https://protohaven.org/wiki/_media/tools/large_format_laser_tool_tutorial_image14.jpg "large_format_laser_tool_tutorial_image14.jpg")](https://protohaven.org/wiki/_detail/tools/large_format_laser_tool_tutorial_image14.jpg?id=tools%3Alaser_rabbit%3Astart "tools:large_format_laser_tool_tutorial_image14.jpg")

<div class="section_highlight_wrapper" id="bkmrk-lid---absorbs-the-la"><div class="level3">1. <div class="li">Lid - Absorbs the laser radiation and must be closed when running a job</div>
2. <div class="li">Exhaust - Allows for the efficient removal of fumes and particulate</div>
3. <div class="li">Maintenance Tag - Manually tracks the usability status with Green/Yellow/Red cards</div>
4. <div class="li">Lens Carriage - Houses the mirror, lens, and air assist</div>
5. <div class="li">Cutting Bed - 1200 x 900mm (~47” x 35”) Consists of a removable, magnetic honeycomb tray. Seated properly, it should feel stable &amp; secure</div>
6. <div class="li">Emergency Stop - Reserved for emergencies. To deactivate and reset, you must twist the spring-loaded knob.</div>
7. <div class="li">Power Switch - Key switch turns the machine on and off</div>
8. <div class="li">Control Panel - LCD interface with commands to operate the laser</div>

</div></div>### Control Panel

[![](https://protohaven.org/wiki/_media/tools/large_format_laser_tool_tutorial_image10.png)](https://protohaven.org/wiki/_detail/tools/large_format_laser_tool_tutorial_image10.png?id=tools%3Alaser_rabbit%3Astart "tools:large_format_laser_tool_tutorial_image10.png")

<div class="section_highlight_wrapper" id="bkmrk-jog-x-axis-and-y-axi"><div class="level3">1. <div class="li">Jog X-axis and Y-axis</div>
2. <div class="li">Adjust Z-Axis</div>
3. <div class="li">Exit Menu/Return to main screen</div>
4. <div class="li">Select menu item</div>
5. <div class="li">Set Job Origin</div>
6. <div class="li">Trace the footprint of a job to check its size and placement</div>
7. <div class="li">Reset machine, Abort Job</div>
8. <div class="li">Pulse the laser to mark its precise location</div>
9. <div class="li">Adjust speed (mm/sec)</div>
10. <div class="li">Adjust power (0-100%) for the areas the laser approaches a node/edge</div>
11. <div class="li">Adjust power (0-100%) for the areas where the laser is mid-cut/mid line</div>
12. <div class="li">Retrieve file sent to the machine (job queue)</div>
13. <div class="li">Start job, pause job, resume job</div>

</div></div>### Tool Safety

#### Common Hazards

<div class="section_highlight_wrapper" id="bkmrk-fire-toxic-fumes-len"><div class="level3"><div class="table sectionedit9"><table class="inline"><thead><tr class="row0"><th class="col0">Fire</th><th class="col1">Toxic Fumes</th><th class="col2">Lens Collision</th></tr></thead><tbody><tr class="row1"><td class="col0">Listen for the exhaust. It should automatically turn on with the laser.</td><td class="col1">Be mindful of the safety of your cutting material.</td><td class="col2">Load material with care.</td></tr><tr class="row2"><td class="col0">Vacuum beneath the cutting bed to prevent flammable build-up.</td><td class="col1">Avoid chlorinated plastics and other prohibited material on the list.</td><td class="col2">Be mindful when moving the cutting bed to vacuum.</td></tr><tr class="row3"><td class="col0">Avoid foam and other prohibited material.</td><td class="col1">Off-gassing dangerous fumes like chlorine and cyanide is always a concern.</td><td class="col2">Ensure material is flat and will not collide with the lens carriage during operation.</td></tr></tbody></table>

</div></div></div><p class="callout warning">Always pause the laser if you need to step away from the machine!</p>

#### Prohibited Materials

<p class="callout danger">Do not use prohibited materials in the laser (see [Material Safety](https://wiki.protohaven.org/books/tool-guides/page/materials) for allowed and prohibited materials)</p>

<div class="section_highlight_wrapper" id="bkmrk-material-danger-chlo"><div class="level3">  
</div></div>### Inspection

Before you start using the tool you are expected to do an initial inspection and assess its readiness for use.

### Setup

**RASTER VS. VECTOR** Rastered data is an image that is made of pixels. Much like an inkjet printer, the laser will scan the artwork on a scale from black to white. The laser will vary the number of dots it fires depending on the tone of each pixel.

Common file formats like .jpeg, .gif, and .png are all rastered data.

Vectored data is made of paths that form lines and shapes. They contain mathematical data that allows the laser to trace the path like following coordinates on a map. This allows the laser to cut or score a line as well as etch a filled shape.

Common file formats like .ai, .dxf, and .svg are all vectored data.

<div class="section_highlight_wrapper" id="bkmrk-power-on-the-laser-i"><div class="level2">1. <div class="li">Power on the laser</div>
2. <div class="li">Import your file into Lightburn</div>
3. <div class="li">Set the job origin in Lightburn</div>
4. <div class="li">Check the layer mode</div>
5. <div class="li">Adjust the speed and power settings</div>
6. <div class="li">Send your file to the Laser</div>

</div></div>#### Lightburn Setup

[![300](https://protohaven.org/wiki/_media/tools/large_format_laser_tool_tutorial_image18.png "300")](https://protohaven.org/wiki/_detail/tools/large_format_laser_tool_tutorial_image18.png?id=tools%3Alaser_rabbit%3Astart "tools:large_format_laser_tool_tutorial_image18.png") Lightburn accepts a range of file formats.

Supported vector files: .ai .pdf .dxf .svg .lbrn

Supported image files: .jpg .jpeg .png .tif .tiff .bmp

<div class="section_highlight_wrapper" id="bkmrk-%C2%A0import-your-file-in"><div class="level4">1. <div class="li">[![200](https://protohaven.org/wiki/_media/tools/large_format_laser_tool_tutorial_image11.jpg "200")](https://protohaven.org/wiki/_detail/tools/large_format_laser_tool_tutorial_image11.jpg?id=tools%3Alaser_rabbit%3Astart "tools:large_format_laser_tool_tutorial_image11.jpg") Import your file into Lightburn.</div>
2. <div class="li">[![200](https://protohaven.org/wiki/_media/tools/large_format_laser_tool_tutorial_image1.png "200")](https://protohaven.org/wiki/_detail/tools/large_format_laser_tool_tutorial_image1.png?id=tools%3Alaser_rabbit%3Astart "tools:large_format_laser_tool_tutorial_image1.png") Set the job origin.</div>
3. <div class="li">[![200](https://protohaven.org/wiki/_media/tools/large_format_laser_tool_tutorial_image9.png "200")](https://protohaven.org/wiki/_detail/tools/large_format_laser_tool_tutorial_image9.png?id=tools%3Alaser_rabbit%3Astart "tools:large_format_laser_tool_tutorial_image9.png") Check the layer mode:</div>
    - <div class="li">fill—fills a vector shape to etch</div>
    - <div class="li">line—traces along a vector line</div>
    - <div class="li">images—will only etch and optimize for a rastered photo</div>
4. <div class="li">Adjust the speed and power settings.</div>
5. <div class="li">[![200](https://protohaven.org/wiki/_media/tools/large_format_laser_tool_tutorial_image12.png "200")](https://protohaven.org/wiki/_detail/tools/large_format_laser_tool_tutorial_image12.png?id=tools%3Alaser_rabbit%3Astart "tools:large_format_laser_tool_tutorial_image12.png")Send the file to the laser, keeping the filename “LIGHTBRN”. This saves over old job files and helps maintain a manageable memory in the machine’s job queue.</div>

</div></div>#### Common Cut Settings

<div class="section_highlight_wrapper" id="bkmrk-material-thickness-p"><div class="level4"><div class="table sectionedit15"><table class="inline"><thead><tr class="row0"><th class="col0">Material</th><th class="col1">Thickness</th><th class="col2">Power(%)</th><th class="col3">Speed (mm/s)</th></tr></thead><tbody><tr class="row1"><td class="col0">Bass Wood</td><td class="col1">1/8“</td><td class="col2">50</td><td class="col3">15</td></tr><tr class="row2"><td class="col0">Balsa Wood</td><td class="col1">1/8”</td><td class="col2">50</td><td class="col3">45</td></tr><tr class="row3"><td class="col0">Birch Plywood</td><td class="col1">3/16”</td><td class="col2">70</td><td class="col3">10</td></tr><tr class="row4"><td class="col0">Acrylic</td><td class="col1">1/4“</td><td class="col2">55</td><td class="col3">12</td></tr><tr class="row5"><td class="col0">Leather</td><td class="col1">1/16”</td><td class="col2">70</td><td class="col3">12</td></tr></tbody></table>

</div></div></div>#### Common Cut Settings

<div class="section_highlight_wrapper" id="bkmrk-material-thickness-p-1"><div class="level4"><div class="table sectionedit16"><table class="inline"><thead><tr class="row0"><th class="col0">Material</th><th class="col1">Thickness</th><th class="col2">Power(%)</th><th class="col3">DPI</th></tr></thead><tbody><tr class="row1"><td class="col0">Acrylic</td><td class="col1">55</td><td class="col2">300</td><td class="col3">391</td></tr><tr class="row2"><td class="col0">Anodized Aluminum</td><td class="col1">25</td><td class="col2">325</td><td class="col3">391</td></tr><tr class="row3"><td class="col0">Cermark</td><td class="col1">50</td><td class="col2">300</td><td class="col3">362</td></tr><tr class="row4"><td class="col0">Granite</td><td class="col1">85</td><td class="col2">150</td><td class="col3">299</td></tr><tr class="row5"><td class="col0">Glass</td><td class="col1">12</td><td class="col2">350</td><td class="col3">462</td></tr><tr class="row6"><td class="col0">Leather</td><td class="col1">45</td><td class="col2">325</td><td class="col3">299</td></tr><tr class="row7"><td class="col0">Powder Coated Metal</td><td class="col1">25</td><td class="col2">325</td><td class="col3">299</td></tr><tr class="row8"><td class="col0">Romark</td><td class="col1">12</td><td class="col2">325</td><td class="col3">254</td></tr><tr class="row9"><td class="col0">Wood</td><td class="col1">14</td><td class="col2">350</td><td class="col3">300</td></tr></tbody></table>

</div></div></div>### Operation

<div class="section_highlight_wrapper" id="bkmrk-listen-for-the-exhau"><div class="level2">1. <div class="li">Listen for the exhaust to ensure that it is on</div>
2. <div class="li">Check that your material is safe to cut</div>
3. <div class="li">Load material</div>
4. <div class="li">Focus the lens on your material</div>
5. <div class="li">Set the origin on the laser</div>
6. <div class="li">Check the footprint of your job</div>
7. <div class="li">Start your file</div>
8. <div class="li">Monitor the machine until the job is complete and cleanup</div>

</div></div>### Focusing the Lens

<div class="section_highlight_wrapper" id="bkmrk-select-z-%28control-pa"><div class="level3">1. <div class="li">Select Z (Control Panel 2) to change to bed height control.</div>
2. <div class="li">Use ↔ (Control Panel 1) to align the lens carriage to the focus gauge (Right raises bed, left lowers)</div>
3. <div class="li">Select Esc (Control Panel 3) to return to the main menu.</div>

</div></div>### Setting the Origin

<div class="section_highlight_wrapper" id="bkmrk-use-the-directional-"><div class="level3">1. <div class="li">Use the directional arrows (Control Panel 2) to jog the lens carriage to the desired location.</div>
2. <div class="li">Optional: Press Pulse (Control Panel 8) to verify the exact location.</div>
3. <div class="li">Select Origin (Control Panel 5) to set the Origin</div>
4. <div class="li">Select Frame (Control Panel 6) to check the footprint of job. (framing can also be managed from Lightburn control)</div>

</div></div>### Cleanup

<div class="section_highlight_wrapper" id="bkmrk-power-off-the-laser-"><div class="level2">1. <div class="li">Power off the Laser</div>
2. <div class="li">Reset any modified computer settings to default</div>
3. <div class="li">Vacuum the interior so material does not build up beneath the honeycomb</div>
4. <div class="li">Note any maintenance needs or concerns on the tag and at protohaven.org/maintenance</div>
5. <div class="li">Recycle waste in the single-stream scrap bins</div>
6. <div class="li">Empty the bin when full</div>

</div></div>#### Scrap Breakdown

There are two black scrap bins reserved for laser waste. Maintaining these is a shared, communal responsibility.

When you notice the scrap bins are full, it’s time to take it to the dumpster out back. Feel free to enlist a helping hand.

If you notice valuable material while emptying the bins, use your judgement to selectively save a few pieces or take it home for your personal use.

### Troubleshooting

<div class="section_highlight_wrapper" id="bkmrk-problem-likely-cause"><div class="level2"><div class="table sectionedit23"><table class="inline"><thead><tr class="row0"><th class="col0">Problem</th><th class="col1">Likely Cause</th><th class="col2">Potential Solution</th><td class="col3"> </td></tr></thead><tbody><tr class="row1"><td class="col0" rowspan="2">Cut does not go through the material</td><td class="col1">The speed is too fast or the power is too low</td><td class="col2">Use a scrap piece of the same material to make a series of tests with incremental adjustments until you find the sweet spot</td><td class="col3"> </td></tr><tr class="row2"><td class="col0">The lens or mirror is fogged</td><td class="col1">Alert the staff or volunteer on duty to the issue</td><td class="col2"> </td></tr><tr class="row3"><td class="col0" rowspan="2">Slop in the frame</td><td class="col1">The origin in Lightburn is not set appropriately</td><td class="col2">Adjust the origin point in Lightburn</td><td class="col3"> </td></tr><tr class="row4"><td class="col0">The artwork is too large for the cutting bed: 1200 x 900mm (~47 x 35”)</td><td class="col1">Adjust the overall artwork size</td></tr><tr class="row5"><td class="col0">Burn marks on the back of the material</td><td class="col1">Hot debris is scorching the edges of the cut lines</td><td class="col2">Lay a sheet of paper beneath the material and the bed or line it with a laser-safe vinyl free tape</td><td class="col3"> </td></tr><tr class="row6"><td class="col0">No visible cutting happening</td><td class="col1">Lid safety switches not engaged, or software issue</td><td class="col2">Confirm the lid safety switches click when the lid closes. Turning the machine off and on again may also help if that isn't the problem.</td><td class="col3"> </td></tr></tbody></table>

</div></div></div>#### Special Setups

<div class="section_highlight_wrapper" id="bkmrk-register-your-materi"><div class="level4">- <div class="li">Register your material on the cutting bed using magnets or tape when doing a production run.</div>
- <div class="li">Use the front pass-through door for extra long pieces.</div>
- <div class="li">Use surface treatments like Cermark or paint to etch designs onto metal surfaces.</div>

</div></div>