Sheet Metal Shear Tool Tutorial
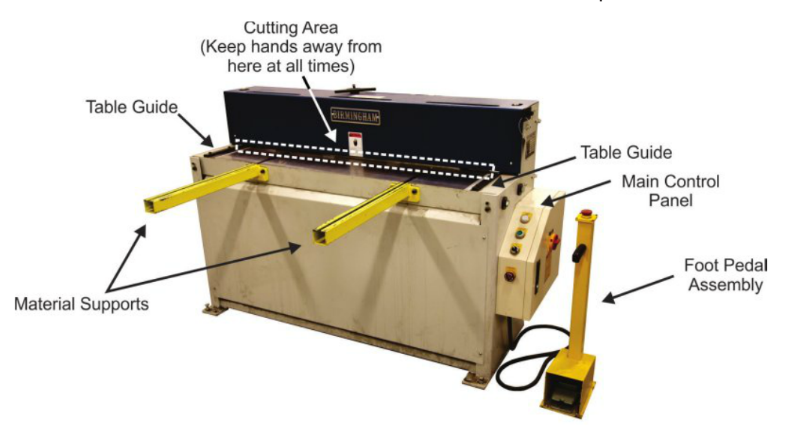
The hydraulic shear is used to cut sheet metal to accurate dimensions quickly. This is a powered machine that uses a blade to shear the metal with hydraulic force. It is operated by a foot pedal so the operator’s hands are away from the blade when shearing operations are performed. The machine has a fence to create continuous and accurate cuts at user specified dimensions.
Safety Precautions and Features
- Keep hands away from pinch points and clear of all cutting areas.
- Sheet metal has sharp edges and gloves are suggested when working with sheet metal.
- Do not exceed the maximum capacity (16ga aluminum or mild steel)
- Leave foot off the pedal until hands are clear and you are ready to operate the machine
- Do not put your hands under your material. They can be crushed under your material even if away from the blade
When shearing small pieces of material use a push stick. Do not have your hands under push sticks when shearing as they could be crushed. - Do not push pieces of metal (that did not fall out the back after being cut) through with your fingers.
- Always use a push stick to push pieces through the cutting area
- Never have your fingers under the cutting area.
- Before operating the machine make sure that no one is behind it or in an area of danger
- The sheared metal will have a sharp burred edge. Use gloves to handle the sheet metal.
Adjustments
Adjusting the Fence
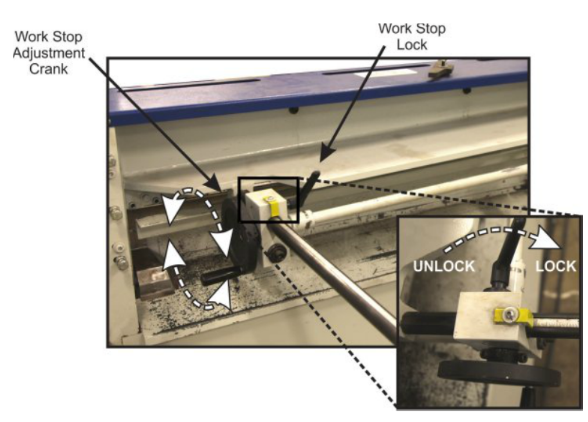
- Release both work stop locks to allow fence movement.
- Turn the crank handle until the yellow gauge reads at the dimension that is desired.
- Ensure that the desired position is reached on both measurement points on the fence.
- Tighten both work stop locks to ensure this position does not move.
Do not rely on the fence for shearing precision dimensions. Expect slight variation between the dimension measured with the fence and the actual cut dimension.
Adjusting Modes
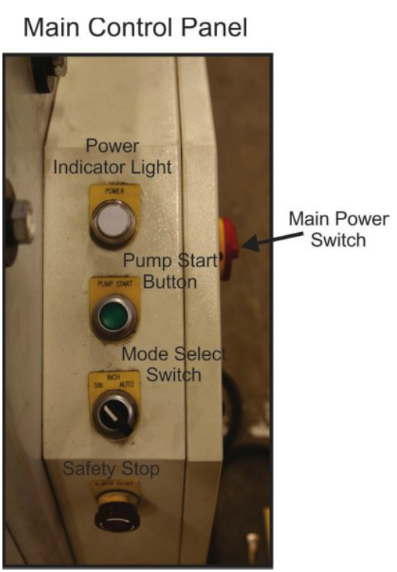
The hydraulic shear has 3 different cutting modes: SIN, INCH, and AUTO.
- SIN is short for single. In this mode when you depress the foot pedal the shear will complete one complete cutting cycle and then park at the top position.
- INC is short for incremental. When the pedal is tapped the blade will lower incrementally. If the pedal is depressed fully it will contiually run through cutting cycles.
- AUTO - The shear will keep running through cutting cycles as long as the pedal is depressed.
Basic Operation
- Adjust work stop fence to desired location.
- Turn machine ON by rotating the main power switch to the ON position.
- Start the pump by pressing the PUMP START button on the main panel.
- Select the desired mode cutting mode: SIN, INCH, or AUTO.
- Release the stop on the main panel by rotating it clockwise. It is released when it pops out.
- Place material on the machine table and ensure that it is pushed all the way back against the work stop fence and aligned square with the table guide.
- Release the stop on top of the foot pedal assembly by rotating it clockwise. It is released when it pops out.
- Ensure that everything is clear of the cutting area other than your material and that your hands are not located under your material.
- Push down on the foot pedal.
- Release the foot pedal.
- Remove material.
- When all operations are complete, activate the main panel and foot pedal assembly stops by pressing them in.
- Stop the pump by pressing the pump start button once more.
- Turn main power switch to the OFF position.
- Clean up scraps behind the machine.
Notes
- Angles can be cut if a fixture is used to set against the table guide at the desired angle. This piece would then guide your work to be cut at the desired angle. Find a shop tech for assistance in setting up a fixture for cutting angles.
- Malleable plastics can also be cut on the hydraulic shear such as PETG, polycarbonate, polypropylene, and Delrin as long as the thickness is under 1/8”
- Cut a test piece first to ensure your work stop distance is accurate enough for your needs
- Use a push stick on top of your material to hold it down
- Clamp to the material supports to prevent material from shifting.