Welding - Spot Welder
Spot Welder Tool Tutorial
A spot welder is part of a metal joining process in which parts to be welded are held together under pressure by electrodes. Current is then applied and the resistance between the 2 sheets of metal causes a bonding only at the contact point and creates a small weld. The weld is made by a combination of heat, pressure, and time. The spot welder will weld steel of 16 gauge or thinner.
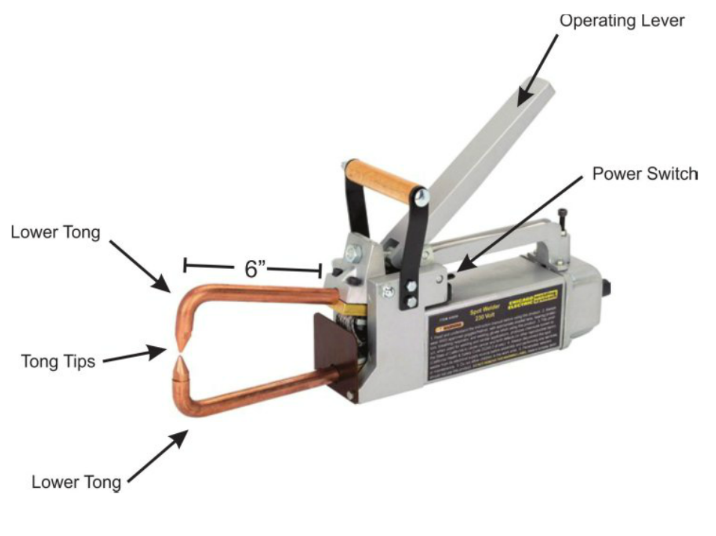
Safety Precautions and Features
- Do not touch live electrical parts
- Remove all flammables within the area of the weld
- Do not spot weld where flying sparks can strike flammable material
- Watch for fire, and keep a fire extinguisher nearby
- After completion of work, inspect the area to ensure it is free of sparks, glowing embers, and flames
- Do not exceed the equipment rated capacity
- Wear dry, hole-free insulating gloves and body protection
- Keep cords dry, free of oil and grease, and protected from hot metal and sparks.
- Frequently inspect the input power cord and ground conductor for damage or bare wiring
- Turn off all equipment when not in use
- Do not touch hot parts bare handed
- Do not breathe the fumes
- Do not put hands between tips
Adjustments
The tong tips will become distorted and will flatten out from the heat and pressure involved during operation. The tips will need to be
dressed by a staff member or shop tech.
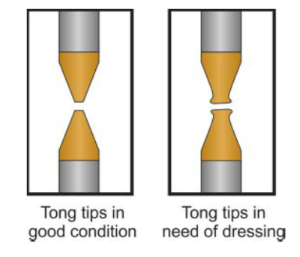
Adjustments can be made to adjust tong pressure. Find a staff member or shop tech to adjust these settings.
Here is what to look for to determine if the tong pressure is too weak or too strong:
- If the tongs pressure is too weak, and the workpieces are loose when the tongs close, severe
arcing will occur between the workpieces and no weld can be made - If the tongs pressure is too strong, the weld will dimple, and material will splash out around the
weld area
Basic Operation
- Brush the metal to remove oxidation.
- Clamp both pieces together with a C-clamp.
- Plug spot welder in.
- Push the operating lever down so the tongs apply pressure directly to the spot where a weld is desired.
- Flip and hold the power switch to the left or right and hold until the metal becomes red hot.
- Release the power switch and then release the operating lever.
- Unplug the spot welder when all welding operations are complete.
Notes
Here is a matrix for basic troubleshooting with the spot welder. Find a staff member or shop tech for any adjustments that need to be made to the spot welder. Do NOT attempt to make these adjustments yourself.
| Problem | Solution |
| No Weld Output |
Replace Line fuse or reset line circuit breaker. Reset circuit breaker and check power/start switch. Clean material to be welded and clean tongs and tong holders. |
| Longer than normal weld time required |
Dress or replace tips Clean workpieces Adjust tong pressure Clean ends of tongs and tong holders |
| Burn through at point of weld |
Shorten weld time Adjust tong pressure Dress or replace tips Realign |