Welding - Oxy-Acetylene Torch
Oxy-Acetylene Torch Tool Tutorial
Oxygen and Acetylene in conjunction with a torch setup are used for cutting and welding steel and other metals. Some other fuel gasses can be used with Oxygen for cutting, but many cannot be used for welding.
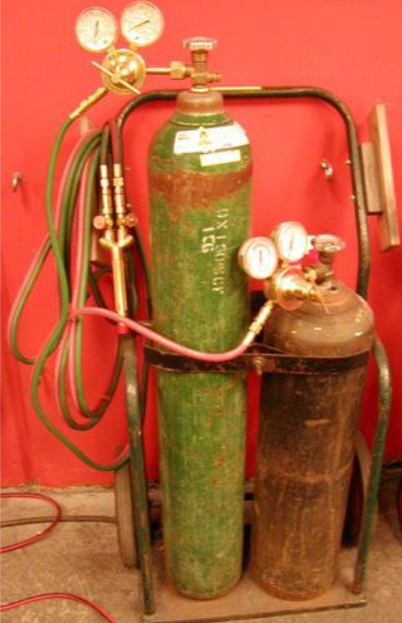
Safety
OXYGEN AND ACETYLENE RIGS POSE THE RISK OF FIRE, EXPLOSION, SERIOUS INJURY OR DEATH UNLESS USED CORRECTLY. PLEASE FOLLOW ALL PROCEDURES STRICTLY TO ENSURE SAFETY.
BE SURE all connectors on the whole welding rig are tight to avoid leaks and potential fire or explosion.
Gas Cylinders
COMPRESSED GAS CYLINDERS CAN CAUSE SEVERE PROPERTY DAMAGE, INJURY AND DEATH. STRICT SAFETY PROCEDURES MUST BE FOLLOWED.
- Compressed gasses are under high pressure. Tanks should be kept upright and strapped or chained, and bottles should be capped or attached to a regulator. If you find any tanks in an unsecure condition, please notify staff or shop tech immediately.
- Only shop techs and staff should move or change tanks. Notify the nearest shop tech if a tank is empty.
- Keep all sparks, heat, electricity and heavy activity away from tanks.
- Never EVER weld or cut a gas cylinder, even if you think it is empty.
- Oxygen is under extremely high pressure in the tank, and can cause other materials to spontaneously combust and explode. Always make sure the tank is handled gently and is in a secure position, as described above.
- Acetylene, while not under high pressure, is very unstable and prone to explosion. It should never reach over 15 p.s.i. hose pressure or under 40 p.s.i. tank pressure.
- Always make sure that tank valves are closed when not in use and never open both Oxygen and Acetylene tank valves at the same time unless you are lighting the torch.
Regulators
- Regulators should be attached to gas cylinders. Only staff and volunteer leadership should change out or install regulator systems.
- Regulators should be kept clean and dry at all times. They can be wiped down with dry rags only.
- If you suspect a leak, you can check yourself or ask a shop tech to do so. If you do it yourself, use Leak Check Solution to spray on regulators and look for continual bubbling. Do NOT use soapy water, as the ingredients in some soaps can act as fuel. Notify a shop tech on duty of any leaks that are not solved by tightening the bolting surface or are present on hoses or anywhere that is not a bolted joint.
- All hose lines should be bled and all valves closed after use. If you see a regulator not in use that shows its needles above zero, please bleed the lines or notify the tech on duty.
- If needles do not return to zero upon attempting to bleed the lines, notify the tech on duty.
Hoses
- Hoses should continually be checked for damage, and always kept out of harm’s way. Coil excess hose on the rig; do not keep it loose on the floor.
- Do not use a hose that looks damaged for any reason. If a hose appears damaged, shut down the rig and notify the shop tech on duty immediately.
Torch
- Torch should be very clean and not show any damage. If soot or damage is present, shut down the rig and notify the shop tech on duty.
- Torch can be wiped down with a dry rag only. Do not use water or solvents on the brass parts.
- Check all tips for soot, damage or clogged holes. If holes are clogged or unclean, use the tip cleaner while the tip is off of the torch.
- Check all torch knobs and connections to ensure they are closed before use. Bolted connections should not be able to be turned with fingers.
- Bolted connections should be closed lightly with a wrench after they have been made finger tight. The threads need to be sealed, but should not be tightly closed, as over tightening can damage them.
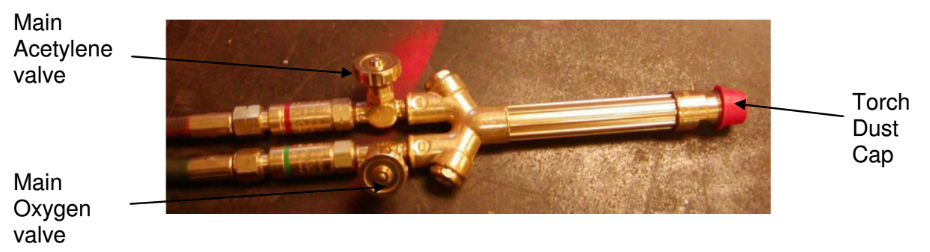
- Make sure that all hand turned knobs are closed when not in use. Never open both Oxygen and Acetylene valves at the same time unless lighting the torch.
- Keep all Oxy-Acetylene equipment away from your clothes and body. You can damage the more delicate parts by leaning against them, and leaking gases can collect near you and create fire and explosion.
Equipment Controls
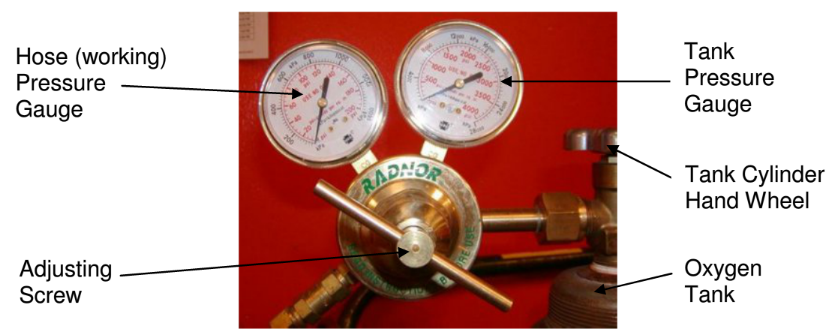
Tank & Regulators
Torch
Cutting Attachment - see page 4-21 in Victor Welding, Cutting and Heating Guide
Cutting Tip - see page 4-23 in Victor Welding, Cutting and Heating Guide
Welding Tip - page 4-24 in Victor Welding, Cutting and Heating Guide
Basic Operation
Safety Check
During the safety check, if you find anything not to the specifications below, it presents a potentially disastrous situation. Notify the shop tech on duty and do not use the Oxy Acetylene rig.
- Make sure tanks are upright, securely chained or strapped, and regulators are securely fastened.
- READ THE LABELS on the tanks. If there is no label or the tanks do not read oxygen and acetylene, do not use them and notify the shop tech on duty immediately.
- The gases should be attached as follows:
- The oxygen should be attached to a regulator with tank pressure numbers that reach to 4000 and to a green hose that leads to a valve on the bottom right of the torch labeled “O” or “OXY”.
- The acetylene should be attached to a regulator with tank pressure numbers that reach to 400 and to a red hose that leads to a valve on the bottom left of the torch that reads “F” or “FUEL”.
- The oxygen should be attached to a regulator with tank pressure numbers that reach to 4000 and to a green hose that leads to a valve on the bottom right of the torch labeled “O” or “OXY”.
- Look for excessive dirt or grease anywhere, and any damage or missing parts on the regulators.
- Check that all connections to torch, hoses, regulator, and tank are tight.
- Regulator screws should turn with one finger, indicating that the regulator valve is closed.
- All needles on gauges should be all the way down, touching the pin, not registering any pressure. If they are registering pressure, you can bleed the lines yourself or have a shop tech do it for you. If the needles do not fall after being bled, there may be regulator damage.
- Check the hoses thoroughly on both sides for any burns, deep cracks, or holes.
- The torch should have all valves closed.
OXYGEN AND ACETYLENE ARE SAFE WHEN USED CORRECTLY, BUT CAN START FIRES AND CAN BE HIGHLY EXPLOSIVE. FOLLOW ALL INSTRUCTIONS CAREFULLY AND DO NOT DEVIATE FROM SAFE OPERATION
Torch Settings for CUTTING
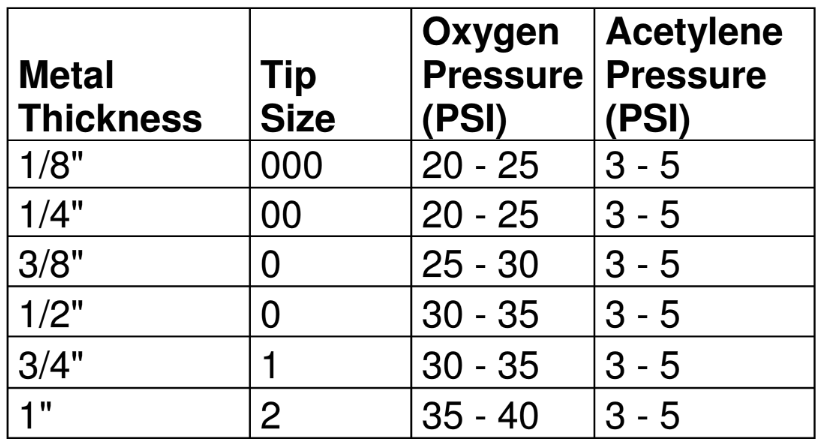
Torch Settings for WELDING
Assembling the torch
- Check all mating surfaces for dents or damage, and all o-rings for cracks or melting. Notify the nearest shop tech and do not use the torch if these are damaged.
- All threaded attachments should be screwed on finger tight and then tightened gently with a wrench until they reach a stopping point.
For Cutting: Bolt the top of the cutting attachment to the bottom of the torch body. Choose a cutting tip based on the thickness of the metal and attach it to the top of the cutting attachment.
For Welding: Choose a welding tip based on the thickness of the metal, and bolt it directly to the torch body.
Setting the gas pressure
Always stand to the side of the regulator when opening the tank hand wheels.
Oxygen
- Crack open the oxygen tank valve, and open it all the way (do not back off, leave it at the end of travel). Do not put your hand on top of the knob; turn the knob from the side to avoid injury. If the needle does not stay still, does not rise at all, or reads at a number above 2500 PSI, shut down the rig and notify the shop tech on duty.
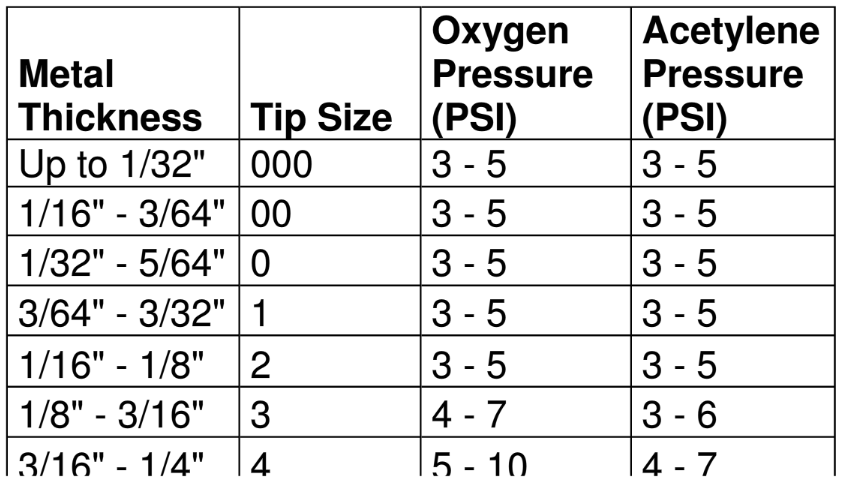
- Turn the adjusting screw clockwise until the needle on the working pressure gauge reaches the numbers listed for your tip size on the chart.
- If your metal thickness is on the high side for your tip range, use the higher numbers on the gas adjustment range. Use the low range if the thickness is low or in the middle (keeping numbers on the low side for the thickness usually helps to result in a cleaner cut).
- NEVER USE NUMBERS OUTSIDE THE RANGE OF YOUR TIP, regardless of the thickness of your metal.
- To get true working pressure, turn adjusting screw while the oxygen is flowing. Open both bottom and top valves on the cutting torch, or just the one valve for the welding tip. TURN OFF ALL VALVES WHEN COMPLETE.
Acetylene
- Crack open the acetylene valve and open it 1/4 - 1/2 turn ONLY. If the needle does not stay still, does not rise at all, or reads at a number above 2500 PSI, shut down the rig and notify the shop tech on duty.
- Turn the adjusting screw clockwise until the needle on the working pressure gauge reaches the number listed for your tip size on the chart.
- If your metal thickness is on the high side for your tip range, use the higher numbers on the gas adjustment range. Use the low range if the thickness is low or in the middle (keeping numbers on the low side for the thickness usually helps to result in a cleaner cut).
- NEVER USE NUMBERS OUTSIDE THE RANGE OF YOUR TIP, regardless of the thickness of your metal.
- If your metal thickness is on the high side for your tip range, use the higher numbers on the gas adjustment range. Use the low range if the thickness is low or in the middle (keeping numbers on the low side for the thickness usually helps to result in a cleaner cut).
- To get true working pressure, turn the adjusting screw while the acetylene is flowing. Open the acetylene knob slightly on the bottom left of the torch. MAKE SURE ALL TORCH VALVES ARE CLOSED WHEN COMPLETE.
Lighting the Torch and adjusting the Neutral flame
- Use Striker to light torch — NO OTHER starter
- #5 shade eye protection must be worn
- When assembling torch and tips at bolting surfaces, tighten with fingers until snug, then use wrench to ensure seal by turning until it stops.
Cutting
- Check to ensure all knobs on the torch are turned fully counterclockwise.
- Open the lower Oxygen knob all the way.
- Point the torch away from you and anything flammable. Open the Acetylene knob on the bottom left just a little (note: you may detect a garlic like smell that indicates the acetylene is flowing).
- Click the striker and light the torch.
- Turn the Acetylene knob counter clockwise SLOWLY until the turbulent part of the flame is approximately TWO INCHES from the Cutting Tip
- Reach up to the top Oxygen valve and turn it counter clockwise until all secondary flames disappear and preheating cones are both as bright and as sharp as possible. Be careful not to add too much Oxygen; the torch should sound quiet, with no hissing.
- Using the instructions on pages 7-49 through 7-50 of the Victor Welding, Cutting and Heating Guide, position the torch against the material and guide it to cut through the steel, ideally in one continuous motion.
- If you lose the cut at any point, lift the torch and release the Oxygen Jet, then return the torch to the very end of the cut, and resume the cut as though you were starting from the beginning.
- If you do not get through the material at any point in the first pass, DO NOT go over the cut again, as you will only further heat the steel and allow it to slump and weld together.
- When the cut is complete, you can move to begin another one or shut down the torch.
Never put the torch down when it is lit!
Turning off the torch:
- Turn off the acetylene knob on the bottom left, then the top oxygen knob.
- You may leave the oxygen knob on the bottom left open until you leave the area or finish the cutting session.
Welding
- Check to ensure all knobs on the torch are turned fully counterclockwise.
- Point the torch away from you and anything flammable. Open the Acetylene knob on the bottom left just a little (note: you may detect a garlic like smell that indicates the acetylene is flowing).
- Click the striker and light the torch.
- Turn the Acetylene knob counter clockwise SLOWLY until the turbulent part of the flame is approximately ONE INCH from the Welding Tip.
- Turn the oxygen valve on the right counter clockwise until all secondary flames disappear and the preheating cone is both as bright and as sharp as possible. Be careful not to add too much Oxygen; keep the cone bright.
- This flame will be more noisy than the one for cutting.
See also pages 5-33 through 5-34 of the Victor Welding, Cutting and Heating
Guide for a different technique for adjusting the neutral flame and diagrams of
the neutral flame.
Welding:
- Select a piece of copper coated steel filler rod, size 3/32” in diameter. The alloy code on the package should read R45, indicating a rod for gas welding mild steel without flux.
- Place the 2 pieces of metal you are going to weld sided by side on the foundry brick, with a gap about 1/32” at the starting end, and about 1/16” at the trailing end. With this thickness of material, the gap on the trailing end will close as the filler metal contracts while it cools during the welding process
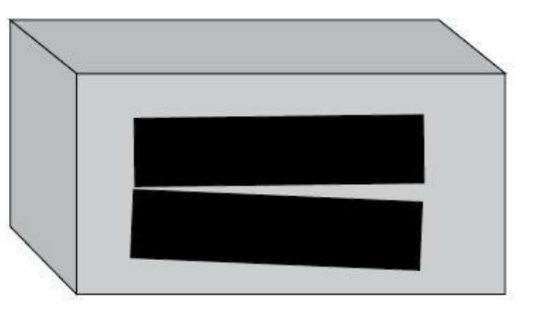
An alternate way of tacking the metal in place is described on page 6-35 of the Victor Welding, Cutting and Heating Guide.
Turning off the torch:
- Turn off the acetylene knob on the bottom left, then the top oxygen knob.
- You may leave the oxygen knob on the bottom left open until you leave the area or finish the cutting session.
If a leak or flashback occurs
Leak
- Turn off all valves on the torch and tank and notify the shop tech on duty.
- Do not use this equipment until it is repaired and cleared.
Flashback
A flashback is when flames appear anywhere on the torch or hoses, or you hear a loud whistling sound.
- Turn off torch valves immediately (you can skip the bottom oxygen if you are using the cutting torch).
- Turn off tank valves.
- Notify the shop tech on duty, and do not use this equipment until cleared.
Cleanup
Bleeding the lines at the end of your working session
- Make sure all torch valves are closed by checking the knobs to ensure they are turned clockwise all the way.
- Bleed the lines ONE GAS AT A TIME ONLY.
- Turn off the tank valve by turning it clockwise all the way.
- Find the knob(s) of that same gas on the torch and crack them open until both needles on the gauges fall counterclockwise back to the pin. Close the knobs.
- Turn the adjusting screw of that regulator counterclockwise until it becomes noticeably looser and you can turn it with one finger.
- Repeat with the other gas.
Never let both gases flow through the torch at once unless you are lighting it.
General cleanup
- Carefully hook the hoses onto the hose hanger.
- Return all tools and safety equipment to their proper locations.
- Sweep your work area thoroughly. Put all sweepings and hot metal in the steel scrap bucket, not in the regular trash.
Brazing
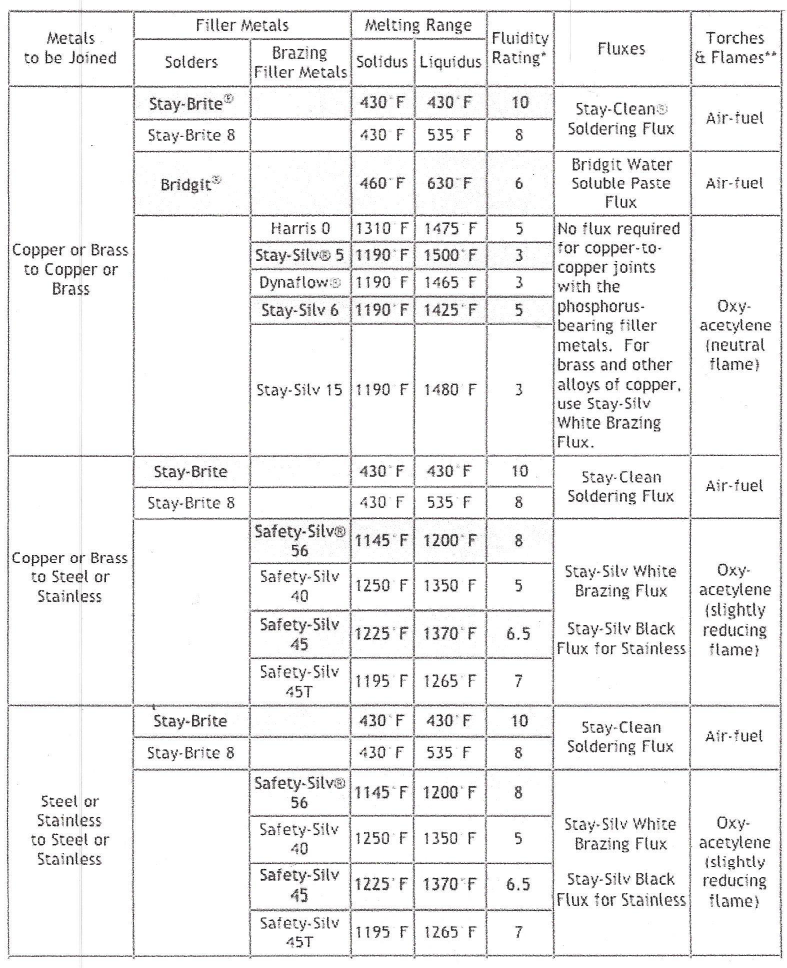
Brazing is a metal joining process utilizing gas/fuel torches and filler metals which melt above 840° F and below the melting point of the base metals. The filler metal is drawn into the joint by capillary attraction producing a sound, leak-proof connection. For most applications requiring high strength, high temperature bonds, which also provide a clean and neat final appearance brazing techniques offer quick and economical solutions. It’s about selecting the right tools and materials for a given application. Doors open, new possibilities come to light. Join dissimilar metals, work on a larger scale, add color and texture to your work. All this is possible with relatively inexpensive materials and equipment.
Resources
COOL LINKS
American Welding Society - http://www.aws.org
Charts and Equipment
Victor Equipment
http://www.thermadyne.com/victor/
Education
Wikipedia - http://en.wikipedia.org/wiki/Oxy-fuel_welding_and cutting
ESAB Welding OxyFuel Handbook - http://www.esabna.com/EUWeb/OXY _handbook/5890oxy1 1.htm
BOOKS
Oxyfuel Gas Welding
Bowditch/Bowditch (129 pages)
Goodheart/Wilcox ISBN #1-56637508-8
Welding Project Ideas
Miller Welding
http://www.millerwelds.com/interests/projects/
Lincoln Electric
http://www.lincolnelectric.com/community/projects/