# Textiles - Juki Straight Stitch


Juki DDL 8700

Clearance: Required

# Manual(s)

*Manuals and other reference materials from the manufacturer or other sources.*

- [Juki DDL 8700 Instruction Manual](https://juki.com/pub/media/wysiwyg/products/DDL-8700_manual.pdf)

# Member Notes


# Resources

*Where to obtain materials, consumables, and tooling.*

Appropriate needles and bobbins are available in the consumables section of our store front. Both are sold individually for ease and convenience.

Members are responsible for bringing their own thread, specialty needles/feet, and fabric.

<div class="section_highlight_wrapper" id="bkmrk-bobbin%3A%C2%A0juki-%23229-32"><div class="level3">- <div class="li">**Bobbin:** Juki #229-32909 metal bobbin  
    </div>

- <div class="li">**Thread:**</div>
- <div class="li">Must be in a Cone or Vicone to accommodate the high speed</div>
- <div class="li">Always use the same thread in the upper tension and in the bobbin</div>

- <div class="li">**Fabric** Light to medium weight</div>

- <div class="li">**Needle**:</div>
- <div class="li">[Size Range for machine:](https://www.thethreadexchange.com/miva/merchant.mvc?Screen=CTGY&Category_Code=needle-information "https://www.thethreadexchange.com/miva/merchant.mvc?Screen=CTGY&Category_Code=needle-information")</div>
    - <div class="li">DBx1 #9 to #18 (Organ)</div>
    - <div class="li">134 #65 to #110 (Groz-Beckert)</div>
- <div class="li">Point Type: [appropriate to fabric](https://sewtootpatterns.com/wp-content/uploads/2016/02/Needle_Types.jpg "https://sewtootpatterns.com/wp-content/uploads/2016/02/Needle_Types.jpg")</div>
- <div class="li">Weight: [appropriate to the thread and fabric](https://sewtootpatterns.com/wp-content/uploads/2016/02/Needle_Types.jpg "https://sewtootpatterns.com/wp-content/uploads/2016/02/Needle_Types.jpg")</div>
- <div class="li">Eye: must be 40% larger than the thickness of the thread</div>

</div></div>### Vendors

- [Wawak](https://www.wawak.com/&sa=D&source=editors&ust=1676742700829073&usg=AOvVaw0Wbizk4Rt_RA_6rTqfU1Yz "https://www.wawak.com/&sa=D&source=editors&ust=1676742700829073&usg=AOvVaw0Wbizk4Rt_RA_6rTqfU1Yz") — Place to buy Needles and thread of every type, including heavy duty and embroidery
- [The Thread Exchange](https://www.thethreadexchange.com/miva/merchant.mvc?Screen%3DCTGY%26Category_Code%3DNDL-135x17&sa=D&source=editors&ust=1676742700829607&usg=AOvVaw1NJYXAnTLKLF6x3clQRm-e "https://www.thethreadexchange.com/miva/merchant.mvc?Screen%3DCTGY%26Category_Code%3DNDL-135x17&sa=D&source=editors&ust=1676742700829607&usg=AOvVaw1NJYXAnTLKLF6x3clQRm-e") - thread and needles 
    - [Needle buying Guide](https://www.thethreadexchange.com/miva/merchant.mvc?Store_Code%3DTTE%26Screen%3DCTGY%26Category_Code%3Dneedle-information&sa=D&source=editors&ust=1676742700830475&usg=AOvVaw2ol_2TNOsxxeNjsPj78DbT "https://www.thethreadexchange.com/miva/merchant.mvc?Store_Code%3DTTE%26Screen%3DCTGY%26Category_Code%3Dneedle-information&sa=D&source=editors&ust=1676742700830475&usg=AOvVaw2ol_2TNOsxxeNjsPj78DbT")
    - [Needle and thread Guide](https://www.servicethread.com/blog/industrial-sewing-thread-needle-sizes&sa=D&source=editors&ust=1676742700831159&usg=AOvVaw09QuL5MFPN91oV-4xO7zUQ "https://www.servicethread.com/blog/industrial-sewing-thread-needle-sizes&sa=D&source=editors&ust=1676742700831159&usg=AOvVaw09QuL5MFPN91oV-4xO7zUQ")
    - [Bobbin Guide](https://www.thethreadexchange.com/miva/merchant.mvc?Screen%3DCTGY%26Store_Code%3DTTE%26Category_Code%3Dprewound-bobbin-information&sa=D&source=editors&ust=1676742700831661&usg=AOvVaw3faMV7GkKnMUpG0idGiCqJ "https://www.thethreadexchange.com/miva/merchant.mvc?Screen%3DCTGY%26Store_Code%3DTTE%26Category_Code%3Dprewound-bobbin-information&sa=D&source=editors&ust=1676742700831661&usg=AOvVaw3faMV7GkKnMUpG0idGiCqJ")

### Checking Needle Size

{{@577#bkmrk-grab-a-needle-and-ab}}  
{{@577#bkmrk-if-the-needle-does-n}}

# Tool Tutorial

Link to PDF Tool Tutorial: [Letter size straight stitch 2025.pdf](https://wiki.protohaven.org/attachments/252)

<span style="color: rgb(0, 0, 0);">Link to 2025 rev. poster: [24 x 24 straight stitch poster 2025.pdf](https://wiki.protohaven.org/attachments/253)</span>

<span style="background-color: rgb(241, 196, 15);">TODO: factor out content shared with [Industrial Walking Foot](https://wiki.protohaven.org/books/tool-guides/chapter/textiles-juki-walking-foot "Industrial Walking Foot")</span>

This machine is great for working with long straight items like draperies and bedding using fabric ranging from light to medium weight.

Maximum sewing speed is 5500 stitches per minute!

# Warnings

🚫 Do not push or pull material while stitching.  
⚠️ Power off the machine before threading, inserting the bobbin, or handling the needle.  
⚠️ Keep hair, loose clothing, and fingers away from all moving parts!

See the Safety Section for more information.

## Tool Anatomy

### GENERAL LAYOUT

[![industrial_straight_stitch_tool_tutorial_image11.jpg](https://protohaven.org/wiki/_media/tools/industrial_straight_stitch_tool_tutorial_image11.jpg "industrial_straight_stitch_tool_tutorial_image11.jpg")](https://protohaven.org/wiki/_detail/tools/industrial_straight_stitch_tool_tutorial_image11.jpg?id=tools%3Asewing_straight_stich%3Astart "tools:industrial_straight_stitch_tool_tutorial_image11.jpg")

<div class="section_highlight_wrapper" id="bkmrk-light---for-easy-vie"><div class="level3">1. <div class="li">Light - For easy viewing</div>
2. <div class="li">Straight Stitch - The Machine</div>
3. <div class="li">Thread Holders - Please Note: The secondary holder is for continual bobbin winding</div>
4. <div class="li">Bobbin Winder</div>
5. <div class="li">Maintenance Tag - Manually tracks the usability status with Green/Yellow/Red cards</div>
6. <div class="li">Knee Presser Foot Lifter - Knee operated lever that lifts the presser foot while sewing</div>
7. <div class="li">On/Off Switch - Main power to the machine</div>
8. <div class="li">Foot Pedal - Controls the speed of the motor</div>

</div></div>### MACHINE ANATOMY

[![industrial_straight_stitch_tool_tutorial_image5.jpg](https://protohaven.org/wiki/_media/tools/industrial_straight_stitch_tool_tutorial_image5.jpg "industrial_straight_stitch_tool_tutorial_image5.jpg")](https://protohaven.org/wiki/_detail/tools/industrial_straight_stitch_tool_tutorial_image5.jpg?id=tools%3Asewing_straight_stich%3Astart "tools:industrial_straight_stitch_tool_tutorial_image5.jpg")

<div class="section_highlight_wrapper" id="bkmrk-manual-presser-foot-"><div class="level3">1. <div class="li">Manual Presser Foot Lifter (not seen, around back)</div>
2. <div class="li">Presser Foot Height Adjustment</div>
3. <div class="li">Thread Guide</div>
4. <div class="li">Oil Level Indicator</div>
5. <div class="li">Hand Wheel</div>
6. <div class="li">Thread Tension and Guides</div>
7. <div class="li">Stitch Length Knob</div>
8. <div class="li">Bobbin Winder Tensioner</div>
9. <div class="li">Needle</div>
10. <div class="li">Reverse Lever</div>
11. <div class="li">Bobbin Winder Spindle</div>

</div></div>## Tool Safety

#### Personal Protective Equipment

<div class="section_highlight_wrapper" id="bkmrk-safety-glasses-are-r"><div class="level4">- <div class="li">Safety glasses are recommended.</div>

</div></div>Check the needle condition prior to sewing, be sure it is the correct size for the material being sewn, and it is not bent or chipped.

Never sew over pins, staples or other metal materials, as this may cause the needle to shatter, resulting in bodily harm and severe machine damage.

Always turn the handwheel towards you, (down) never away.

### COMMON HAZARDS

The most common hazards are thread jams and broken needles. Watch for binds, jams, and bird nests—stop immediately if they occur.

<div class="section_highlight_wrapper" id="bkmrk-ensure-the-needle-an"><div class="level3">- <div class="li">Ensure the needle and thread are removed before winding a bobbin</div>
- <div class="li">Avoid pulling/pushing fabric, which may misalign and break the needle</div>

</div></div>The most significant hazard is injury. Always power off and run the machine until the motor drains before handling, adjusting, or threading.

<div class="section_highlight_wrapper" id="bkmrk-keep-fingers-3%E2%80%9D-away"><div class="level3">- <div class="li">Keep fingers 3” away from the needle</div>
- <div class="li">Power off and drain the motor before:</div>
    - <div class="li">Threading</div>
    - <div class="li">Replacing needles</div>
    - <div class="li">Removing jams</div>

- <div class="li">Tie back hair and scarves</div>
- <div class="li">Tuck sleeves behind elbows</div>

</div></div>### Prohibited Materials

Thread Jams and needle breakage are critical concerns. Material that is too thick or rigid will lead to needle breakage. Material that is too slick (plasticized or otherwise “finished”) will slide against the presser foot and cause thread jams and/or needle breakage.

Industrial machines will not “step over” pins in the fabric. Hitting one may break the needle and send broken parts into the hook below.

For those reasons, it is important to avoid:

<div class="section_highlight_wrapper" id="bkmrk-abrasives-paper-and-"><div class="level3">- <div class="li">Abrasives</div>
- <div class="li">Paper and cardboard products</div>
- <div class="li">Pins in the fabric</div>
- <div class="li">Plastics</div>
- <div class="li">Rigid Material (non-fabric)</div>

</div></div>## Initial Setup

<div class="section_highlight_wrapper" id="bkmrk-wipe-down%C2%A0the-machin"><div class="level2">1. <div class="li">Wipe down the machine and bed to clean up any oil or dust.</div>
2. <div class="li">Check the oil level, see Maintenance.</div>
3. <div class="li">Power on the machine.</div>
4. <div class="li">Wind the bobbin.</div>
5. <div class="li">Power off the machine to insert the bobbin and thread the machine.</div>
6. <div class="li">Thread the machine.</div>
7. <div class="li">Ensure the needle is usable and appropriate for the material and thread.</div>
8. <div class="li">Lower the presser foot and begin operation.</div>

</div></div>### CHECKING NEEDLE SIZE

<div class="section_highlight_wrapper" id="bkmrk-grab-a-needle-and-ab"><div class="level3">1. <div class="li">Grab a needle and about 12 inches of the intended thread</div>
2. <div class="li">Thread the needle</div>
3. <div class="li">Hold both ends of the thread, creating a 60 degree slope with one end to see if the needle is able to slide along the slope</div>
4. <div class="li">Reverse the process to see if the needle slides back</div>

</div></div>If the needle does not freely slide down the thread, the size may be too small. As a general rule, you’ll want the smallest size needle that will slide freely down the thread.

<div class="section_highlight_wrapper" id="bkmrk--2"></div>### WIND THE BOBBIN

<div class="section_highlight_wrapper" id="bkmrk-raise-the-presser-fo"><div class="level3">  
</div><div class="level3">1. <div class="li">Raise the presser foot by winding the handwheel (a) counterclockwise</div>
2. <div class="li">Ensure there is nothing near the needle while filling the bobbin</div>

</div></div>**It does not disengage while winding like a consumer machine**

<div class="section_highlight_wrapper" id="bkmrk-pass%C2%A0the-thread-thro"><div class="level3">1. <div class="li">Pass the thread through the guide on the tension and between the disks (b).</div>
2. <div class="li">Pass the thread between a hole on the bobbin case ©.</div>
3. <div class="li">Rotate the case 2-3 times to manually wind the thread for traction.</div>
4. <div class="li">Place the bobbin on the spindle, holding onto the tail of loose thread.</div>
5. <div class="li">Gently press the foot pedal to wind the bobbin. It will stop when full.</div>

</div></div>Please watch [this video,](https://www.youtube.com/watch?v=22AeAlLLEgM "https://www.youtube.com/watch?v=22AeAlLLEgM") which includes details of winding and placing the bobbin in the case.

### ATTACH THE BOBBIN CASE

<div class="section_highlight_wrapper" id="bkmrk---pass-the-thread-th"><div class="level3"><div class="table sectionedit15"><table class="inline"><tbody><tr class="row0"><td class="col0">[![](https://protohaven.org/wiki/_media/tools/industrial_straight_stitch_tool_tutorial_image4.png)
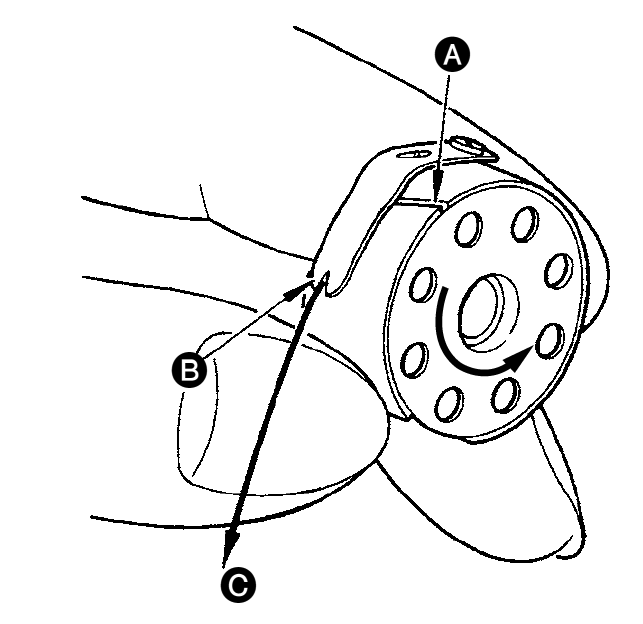
](https://protohaven.org/wiki/_detail/tools/industrial_straight_stitch_tool_tutorial_image4.png?id=tools%3Asewing_straight_stich%3Astart "tools:industrial_straight_stitch_tool_tutorial_image4.png")</td><td class="col1">- Pass the thread through thread slit A, and pull the thread in direction B. By doing so, the thread will pass under the tension spring and come out from notch B.  


Check that the bobbin rotates in the direction of the arrow when thread C is pulled.</td></tr></tbody></table>

</div></div></div><div class="section_highlight_wrapper" id="bkmrk--3"></div>### INSERT THE NEEDLE

<div class="section_highlight_wrapper" id="bkmrk-turn-the-handwheel-f"><div class="level3"><div class="table sectionedit17"><table class="inline"><tbody><tr class="row0"><td class="col0">[![](https://protohaven.org/wiki/_media/tools/industrial_straight_stitch_tool_tutorial_image9.png)
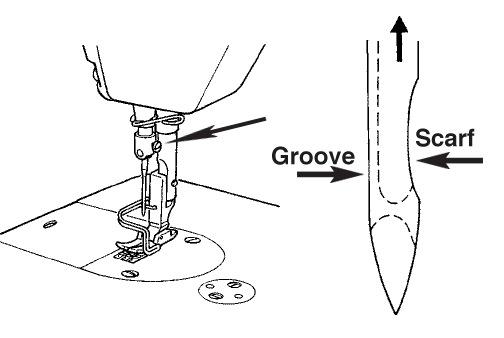
](https://protohaven.org/wiki/_detail/tools/industrial_straight_stitch_tool_tutorial_image9.png?id=tools%3Asewing_straight_stich%3Astart "tools:industrial_straight_stitch_tool_tutorial_image9.png")</td><td class="col1">Turn the handwheel forward until the needle bar is at the highest position  
  
- Loosen the needle clamp screw and hold the needle so that the scarf is to the right and the long groove in the needle is exactly to the left.  
- Insert the needle (1) into the clamp hole until it will go no further.  
- Tighten the needle clamp screw firmly (monkey tight—not gorrilla!)</td></tr></tbody></table>

</div></div></div>### THREAD THE MACHINE

[Example Video](https://www.youtube.com/watch/v=QI-8pLZGqvU "https://www.youtube.com/watch/v=QI-8pLZGqvU")

[![](https://protohaven.org/wiki/_media/tools/industrial_straight_stitch_tool_tutorial_image3.png)](https://protohaven.org/wiki/_detail/tools/industrial_straight_stitch_tool_tutorial_image3.png?id=tools%3Asewing_straight_stich%3Astart "tools:industrial_straight_stitch_tool_tutorial_image3.png")

Thread the machine following the order of (1) through (11) as shown above.

Move the handwheel towards you, never away to get the top thread to take up the bobbin thread.

<div class="section_highlight_wrapper" id="bkmrk--5"></div>## Operation

<div class="section_highlight_wrapper" id="bkmrk-setup%C2%A0the-machine-ra"><div class="level2">1. <div class="li">Setup the machine</div>
2. <div class="li">Raise the presser foot with the knee pedal to load fabric</div>
3. <div class="li">Test by sewing on scrap similar to what you will be sewing</div>
4. <div class="li">Adjust the tension and stitch length</div>
5. <div class="li">Remove test and trim threads</div>
6. <div class="li">Load and align project fabric</div>
7. <div class="li">Back stitch/reverse to keep your stitch from unraveling</div>
8. <div class="li">Sew</div>
9. <div class="li">Cleanup</div>

</div></div>### ADJUST THE TENSION

[![](https://protohaven.org/wiki/_media/tools/industrial_straight_stitch_tool_tutorial_image7.png)](https://protohaven.org/wiki/_detail/tools/industrial_straight_stitch_tool_tutorial_image7.png?id=tools%3Asewing_straight_stich%3Astart "tools:industrial_straight_stitch_tool_tutorial_image7.png")

<div class="section_highlight_wrapper" id="bkmrk--7"><div class="level3">  
</div></div>### (1) Adjusting the needle thread tension

<div class="section_highlight_wrapper" id="bkmrk-direction-a-clockwis"><div class="level3">1. <div class="li">Direction A clockwise - to increase needle thread tension.</div>
2. <div class="li">Direction B counterclockwise - to decrease needle thread tension.  
    </div>

</div></div>### (2) Adjusting the bobbin thread tension

<div class="section_highlight_wrapper" id="bkmrk-turn-tension-adjustm"><div class="level3">- <div class="li">Turn tension adjustment screw 2 clockwise (in direction C), to increase bobbin thread tension.</div>
- <div class="li">Turn tension adjustment screw 2 counterclockwise (in direction D), to decrease bobbin thread tension.</div>

<div class="table sectionedit23"><table class="inline"><tbody><tr class="row0"><td class="col0">[![021Q5D0101(D)(EN.ES.FR).cdr](https://protohaven.org/wiki/_media/tools/industrial_straight_stitch_tool_tutorial_image2.jpg "021Q5D0101(D)(EN.ES.FR).cdr")](https://protohaven.org/wiki/_detail/tools/industrial_straight_stitch_tool_tutorial_image2.jpg?id=tools%3Asewing_straight_stich%3Astart "tools:industrial_straight_stitch_tool_tutorial_image2.jpg")</td><td class="col1 leftalign">[![021Q5D0101(D)(EN.ES.FR).cdr](https://protohaven.org/wiki/_media/tools/industrial_straight_stitch_tool_tutorial_image8.jpg "021Q5D0101(D)(EN.ES.FR).cdr")](https://protohaven.org/wiki/_detail/tools/industrial_straight_stitch_tool_tutorial_image8.jpg?id=tools%3Asewing_straight_stich%3Astart "tools:industrial_straight_stitch_tool_tutorial_image8.jpg")</td></tr><tr class="row1"><td class="col0 leftalign">Normal tension</td><td class="col1 leftalign">Too loose. Turn the dial clockwise to increase tension.</td></tr><tr class="row2"><td class="col0">[![021Q5D0101(D)(EN.ES.FR).cdr](https://protohaven.org/wiki/_media/tools/industrial_straight_stitch_tool_tutorial_image6.jpg "021Q5D0101(D)(EN.ES.FR).cdr")](https://protohaven.org/wiki/_detail/tools/industrial_straight_stitch_tool_tutorial_image6.jpg?id=tools%3Asewing_straight_stich%3Astart "tools:industrial_straight_stitch_tool_tutorial_image6.jpg")</td><td class="col1">  
Too tight. Turn the tension nut counter clockwise to reduce the tension.</td></tr></tbody></table>

</div></div></div>### BACKSTITCH &amp; STITCH SIZE

<div class="section_highlight_wrapper" id="bkmrk-turn-the-dial-to-cha"><div class="level3"><div class="table sectionedit25"><table class="inline"><tbody><tr class="row0"><td class="col0">[![](https://protohaven.org/wiki/_media/tools/industrial_straight_stitch_tool_tutorial_image1.png?w=300&tok=c01333)](https://protohaven.org/wiki/_detail/tools/industrial_straight_stitch_tool_tutorial_image1.png?id=tools%3Asewing_straight_stich%3Astart "tools:industrial_straight_stitch_tool_tutorial_image1.png")</td><td class="col1">Turn the dial to change stitch size  


Press the lever to reverse at the end of the seam</td></tr></tbody></table>

</div></div></div>## Cleanup

1. Power off and drain the machine
2. Unthread machine head and spool
3. Remove bobbin
4. Wipe down, vacuum, and blow out lint and stray clippings
5. Sweep up threads, lint, and debris and deposit in waste bins
6. Return stray items to drawer under table

### MAINTENANCE REQUESTS

<div class="section_highlight_wrapper" id="bkmrk--8"><div class="level3">  
</div></div>Record issues at [protohaven.org/maintenance](https://www.protohaven.org/maintenance "https://www.protohaven.org/maintenance"). This notifies our staff and volunteer maintenance crew of any issues.

<div class="section_highlight_wrapper" id="bkmrk--9"></div>### Troubleshooting

<div class="section_highlight_wrapper" id="bkmrk-common-issues-possib"><div class="level3"><div class="table sectionedit29"><table class="inline"><thead><tr class="row0"><th class="col0">**Common Issues**</th><th class="col1">**Possible Causes**</th><th class="col2">**Resolutions**</th></tr></thead><tbody><tr class="row1"><td class="col0">Thread comes out of the needle on the first few stitches</td><td class="col1">The threads need a longer tail, and needs to be held back, or  
  
The take up lever is not at its highest position</td><td class="col2">Pull threads to the back when beginning the seam, with the take-up lever in it’s highest position</td></tr><tr class="row2"><td class="col0">Thread clumps up and fabric won’t feed through</td><td class="col1">Bent needle, needle inserted incorrectly, machine threaded incorrectly</td><td class="col2">Be sure it is threaded left to right.   
  
Be sure the needle is right for the fabric.</td></tr><tr class="row3"><td class="col0">Skipped stitches</td><td class="col1 leftalign">Bent needle, needle inserted incorrectly, machine threaded incorrectly</td><td class="col2">Turn off the machine be sure there is no jam near the hook and bobbin casing, then re-thread the machine and bobbin</td></tr></tbody></table>

</div></div></div>## Special Setups

For all of the following, please make a Special Setup Arrangement with a Protohaven Staff Member to gain clearance in advance of use. Consider whether you need specialty adjustments as part of an extended project, or if the adjustments or accessories are temporary.

### WINDING THE BOBBIN WHILE SEWING

For large projects, a second bobbin can be wound while sewing.

<div class="section_highlight_wrapper" id="bkmrk-a-second-spool-of-th"><div class="level3">1. <div class="li">A second spool of thread is required.</div>
2. <div class="li">The needle and presser foot remain in place, and sewing can continue.</div>
3. <div class="li">Follow all other instructions in “Bobbin Winding” above</div>

</div></div>### ADJUSTING THE THREAD TAKE UP STROKE

The amount of thread pulled from the spool can be adjusted to allow thicker or thinner materials to sew more precisely. All adjustments must be reverted to the average settings when finished.

<div class="section_highlight_wrapper" id="bkmrk--10"></div>### SPECIALIZED PRESSER FOOT

Cording foot, Left/Right piping, Zipper foot, Hemmer - User is responsible for purchasing

<div class="section_highlight_wrapper" id="bkmrk--11"></div>### SPECIALIZED FEED DOGS

The machine is set for average types of fabric, but can be adjusted for very fine fabric or very thick. The feed dogs can be changed out for various weights, but the user is responsible for purchasing these and re-setting the machine completely after use.

<div class="section_highlight_wrapper" id="bkmrk--12"></div>## Additional Resources

[Threading and overview](https://www.youtube.com/watch?v=QI-8pLZGqvU "https://www.youtube.com/watch?v=QI-8pLZGqvU")

[Machine capabilities](https://www.youtube.com/watch?v=AZsHSBN2Q6c "https://www.youtube.com/watch?v=AZsHSBN2Q6c")

[Sewing Gold Channel](https://www.youtube.com/channel/UC9DPdV59J32ftSwG2boGYlQ "https://www.youtube.com/channel/UC9DPdV59J32ftSwG2boGYlQ") : (multiple industrial machine videos)

<div class="section_highlight_wrapper" id="bkmrk--13"></div>