Millwork - Planer
Manual(s)
Manuals and other reference materials from the manufacturer or other sources.
Laguna MPLAN1510-0120 with ShearTec II cutter system
MPLAN1510-0120_Platinum Series 16 Planer 16 03 2015.pdf
Member Notes
Resources
Where to obtain materials, consumables, and tooling.
Tool Tutorial
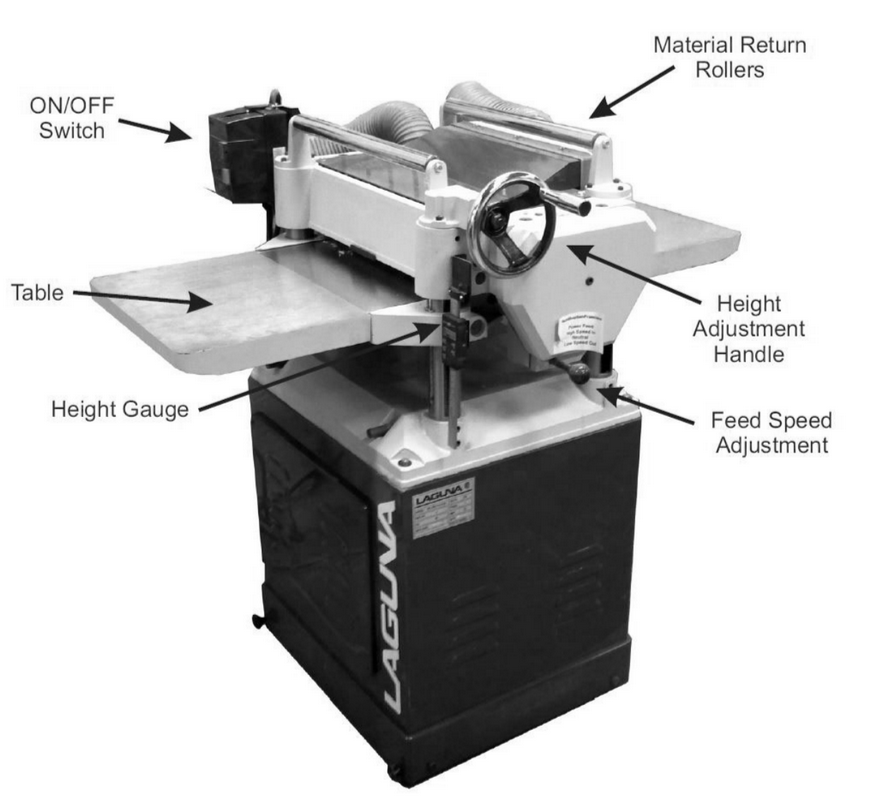
Planer Overview
A planer is used after the board has been jointed. By placing the flat surface created by the jointer on the table, the cutting head in the planer creates a parallel flat surface along the top of the board. It is also used to machine the board to the final thickness. The planer
uses a cutting head similar to the jointer. However, unlike the jointer, there are infeed and outfeed rollers to make the process much more automated. The rollers push your board flat against the table so it’s important to use the planer to have a flat side to push against.
Planer-Specific Safety
- Solid wood is the only material allowed in the planer. Plywood, MDF, plastics and metals are not allowed. Consult a shop tech for advice when planing exceptionally dense hardwoods
- Use good quality wood in the planer. Avoid wood with loose knots, splits, nails, screws, paint or other foreign objects in or on it
- Stand to the side of the planer while feeding boards in to reduce chances of an injury from a kickback
Prohibited Materials
Reclaimed wood often has embedded nails or screws which can damage the blade, cause the workpiece to kick, and can scratch the table. All reclaimed wood should be checked with the hand-held metal detector before being resawn.
Reclaimed materials may be painted with lead paints. Lead paints are prohibited in the shop as the dust created is toxic.
Do not use wood with uncured glue or resin as this will ruin the table and cutters.
Do not use engineered materials like plywood or MDF, as they lack the structural integrity to pass through the planer without disintegrating and becoming entangled with the cutter head or ejecting pieces.
Do not use wood that is badly checking or splintering, as the high forces the planer puts on the wood may break it apart, causing violent ejection of debris.
Planer Adjustments
Table Height
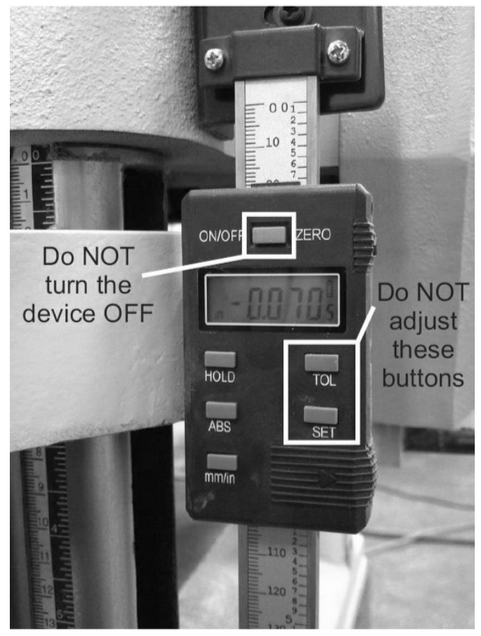
Changing the table height changes the thickness that your boards will be machined to by changing the distance between the cutting head and table. After each pass, raise the table to cut more material. The machine is equipped with a digital height gauge that provides an accurate reading of the distance of the table surface from the blades.
The digital height gauge on the planer can be set to absolute or incremental mode. When the gauge is set to absolute, the display shows the distance between the cutting head and table. In incremental mode, the gauge can be zeroed at any location, which means it will show the distance to where you set the zero. Do not push the TOL or SET buttons or turn the device off, since the height gauge
will need to be recalibrated afterward.
It’s a good idea to make sure the digital height gauge is reading accurately once both sides of your board are flat and parallel. Machine a light pass on your board and check the board with a set of calipers.
Use heavy cuts of 1/16” (.062”) to get your board close to the final dimension and then light cuts of 1/32” (.013”) or less to get a good finish. Use calipers on several points of your board to find the thickest point and use that as a starting thickness for your first pass.
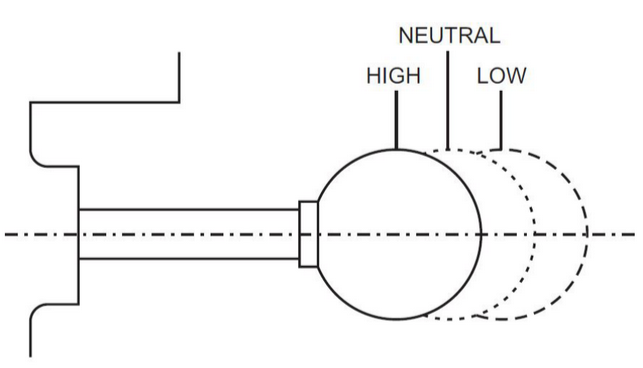
Feed Speed
The planer has two feed speeds for cutting different types of wood. Hard woods should be cut at the low feed speed and soft woods can be cut at the high feed speed. For the best finish, use the slow feed speed on any type of wood. Adjust the feed speed only when the machine is running. Push the knob all the way in for high feed speed and pull the knob all the way out for low feed speed. If your board does not automatically feed into the machine, it’s possible the feed speed is set to neutral between the high and low positions.
Basic Operation
- Loosen the table lock knobs on the left side of the machine.
- Turn the Table Height crank handle to set the table height to the same thickness as the thickest part of your board for the first pass and tighten the table lock knobs.
- Turn on the dust collector and ensure the gates are open between the planer and collector. Close gates to any unused machine to increase the suction at the planer. Planers remove a massive amount of material with each pass that can quickly clog the dust collector tube and cause issues.
- Turn the planer on and feed your board through. On the first pass, the rollers may not grab the board well so you may have to help feed the board in and pull it out.
WARNING: Do not put your fingers into the planer.
- Loosen the table lock knobs and adjust the height up, 1/16” for a heavy cut, 1/32” for a light cut.
- Tighten the lock knobs and feed your board through. Continue the process until your board is the desired thickness.
- If you’re machining multiple boards to the same thickness, pass each one through before adjusting the table height.
Tips and Tricks
- The rollers of the planer push the board flat against the table so it will not make a flat surface. If your board is warped, twisted or cupped, it will be pushed flat between the rollers in the planer and then spring back to its original shape after it is through the
machine - Once both sides are your board are flat and parallel, flip the board every pass or two to remove equal amounts of material from each side. This helps ensure the board will not warp in a new direction after machining is complete
- As with the jointer, cut with the grain (rather than against it) in order to have a smoother finish with fewer tearouts