# Machining - Manual Lathe
Jet GH-1440W-3, Geared Head Lathe
Clearance: Required
# Manual(s)
*Manuals and other reference materials from the manufacturer or other sources.*
- [Manual Lathe Manual GH-1440W-3.pdf](https://wiki.protohaven.org/attachments/173)
##### Regular Maintenance
- Lubrication, manual p. 10
- Coolant Prep, manual p. 12
- Parts List & Exploded Views, manual p. 22-64
Technical Support: 1-800-274-6846
Replacement Parts: [https://store.jettools.com/metalworking.html](https://store.jettools.com/metalworking.html "https://store.jettools.com/metalworking.html")
# Member Notes
# Resources
*Where to obtain materials, consumables, and tooling.*
#### Where to buy consumables
McMaster-Carr is an easy (and incredibly fast) resource for lathe tools and raw materials. [https://www.mcmaster.com/](https://www.mcmaster.com/ "https://www.mcmaster.com/") (Part numbers are listed in the table in the consumables section)
#### Helpful Tutorials
How to use a live center: [https://www.youtube.com/watch?v=8x6maER5qr0](https://www.youtube.com/watch?v=8x6maER5qr0 "https://www.youtube.com/watch?v=8x6maER5qr0")
#### Speed Calculator
Spindle speeds can be calculated here. Look up the feet-per-minute speed for your material and then enter the diameter of your part to calculate how many rotations per minute it needs to spin. Remember to divide by 2 as these speeds will be ideal speeds for machinists under ideal conditions : [https://littlemachineshop.com/reference/cuttingspeeds.php](https://littlemachineshop.com/reference/cuttingspeeds.php "https://littlemachineshop.com/reference/cuttingspeeds.php") (More info in the Set Speed and Common Settings Sections)
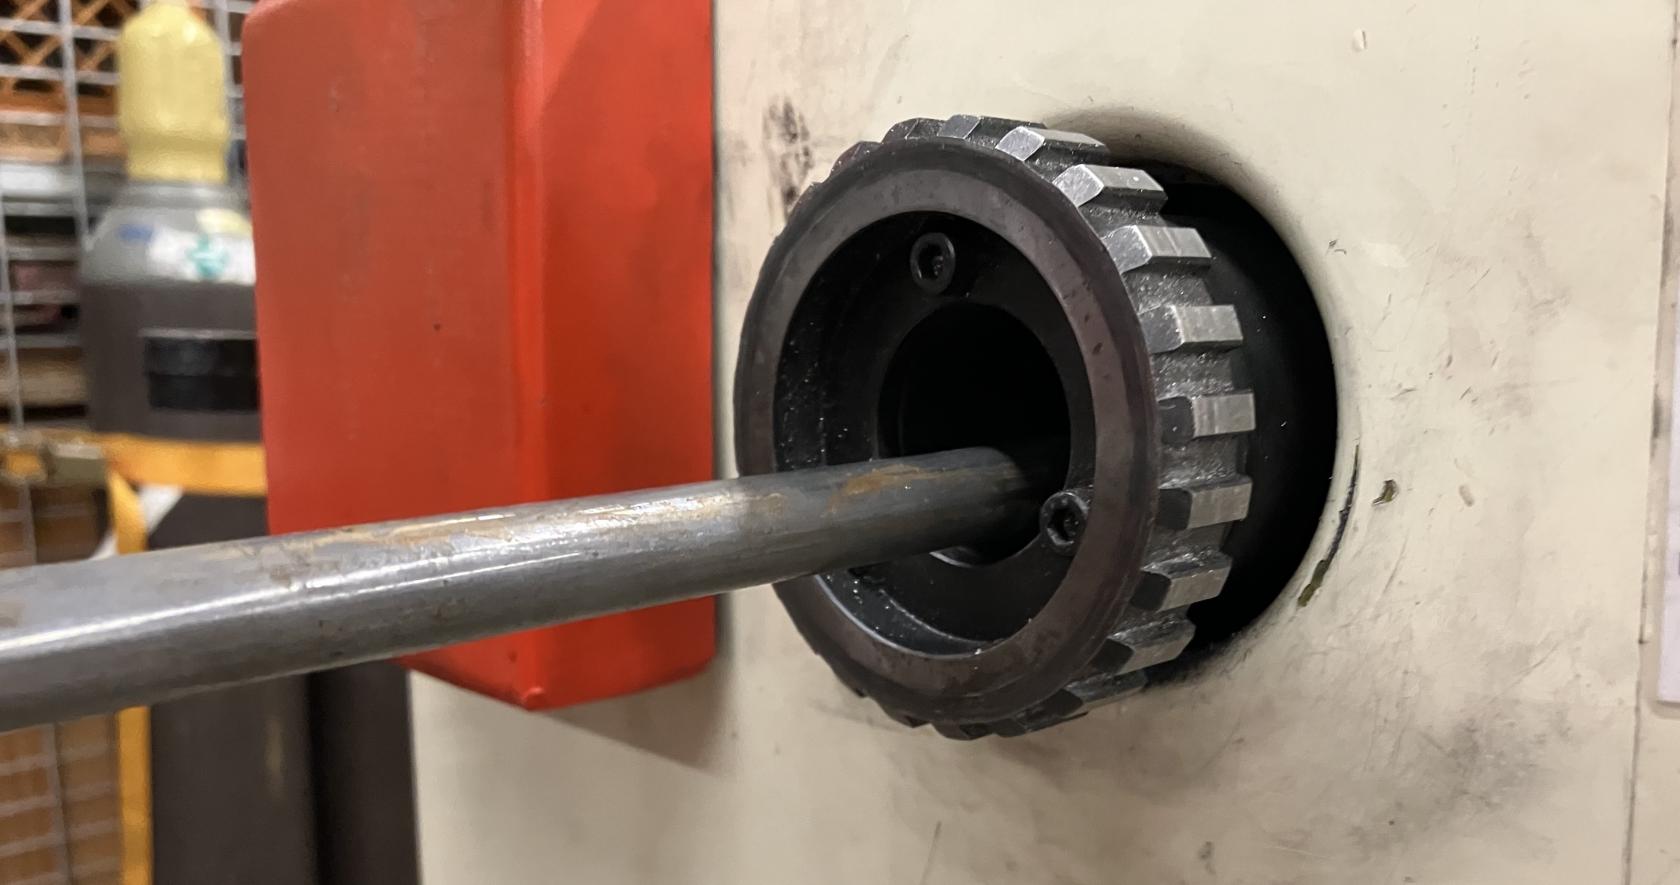
# Supporting Long Stock
If you are using a long piece of stock on the metal lathe that extends through the headstock and then out into the walkway, make sure that the setup is secure and safe.
## Safety
If the workpiece is only supported at the chuck and extends far out behind the headstock, the unsupported part of the workpiece will drop off axis behind the headstock.
[](https://wiki.protohaven.org/uploads/images/gallery/2025-10/rZ6metal-lathe-off-axis-workpiece.jpeg)
[](https://wiki.protohaven.org/uploads/images/gallery/2025-10/metal-lathe-unsupported.jpeg)
Under rotation, the unsupported part of the workpiece will rotate off axis, and will develop a kink where it leaves the back of the head stock. The piece will bend out from the axis of rotation.
A bent workpiece will spin like a helicopter blade behind the headstock of the metal lathe. This is a massive hazard to anyone and anything in the vicinity of the metal lathe.
**Always secure long work pieces behind the headstock when using the metal lathe.** We want to support the workpiece so it stays centered on the lathe axis.
## Securing the Workpiece
To secure a long workpiece when using the metal lathe, you will need:
- a roller stand
- a large c-clamp
- optional: a rag
Secure the workpiece:
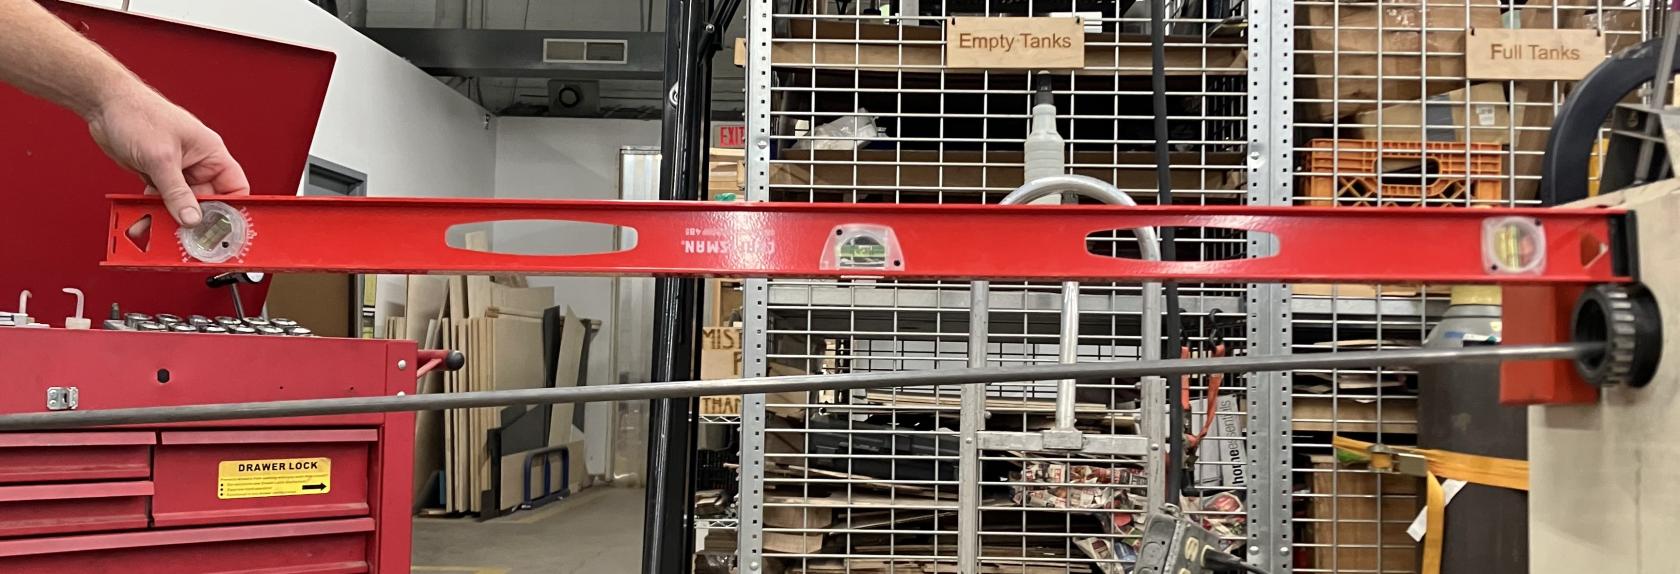
1. Use a roller stand to support the workpiece so that the workpiece is centered in the headstock, and parallel to the floor.
[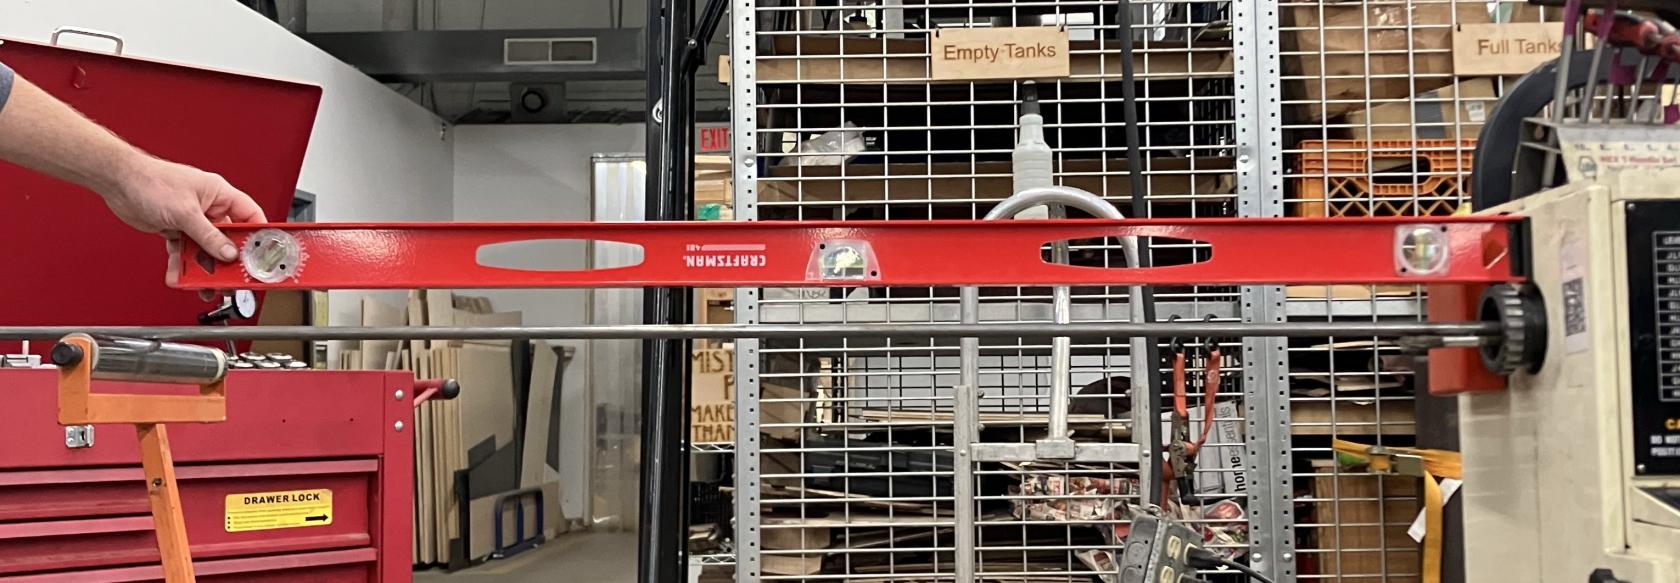](https://wiki.protohaven.org/uploads/images/gallery/2025-10/metal-lathe-supported.jpeg)
2. Lock the roller stand height.
3. Set up the roller stand so that the roller is skew from the workpiece.
[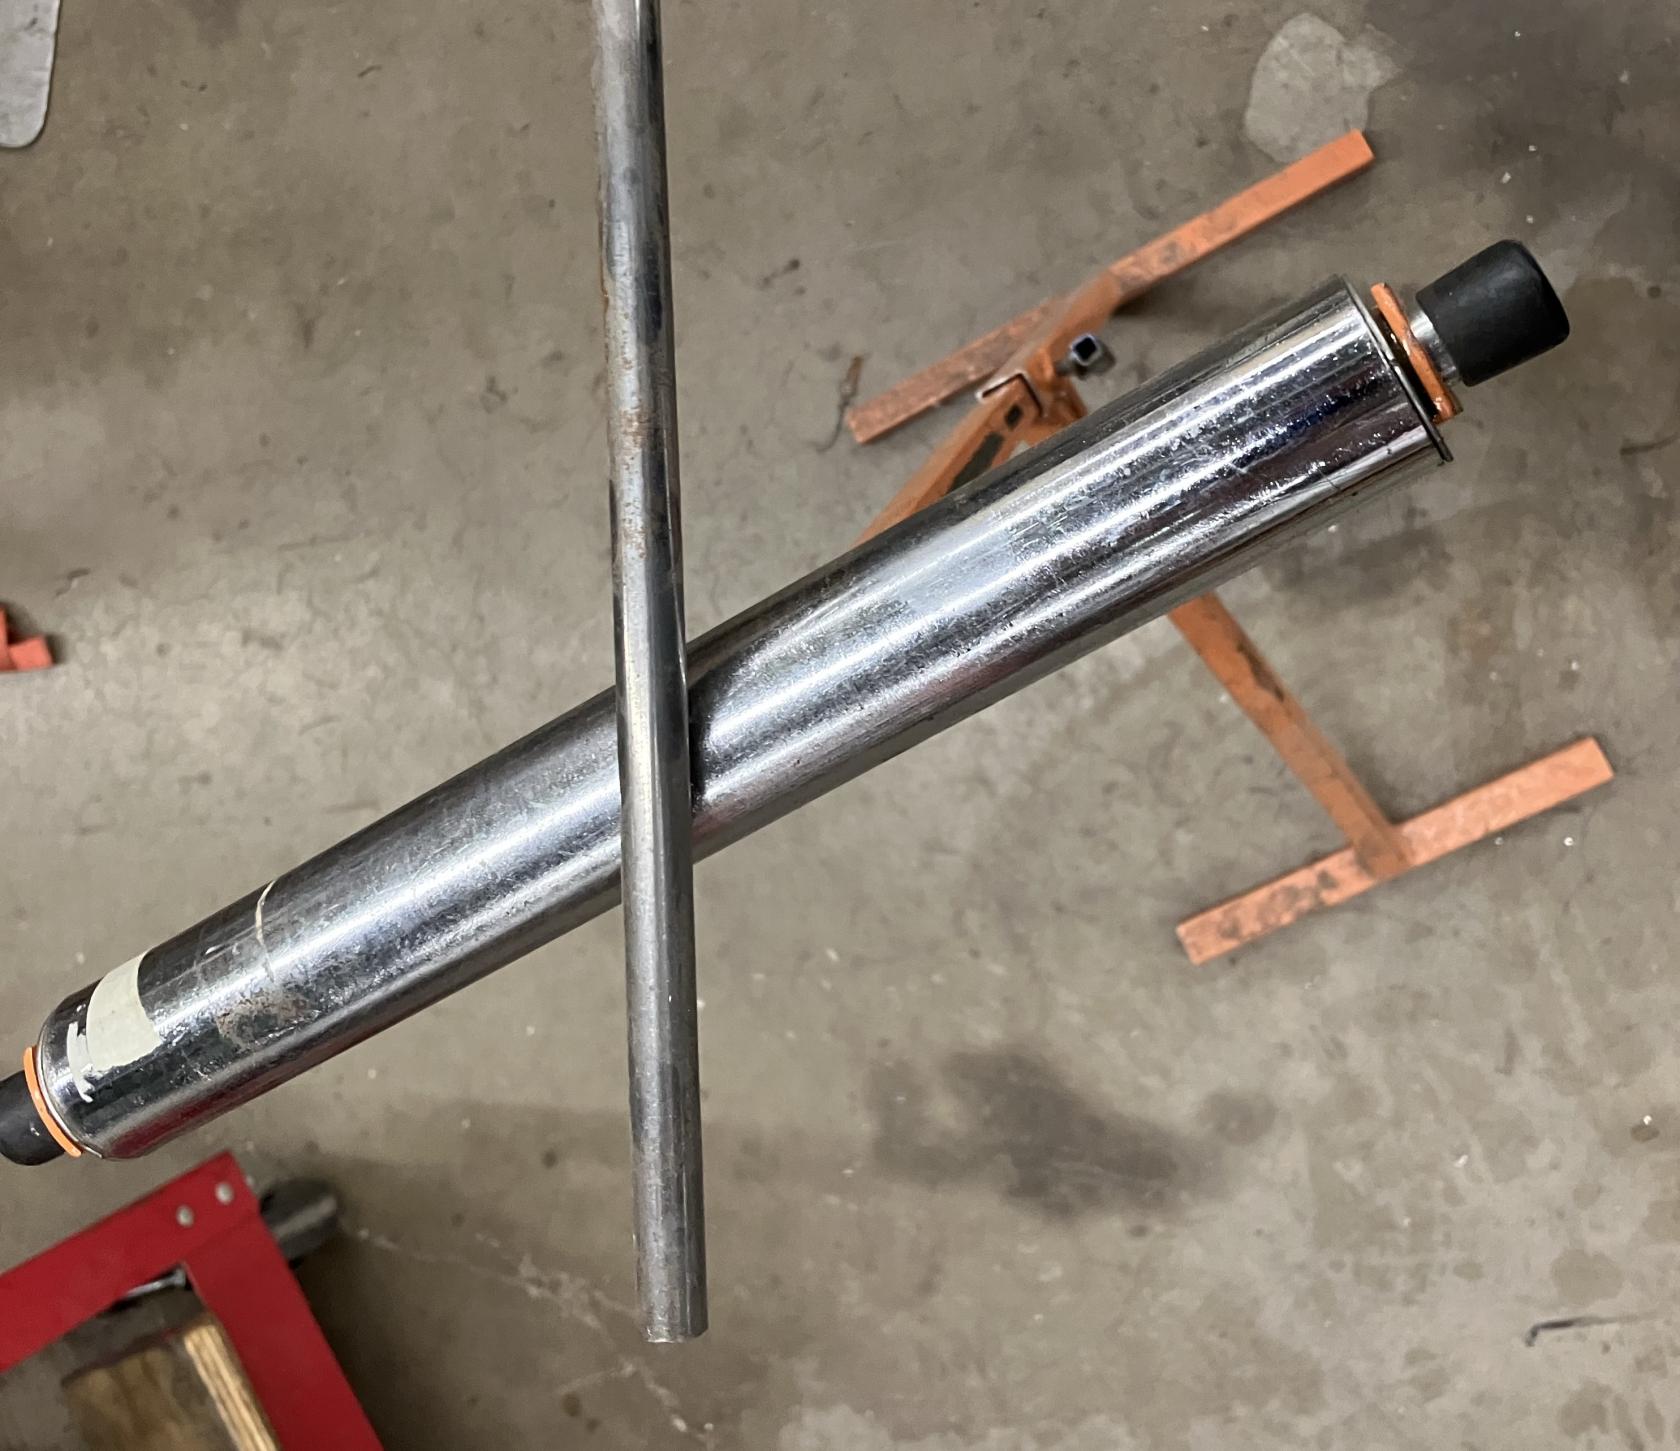](https://wiki.protohaven.org/uploads/images/gallery/2025-10/Ozzmetal-lathe-workpiece-skew-on-roller.jpeg)
4. Use a c-clamp to keep the work piece from lifting off the roller stand, with light but positive contact on the top of the workpiece.
*Do not preload excessive force on the top of the workpiece.*
[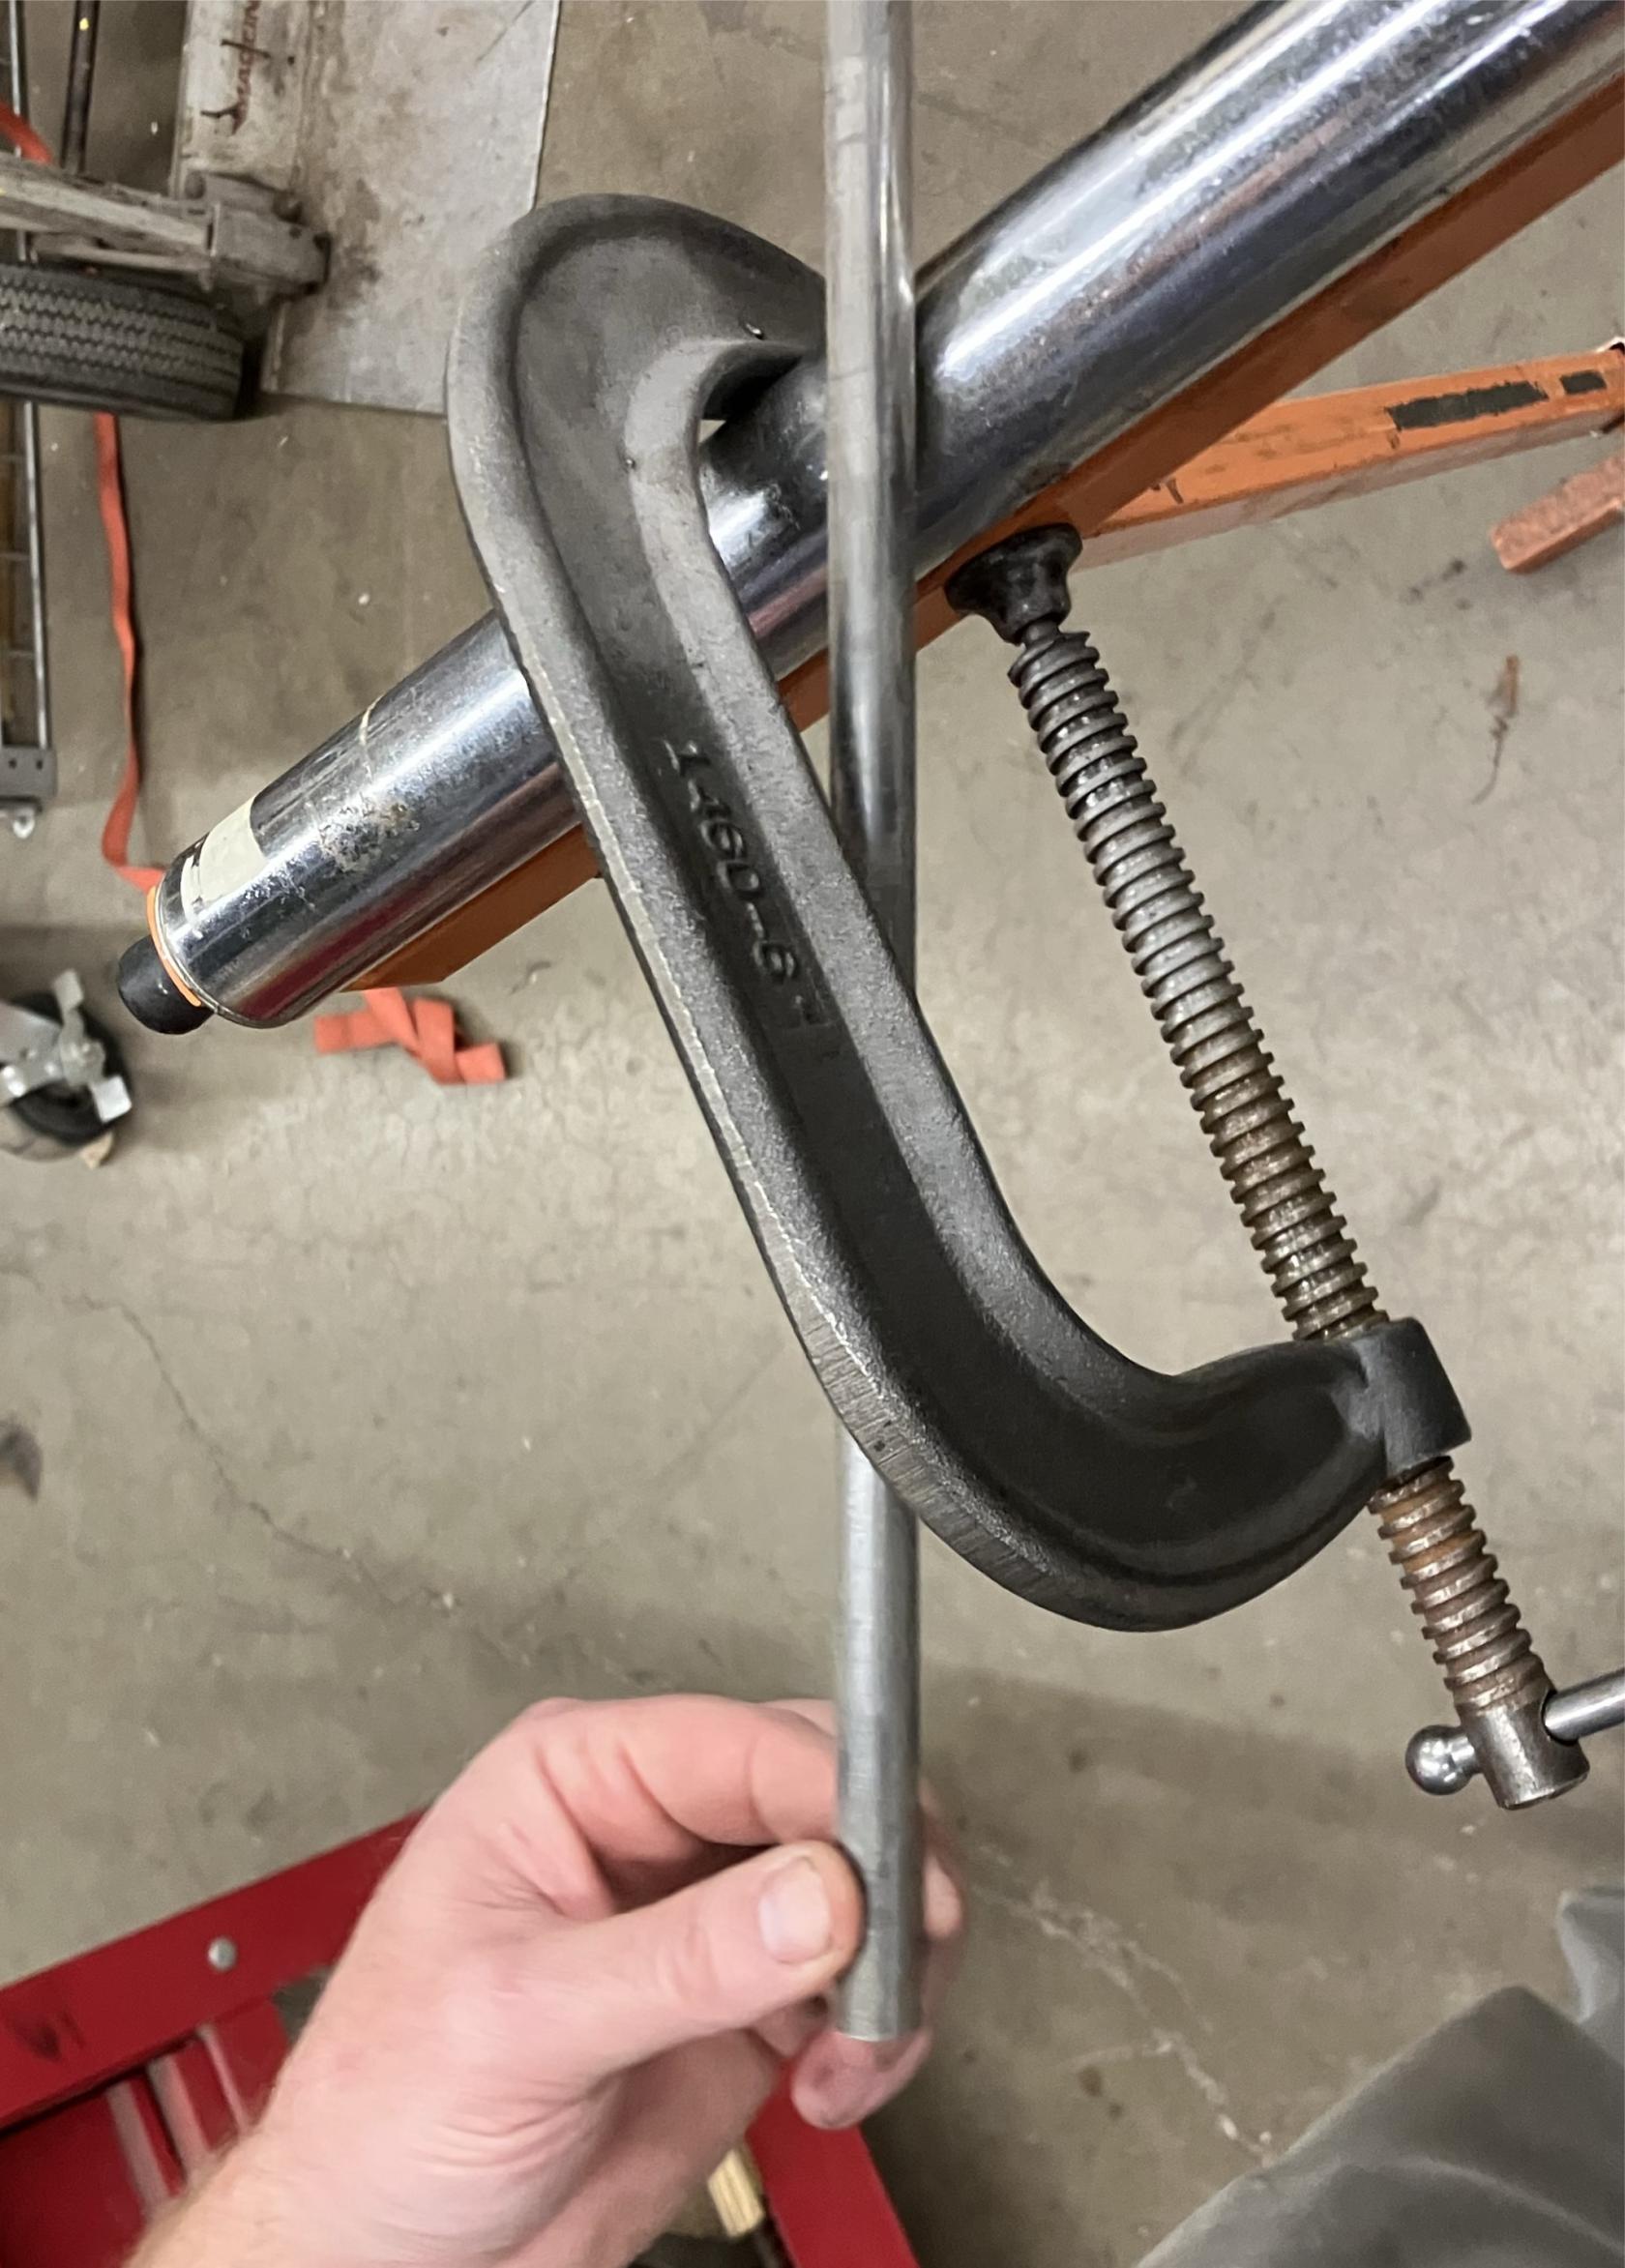](https://wiki.protohaven.org/uploads/images/gallery/2025-10/metal-lathe-c-clamp-on-roller.jpeg)
5. Rotate the stand so that the c-clamp keeps the work piece from drifting left or right across the roller, with light but positive contact on both sides of the workpiece.
*Do not preload excessive force on the sides of the workpiece.*
[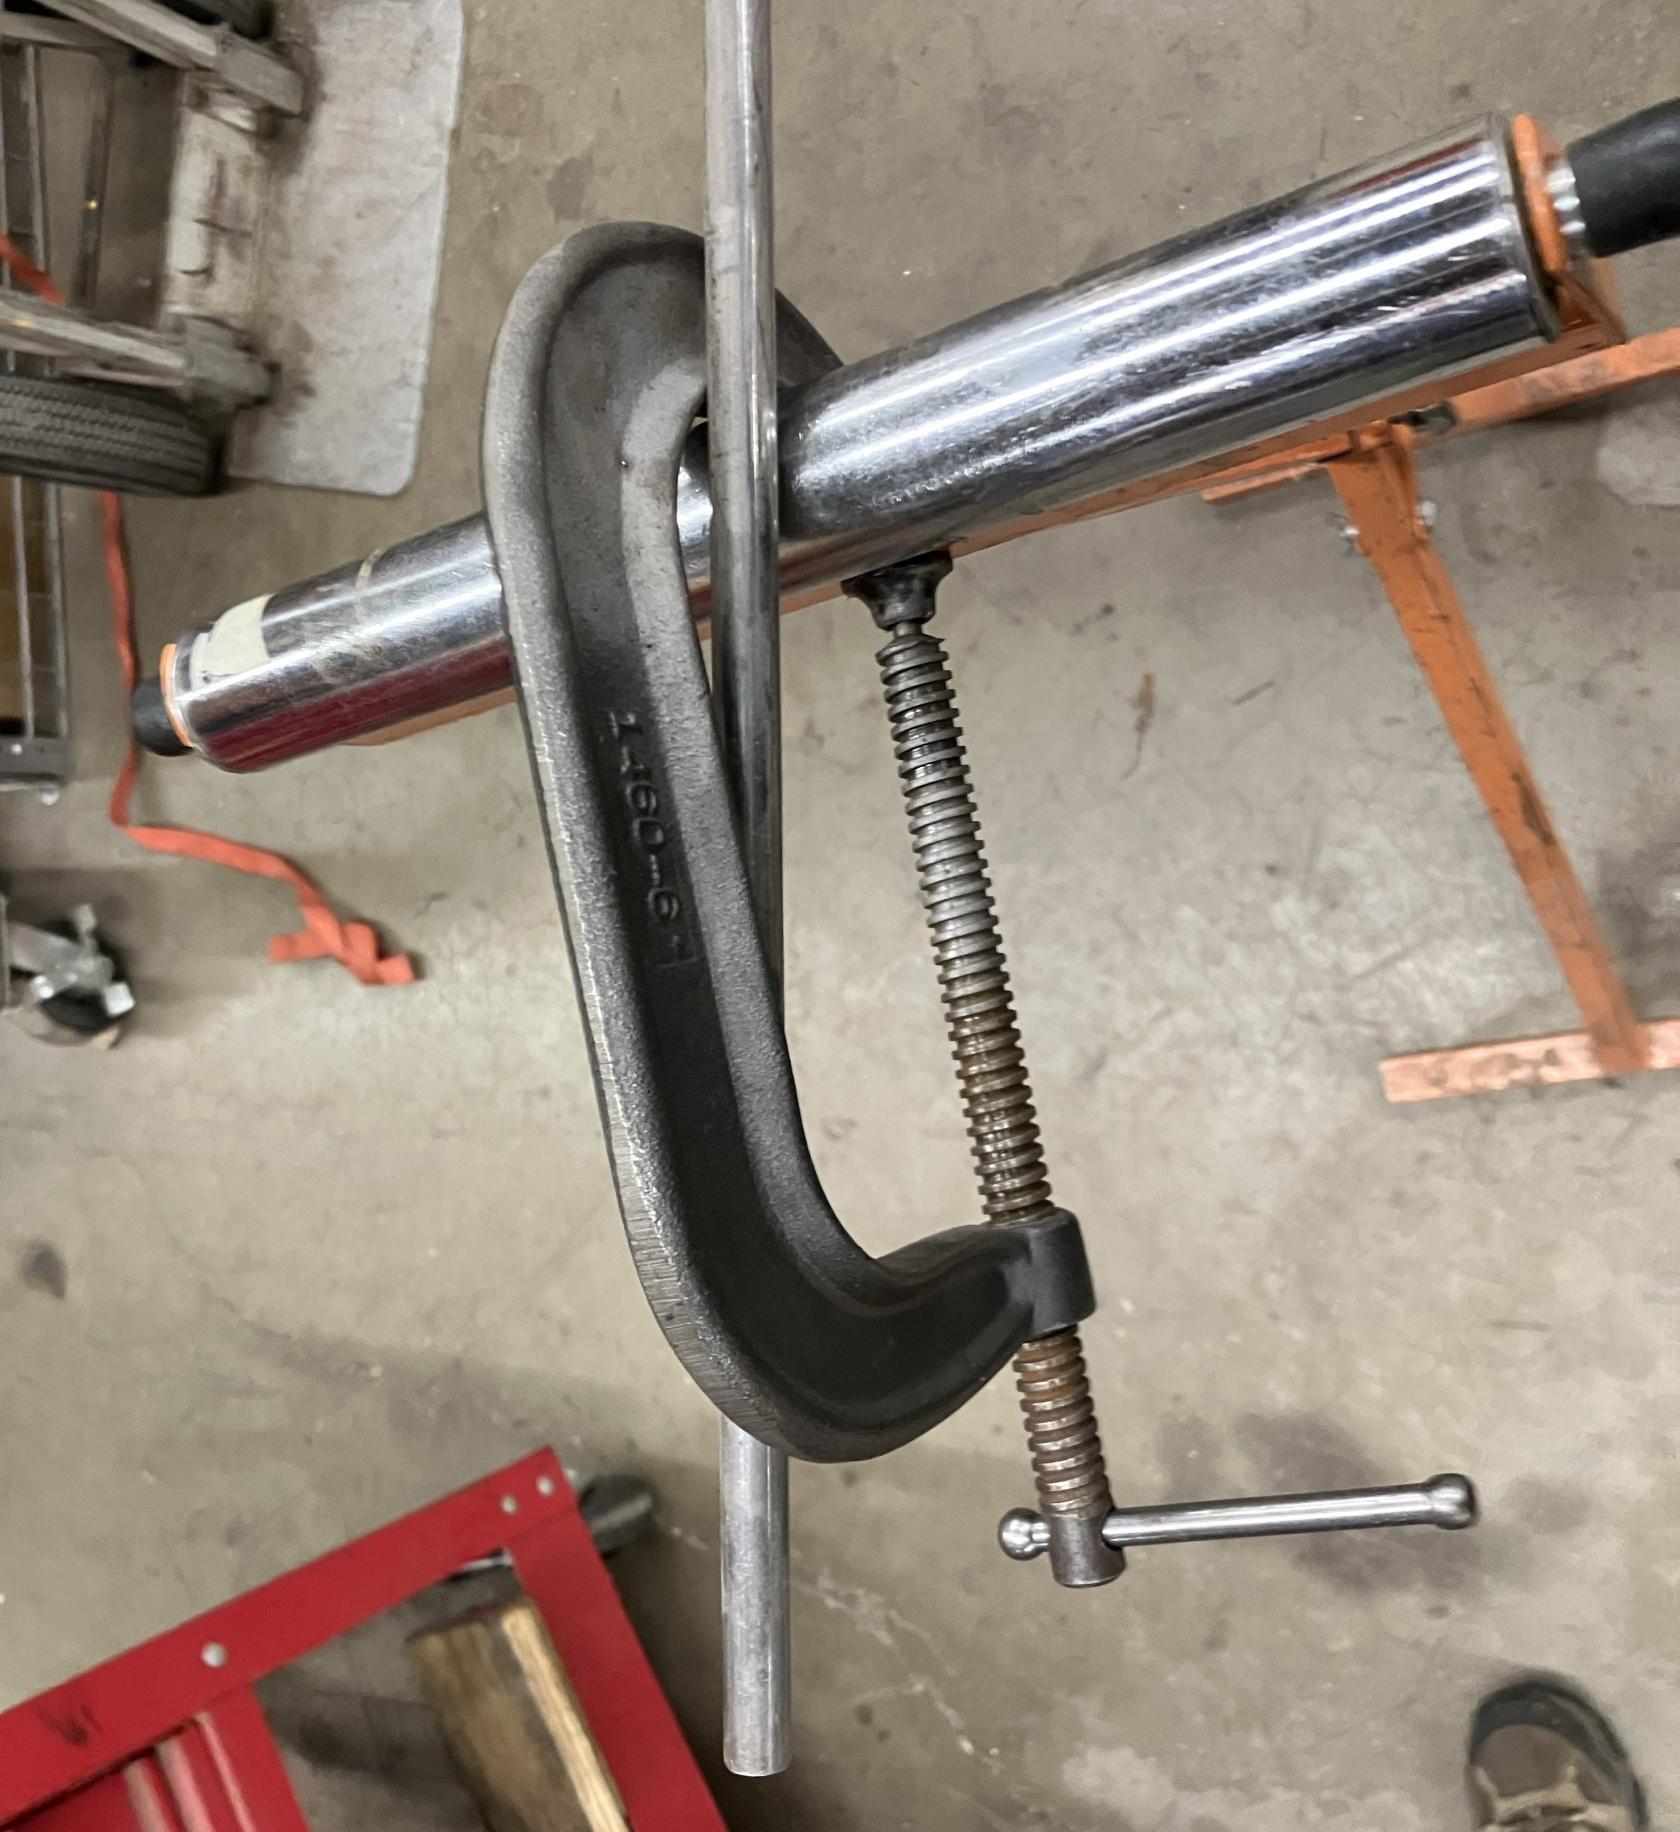](https://wiki.protohaven.org/uploads/images/gallery/2025-10/metal-lathe-c-clamp-snugged.jpeg)
6. *Optional:* lightly place a rag in the back of the headstock around the part to further dampen vibrations.
[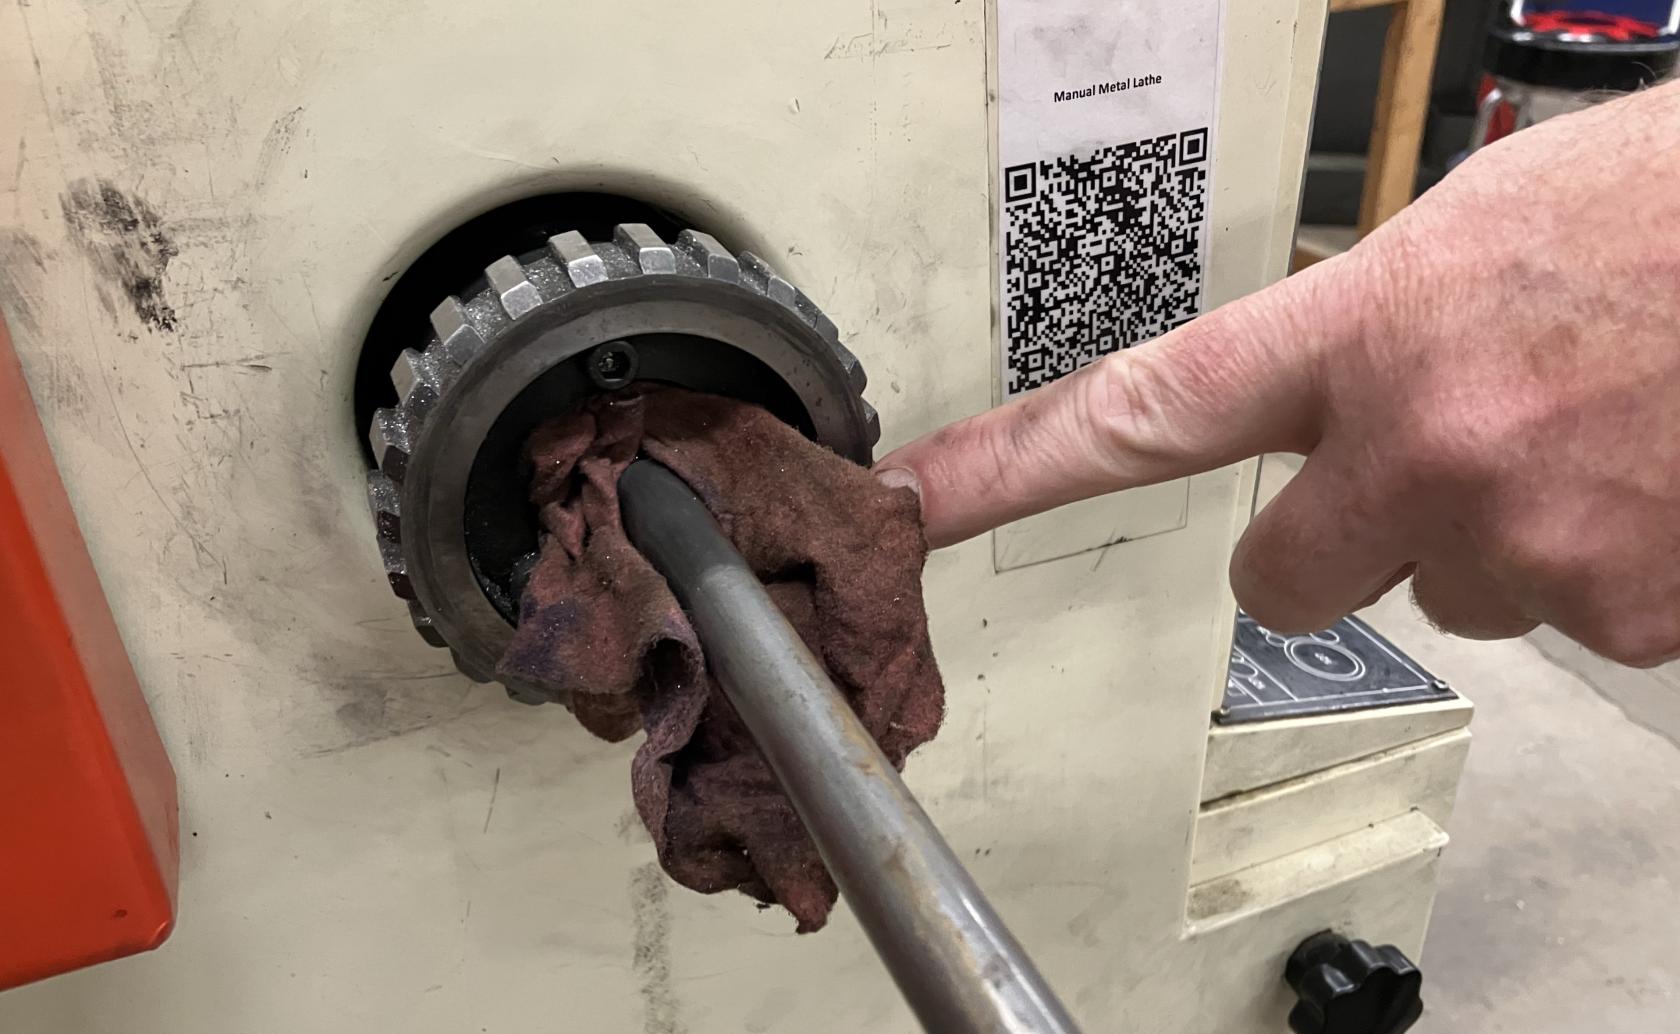](https://wiki.protohaven.org/uploads/images/gallery/2025-10/metal-lathe-additional-stabilization-with-rag.jpeg)
7. **Important Last Step:** Build a fort: place rolling carts around the area to keep other members from accidentally walking into the workpiece while the metal lathe is in use.
While workpiece is turning, monitor the roller stand to make sure that the workpiece does not walk too far off axis, or there is a danger of the workpiece working out of the c-clamp.
# Tool Tutorial
### Manual Metal Lathe
The lathe is used to make parts with radial symmetry and can be used to make incredibly precise cuts in most metals and plastics (accurate to the .001 inch!). It is a joy to operate, but it must command your full attention.
Never leave the key in the chuck. The key in the chuck without a hand touching it is not ok.
Never set the speed while the machine is running.
Wear appropriate PPE
Avoid crashing the tool holder into the chuck.
Ensure all tooling and fixtures are secure before powering on.
Clean the ways and the mating surfaces before and after chuck changes.
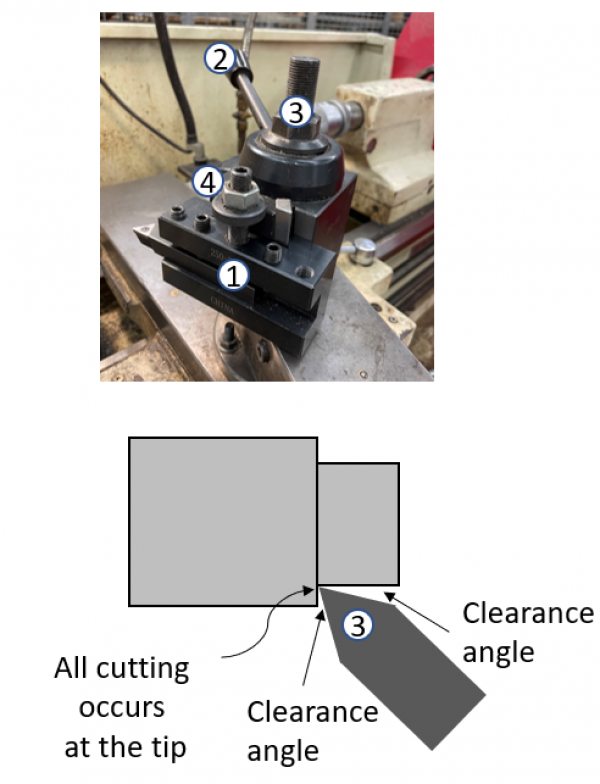
### Tool Anatomy
[](https://protohaven.org/wiki/_detail/tools/metal_lathe_1.jpg?id=tools%3Ametal_lathe%3Astart "tools:metal_lathe_1.jpg")
1.
Tool Post - Securely holds cutting tools and allows their angle to be adjusted
2.
Carriage - Moves tools toward/away from the workpiece on the z axis
3.
Cross slide - Moves tools toward/ away from the workpiece on the x axis
4.
Compound slide - Additional axis that can be set an an angle to move the tool in an additional direction (usually for cutting tapers)
5.
Ways - the rails on which the carriage, cross slide and compound slide move
6.
Three jaw chuck - Holds the workpiece and spins with the spindle.
7.
Tailstock - Holds drills and live center
8.
Control Panel - Adjust speeds, feeds, and e-stop
9.
E-Stop Button - Cuts power to the machine in an emergency (also important to press if working with hands on/in the jaws or spindle)
10.
Emergency Foot Brake - Cuts power to the machine in an emergency
11.
Digital Readout - Provides precise position of the carriage and the cross slide
12.
Maintenance Tag - Manually tracks the usability status with color-coded cards
1.
Speed Adjustment Levers - Set the speed at which the chuck spins
2.
Feed Adjustment Levers - Set the speed at which the autospeed moves the carriage or cross slide.
3.
E-Stop Button - Cuts power to the machine in an emergency (also important to press if working with hands on/in the jaws or spindle)
4.
Jog Switch - Press and release to advance spindle momentarily (Currently does not function)
5.
Power Indicator Light - illuminated whenever lathe has power
6.
Coolant On-Off Switch - turns coolant pump on and off (Currently does not function)
-
On the lathe top
-
Chuck Key
-
1/2“ wrench
-
3/4” wrench
-
1-1/8“ wrench
-
Chip brush
-
Oil
-
Cutting Fluid
-
In the tool cabinet
-
Carbide facing / turning tool
-
Parting off tool
-
Drill chuck
-
Center drills / drills
-
Boring bar
-
Live Center
At the manual lathe safety glasses and closed-toed shoes are also required.
All hair, clothing and accessories should be secured close to the body. Necklaces, hoodie drawstrings, hair, etc. can all be pulled into the machine resulting in injury or death. Roll up sleeves and tie back long hair.
Do not wear gloves or rings when working on the lathe. Much like loose clothing, these can get pulled into the lathe, resulting in serious injury or death.
#### Common Hazards
1.
**The lathe can drag the user in by getting hair, clothing and accessories wrapped around the work piece or chuck.**
-
Always secure dangling clothing, hair and accessories.
-
Remember to roll sleeves securely to elbows
-
Never wear gloves while operating
2.
**Pieces of the workpiece are cut away in spiraling chips. These chips can be sharp and hot. They can also wrap around the chuck and workpiece creating a swirling tornado of sharp metal if not cleared away often enough. That tornado can cut you or worse, catch on your clothing or hair and pull you into the lathe.**
-
Always wear safety goggles and [appropriate PPE](https://protohaven.org/wiki/tools/start#personal_protective_equipment "tools:start")
-
Practice good chip management!
-
Break chips frequently by briefly pausing the cut.
-
Clear chips away from the chuck and push down to the chip tray.
3.
**The lathe operates using high torque. Unsecure objects (like if the chuck key is left in the chuck!) can be flung out of the machine at high speed or dragged into the rotation, possibly resulting in injury or death.**
-
**NEVER LEAVE THE CHUCK KEY IN THE CHUCK**
-
Never reach over the chuck or lean on the machine
-
Never turn the lathe without something gripped in the chuck
-
Wait for the spindle to stop before releasing your focus
1.
Note that the lathe has two emergency stops: [the button and the foot pedal](https://protohaven.org/wiki/tools/start#tool_anatomy "tools:start"). Activating these stops will cut power to the machine, but ***will not stop it immediately***. The lathe has considerable momentum and it will continue to spin for several seconds after the stop has been activated.
2.
Keep the E-STOP engaged when you are installing your workpiece or tools. You don’t want the machine to start if your hands are in it.
3.
Never turn the lathe without something gripped in the chuck. Make sure all three jaws of the chuck are closed on the workpiece. ***Keep as little material as possible exposed***. It will reduce bending and vibration. If you must have a large amount of material exposed, consider using the [live center](https://protohaven.org/wiki/tools/metal_lathe/start#live_center "tools:metal_lathe:start ↵") to help support your workpiece.
4.
Wait for the spindle to stop before speaking to the operator.
5.
Look and listen. If something seems weird, it is weird. Stop and reassess if you hear screeching, thumping or vibrating, or smell something smoky or burning.
-
Hardened Steel - Do not cut hardened steel on the lathe (it is harder than your cutting tool)
-
Wood - Do not cut wood on the metal lathe as there is a more appropriate lathe available in the woodshop.
1.
**Secure** clothing and hair / remove accessories / put on safety goggles
2.
**Check** that all tools are present
3.
**Clean** the ways and mating surfaces
4.
**Oil** the ways
5.
**Ensure** the chuck is tightly attached to the spindle
6.
**Unlock** the E-stops
7.
**Set** speed
8.
**Load** the workpiece keeping as little material as possible exposed, use a live center if a large amount of exposure is necessary.
9.
**Remove the chuck key**
10.
**Power on** the machine and begin operation
-
Carbide insert for facing / turning [1691N59](https://www.mcmaster.com/1691N59 "https://www.mcmaster.com/1691N59")
-
Cutoff tool [3366A45](https://www.mcmaster.com/3366A45 "https://www.mcmaster.com/3366A45")
-
Boring bar [3301A39](https://www.mcmaster.com/3301A39 "https://www.mcmaster.com/3301A39")
-
Cutting fluid (tap magic) [1413K31](https://www.mcmaster.com/1413K31 "https://www.mcmaster.com/1413K31")
1.
Ensure the hatch line on each bolt is between the two Vs etched on the chuck as shown below. If it is not between the Vs it is not tight.
2.
It is good practice to loosen and tighten each of the three bolts before beginning use even if they look tight at first glance. Trust, but verify!
3.
**DO NOT LEAVE THE CHUCK KEY IN THE CHUCK!**
4.
Set the Speed
Never turn the lathe without something gripped in the chuck.
Always ensure that all three jaws of the chuck are closed on the workpiece. Keep as little material as possible exposed. It will reduce bending and vibration.
If you must have a large amount of material exposed, use the live center to help support your workpiece.
#### Set The Speed
The speed of the lathe should be set according to the material you are cutting, the size of the material, and what type of cutting tool you have (carbide or HSS).
Never change the speed while the machine is running.
The recommended settings should be considered upper limits. There is nothing wrong with cutting at lower speeds as you get the feel for it.
Select your speed (see common settings) and finding the closest match on the table located on the upper left portion of the lathe:
[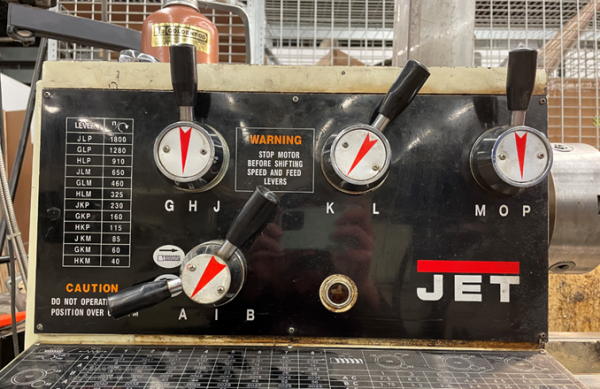](https://protohaven.org/wiki/_detail/tools/metal_lathe_4.png?id=tools%3Ametal_lathe%3Astart "tools:metal_lathe_4.png")
Turn the top three knobs to match the letters indicated by the table. The lathe is set to 115 Rotations Per Minute (RPM) with the knobs set to HKP. (Note O indicates neutral and the lathe won’t spin if the third knob is set to O).
### Common Settings
The turning speed of the lathe depends on the material you are cutting and the diameter of the workpiece. Large workpieces need slower speeds because their surfaces move faster relative to the cutting tool. Soft materials can be cut quickly, but hard materials should be cut slower.
A few example speeds for common materials and diameters are listed below: (all assuming a High Speed Steel (HSS) cutting tool)
| Diameter | Ideal Speed for aluminum (RPM) | Recommended speed (RPM) | Ideal Speed for Steel (RPM) | Recommended |
|---|
| ¾ inch | 2546 | 1273 | 407 | 204 |
| 1 inch | 1910 | 955 | 306 | 153 |
| 2 inch | 955 | 477 | 153 | 76 |
| 3 inch | 700 | 350 | 102 | 51 |
Remember: You can always turn slower than the calculated speed!
### Basic Operation
#### Operation Checklist
1.
**Setup**
2.
**Power on** the machine, leaving the **E-Stop engaged**
3.
**Set** the direction of rotation
4.
**Load** and align tooling
5.
**Set** the origin
6.
**Twist** E-Stop button to enable the lathe (lifting the emergency stop pedal with toe if it still does not start)
7.
**Begin** cutting
8.
**Cleanup**
**Never** move the lever from one direction to the other without first moving the lever to its off position and waiting for the spindle to come to a complete stop.
This lever should be used to stop the lathe during normal, non-emergency usage instead of the e-stop.
#### Load Tooling
Select your tool and tool holder. There are tool holders with tools already installed in the black drawers. Be sure to check that the tool is securely attached by the screws in the tool holder. Don’t assume the person before you installed them correctly.
Once the tool is inserted into the tool holder, load the tool holder onto the tool post shown below:
[](https://protohaven.org/wiki/_detail/tools/metal_lathe_6.png?id=tools%3Ametal_lathe%3Astart "tools:metal_lathe_6.png")
#### Tool Post Setup
#### Checking Tool Height
1.
Move the carriage up to your workpiece and set the height as close to the center of your part as you can.
2.
Lock it down using the lock nut and the dovetail lock handle.
3.
Start the machine at a low speed and face a tiny bit of material off the front of the workpiece. If you are high or low you will see a “belly button”.
4.
Adjust your tool up or down depending on the location of the belly button relative to the cutting tool.
5.
Keep adjusting until the tool is centered and no detectable belly button appears. (Remember that the height of your tool will change slightly after you lock down the dove tail, so you may need to adjust a couple of times.)
1.
Make sure the readout is in *zero mode*. The top right of the screen should say “zero.” If it says “set” instead, hit the mode button (circled in red) until the top right reads “zero.”
2.
Move the carriage and cross slide to your desired zero point and hit the set buttons (circled in blue) to set their positions to zero. (Carriage is Z and the cross slide is X.
3.
If the screen looks as it does below, hit “no ref”.
1.
Touch off on the front of your part
2.
Back off using the cross slide
3.
Move in .020” or so on the carriage
4.
Set Z0 on the digital readout
5.
Slowly move the cutting tool across the face until you reach the center
6.
Back off using the carriage so you don’t ruin your surface finish by tracing back over the part (only on the finishing pass)
7.
If facing to check for centering:
-
Check the front of your workpiece for an “outie belly button.”
-
If there, move your tool up to the belly button to see if it is high or low.
-
Adjust the nut accordingly and repeat.
1.
Touch off on the side of your part
2.
Back off using the carriage
3.
Move in .020” or so on the cross slide
4.
Set X0 on the digital readout
5.
Slowly move the cutting tool across the outer diameter until you reach the end of your shoulder.
6.
Back off using the cross slide so you don’t ruin your surface finish by tracking back over the part. (This will also face the front edge of the shoulder)
1.
To insert drill chuck: extend the tailstock out past the 10 mark
2.
Push the drill chuck in a make sure it is secure (rotate it if it doesn’t slide all the way in)
3.
Do not retract past the 10 mark or it will eject the chuck
4.
Slide the tailstock up close to your part and lock it into position using the handle on the back side. If you don’t lock it down, the tail stock may slide backwards as you drill.
5.
Always drill with a center drill first. This will keep your drill in the center of your part. If you don’t use a center drill, your drill may walk and damage the part or break the drill.
6.
Drill with a **pecking motion** to clear chips and allow the workpiece and drill to cool. (keep an eye out for little pieces of chips welded to the drill. Stop and chip them off if you see them) Be sure to bring the drill all the way out of the workpiece when you peck to clear chips and allow the bit to cool. Cutting fluid is highly
1.
Set the angle of the compound slide
2.
Move the tool in just past the outer diameter
3.
Use the compound slide to make a cut
4.
Retract the compound and move in with the cross axis.
5.
Repeat until your final cut at which point you will retract with the man carriage away from your part to protect the finish.
1.
Load the cut-off tool into the tool post
2.
Loosen the tool post and use the flat front of the 3 jaw chuck to square the cut-off tool to the spindle.
3.
Tighten down the tool post when there is no gap between the front of the jaws and the tool
4.
Touch off on the front side of your part and set the zero position on the digital readout.
5.
Move the cutting tool to your cutting position. Remember the cut-off tool is 0.125” wide, so move the axis an extra 1/8” to make your part the right length
6. **Set the speed appropriately for the parting tool** - a good rule of thumb is 30-40% of the "nominal" turning RPM you'd use for a turning operation.
7.
Slowly drive the tool into your part using the cross slide (1/4 the speed you would use to face or turn)
8.
Remember to back off occasionally to clear chips and cool the tool. Cutting fluid is strongly recommended.
1.
Power off the lathe
2.
Return all tools
3.
Brush chips from top to bottom
4.
Empty the chip tray by removing and dumping and/or vacuum it out
5.
Wipe all chips and debris from mating surfaces (includes ways and inside the chuck attachment if you used the collet attachment)
6.
Oil the ways
7.
Ensure 3 jaw chuck is secured
8.
Ensure all axes are unlocked
9.
Unlock the Estop
10.
Note any maintenance needs or concerns on the tag and at [protohaven.org/maintenance](https://wiki.protohaven.org/protohaven.org/maintenance)
1.
Twist the E-stop button until it pops
2.
Lift the E-stop foot pedal with your toe and try to turn the machine on again
1.
Turn on the power switch on the back of the machine.
1.
Move the carriage or cross slide slower
2.
Speed up the spindle
1.
Too much material is out of the chuck—shorten up. If not possible, use a live center to support the part.
2.
Make smaller cuts to reduce the force on the workpiece
1.
Move the speed selection knobs and make sure you hear/feel them click into place. If they don’t click, rotate the jaw while turning the knobs. (never change speed while running the spindle)
1.
If no electrical activity is heard the handle is lifted, the e-stop is on.
2.
Twist the E-STOP button and release the emergency stop pedal
1.
Press the power button on the back of the machine