# Jewelry - Jewelry Torch


# Manual(s)

*Manuals and other reference materials from the manufacturer or other sources.*

# Member Notes


# Resources

*Where to obtain materials, consumables, and tooling.*

# Tool Tutorial

### Natural Gas Soldering Torch  


<p class="callout warning">This article is incomplete.</p>

A natural gas/oxygen torch produces carbon-free flames, (5120°F for natural gas), which is a good all-purpose system to solder metals together.

### Tool Anatomy

[![](https://protohaven.org/wiki/_media/tools/imported/torches.jpg?w=400&tok=a690c5)
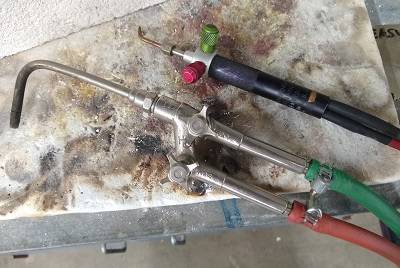
](https://protohaven.org/wiki/_detail/tools/imported/torches.jpg?id=tools%3Ajewelry%3Asoldering_torch "tools:imported:torches.jpg")  
RED = GAS   
GREEN = OXYGEN  
[![](https://protohaven.org/wiki/_media/tools/imported/ventilationhood.jpg?w=400&tok=30f078)
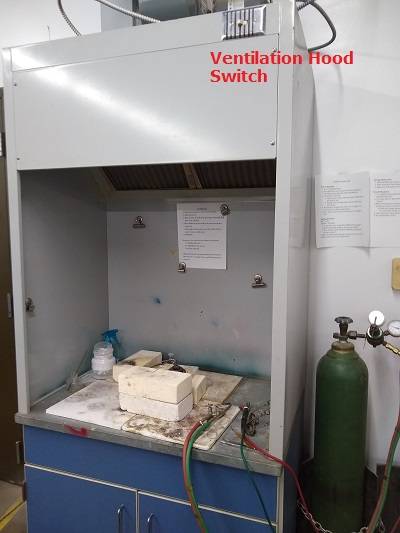
](https://protohaven.org/wiki/_detail/tools/imported/ventilationhood.jpg?id=tools%3Ajewelry%3Asoldering_torch "tools:imported:ventilationhood.jpg")  
[![](https://protohaven.org/wiki/_media/tools/imported/gasvalvea.jpg?w=400&tok=064002)
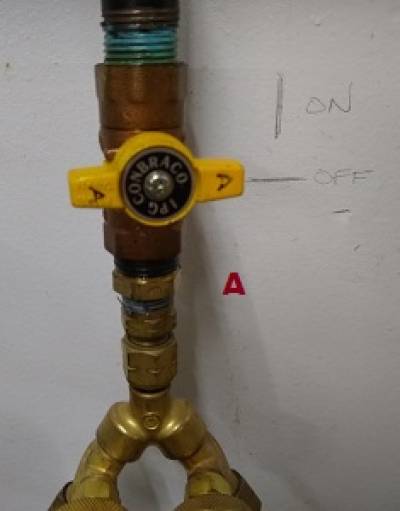
](https://protohaven.org/wiki/_detail/tools/imported/gasvalvea.jpg?id=tools%3Ajewelry%3Asoldering_torch "tools:imported:gasvalvea.jpg")  
[![](https://protohaven.org/wiki/_media/tools/imported/torchinputs.jpg?w=400&tok=d5f995)
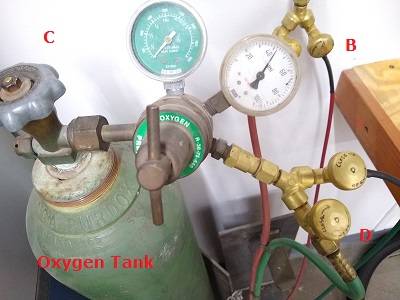
](https://protohaven.org/wiki/_detail/tools/imported/torchinputs.jpg?id=tools%3Ajewelry%3Asoldering_torch "tools:imported:torchinputs.jpg")  
A. Natural gas line opener valve - turns on the gas  
B. Bronze gas valve - allows gas to flow to the torch  
C. Oxygen tank valve - turns on the oxygen  
D. Bronze oxygen valve - allows oxygen to flow to the torch  
[![](https://protohaven.org/wiki/_media/tools/imported/striker.jpg?w=200&tok=05f14b)](https://protohaven.org/wiki/_detail/tools/imported/striker.jpg?id=tools%3Ajewelry%3Asoldering_torch "tools:imported:striker.jpg")Striker

### Tool Safety

#### Personal Protective Equipment

Clothing and closed-toed shoes (preferably boots) must be of natural materials that will burn quickly and not melt to skin (i.e. cotton, denim, leather).

#### Common Hazards

Fire &amp; Burns

#### PROHIBITED MATERIALS

TODO

### Operation

#### Inspection &amp; Set Up

##### **Turn on the gases**

<div class="section_highlight_wrapper" id="bkmrk-turn-on-ventilation-"><div class="level3">1. <div class="li">Turn on ventilation hood</div>
2. <div class="li">Turn yellow knob (A) on gas line that's mounted on the wall from perpendicular (off) to parallel (on)</div>
3. <div class="li">Open bronze valve (B)corresponding to the torch you want to use. The big torch has big hoses, the mini torch has small hoses.</div>
4. <div class="li">Turn the grey Oxygen tank valve (C) to “Open”. It's the valve on top of the oxygen tank.</div>
5. <div class="li">Open bronze valve (D) that connects to the oxygen tank.</div>

</div></div>##### **Light the torch**

<div class="section_highlight_wrapper" id="bkmrk-on-the-torch%2C-turn-o"><div class="level3">1. <div class="li">On the torch, turn on the GAS (RED) knob ¼ turn.</div>
2. <div class="li">Light the gas with a striker, do not use a lighter.</div>
3. <div class="li">Then introduce the OXYGEN (GREEN) by opening the valve slowly.</div>

</div></div>Note: If you open either the gas or oxy valve too much, it will blow itself out. Go slow, start small.

##### **Turn off the torch**

<div class="section_highlight_wrapper" id="bkmrk-close-green-oxy-valv"><div class="level3">1. <div class="li">Close GREEN OXY valve on the torch FIRST</div>
2. <div class="li">Then close RED GAS valve on the torch</div>
3. <div class="li">Make sure both valves are closed when not in use!</div>

</div></div>##### **Turn off the gases**

<div class="section_highlight_wrapper" id="bkmrk-turn-yellow-knob-on-"><div class="level3">1. <div class="li">Turn yellow knob on gas line (A) from parallel (on) to perpendicular (off)</div>
2. <div class="li">Turn grey valve on top of the oxygen tank (C) to “Closed”</div>
3. <div class="li">Bleed out all gas and oxygen from the hoses by opening the valves on the torch.</div>
4. <div class="li">Watch the oxygen gauges. When they both read “0”, close both valves on the torch.</div>
5. <div class="li">Close all bronze valves (B &amp; D)</div>
6. <div class="li">Turn off ventilation hood</div>

</div></div>### Soldering

<div class="section_highlight_wrapper" id="bkmrk-make-sure-your-piece"><div class="level4">1. <div class="li">Make sure your piece is clean and free of debris (optional- Dip your piece in firescale protection solution (FPS) (boric acid+alcohol) This mixture is extremely flammable and has been removed from the soldering enclosure)</div>
2. <div class="li">Flux the joint to be soldered and add chips of solder</div>
3. <div class="li">Slowly warm the whole piece till the flux takes on a crusty appearance, then evenly heat, lastly focus on the area to be soldered. The hot solder will move in the direction of the flame, so positioning is key.</div>
4. <div class="li">(alternate method) Pick up a chip of solder with your flux brush to paint it onto your solder seam once the seam is hot. (more advanced) You risk moving parts out of position and just burning a bunch of brushes.  
    </div>

</div></div><p class="callout info">If your piece has more than one solder joint, use HARD solder first, Use MEDIUM solder second, Use EASY solder last. (Hard solder tarnishes the least and has the closest color to the metal you are working with, so use hard if you just have one seam.)</p>

#### Consumables

Silver solder in easy, medium and hard is available at the front desk for purchase.

## Cleanup

TODO