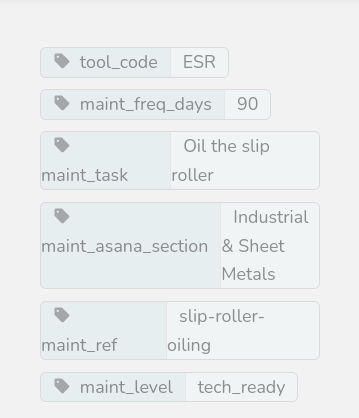
Maintenance - Tech Ready
Maintenance tasks that do not require special training on a given piece of equipment.
- 3D Printers
- Air Compressor
- Arbor Press
- Band Saw, Metal, Horizontal
- Band Saw, Wood
- Band Saw, Wood, Resaw
- Bandsaw, Metal, Vertical
- Cleanup
- Clean Computer Lab and Conference Room
- Clean front desk area and shelves
- Clean out overhead air filters in woodshop
- Clean Popcorn Maker
- Clean the water pitcher
- Clean wash tub and water fountain
- Deep clean coffee maker
- Dust and Sweep Forge Area
- Dust and Sweep Jewelry Area
- Dust and Sweep Metals Area
- Dust and Sweep Studio Area
- Dust and Sweep Woodshop Area
- Dust sheet metals area
- Empty leak catcher in custodial room
- Empty Shop Vacs & Clean Filters
- Lubricate door hinges
- Powder Coating - Sweep and Check Hoses
- Purge the scrap bins
- Verify Tool Tags (Physical & Digital)
- CNC Metal Mill (Tormach)
- CNC Plasma
- CNC Router
- Downdraft Table
- Drum Sander
- Dye Sublimation Printer
- Jewelry - Basic Maintenance
- Jointer
- Laser Cutter, Rabbit
- Clean catch boxes below lasers 1 and 2
- Laser 1 & 2: Clean bed and underneath - NEEDS REVIEW
- Laser 1 & 2: Clean Blower
- Laser 1 & 2: clean honeycomb
- Lathe, Wood
- Lawnmower
- Maintenance Task Automation - For New Tasks, Start Here!
- Miter Saw, Wood
- Pedestal Grinders, Metal
- Empty pedestal grinder media seperator
- Pedestal grinder - cycle the media separator
- Pedestal Grinder Maintenance (Weekly)
- Planer
- Powder Coating Booth
- Powder Coating Ovens
- Safety
- Check fire extinguishers
- Check First Aid Kits for low levels of supply
- Check workshop outlets
- Clean welding helmets and jackets
- Clean/sanitize safety glasses & hearing protection
- Flush Eye Wash Station (Monthly)
- CO Detector, Smoke Detector, and Thermostat Testing
- Test emergency lighting
- Welding fume extractor - check filter
- Sandblaster
- Security
- Slip Roll, Sheet Metal
- Soldering Iron
- Storage
- Table Saw
- Router Table
- Facilities & Outside
- Magnet roller the parking lot
- Correct thermostat temperatures and modes (HVAC)
- Mail/Package Receiving Shelf
- Front Door August Lock Batteries
- Welding Tables
- Pantograph
- Injection Molder
3D Printers
Recharge 3D printer desiccant pack
Recharge Desiccant Pack
- Remove the white rectangular plastic desiccant pack from the "free filament" tote box by the 3D printing cabinet.
- Inspect the desiccant beads through the front window.
- Use the legend by the window to gauge if the beads are wet.
- If the beads are wet, plug the desiccant pack into a wall outlet. *Set a timer* and check every two hours. The unit will heat up to drive out the moisture, which will bead up on the inside of the unit before evaporating. Once the condensation is gone and the beads are a happy color again, unplug the unit.
- Return the dried desiccant pack to the filament box and ensure the lid is closed.
Clean/Lubricate the X/Y/Z Axis of the 3d printers
Clean/Lubricate the X/Y/Z Axis of the 3d printers
- Grab the cleaning kit. Located on the shelf in the 3d printer cabinet.
- Use the Z Axis cleaning device in the kit. If a replacement is needed: https://www.printables.com/model/229145-z-axis-screw-cleaning-device
- Drip some Isopropyl Alcohol on a paper towel.
- Wrap the paper towel around the threaded rod.
- Clip the Z Axis cleaning device around the paper towel and threaded rod.
- Move the gantry up and down using the Z Axis Move option in the settings menu.
- Be careful, the Prusa printers do not stop automatically at the top of travel, so approach the top with caution.
- Apply a dime sized amount of Lithium Grease to a paper towel and wipe up and down the Z Axis threaded rod.
- Move the gantry all the way up and all the way down using the Z Axis Move option (Go to settings in the menu, then move axis, z axis).
- Repeat the last two steps if the grooves of the threaded rod are not covered.
- Wipe off any excess grease.
- Turn off the printer.
- Clean the round linear rails of the X/Y/Z axis with a paper towel and alcohol.
- Apply a small amount of 3 in 1 oil to the rails and move the guides across the oil.
- Wipe any excess oil off.
- Inspect the belts for tension, when picked like a guitar string, they should lightly 'twang'. If they are loose or very tight, file a maintenance report.
- Return cleaning kit to tool tray.
Air Compressor
Air Compressor Maintenance (Weekly)
Wiki page: https://protohaven.org/wiki/tools/air_compressor#maintenance_schedule
Service manual: https://drive.google.com/file/d/1XzDx7dxhe-dacSaEM6lDuwz62_uSK6YC/view
Task List
- Wear safety glasses and hearing protection
- Check for proper oil level (within the two marks on the gauge)
- Check tank for moisture by barely cracking the valve on the bottom of the tank. If water is coming out, file a report as the air dryer (box at the top of the unit) may not be operating.
- Check for any unusual noise or vibration
- Clean all external parts of compressor and dryer with a damp cloth
- Vacuum the radiator on the air compressor (do not use compressed air).
- Using compressed air, blow any dust out of the dryer unit (the black cage on top of the air tank)
- Confirm the timer on the dryer unit (the small white box resting on top of the black tank) is set to the current time, and the side switch is set to "Timer". Rotate the dial counter-clockwise until the black arrow points to the current time.
- Confirm the air compressor clock (on the display in the front) is set to the current time...
- Press the up arrow, then Enter repeatedly until you see the date and time settings.
- Confirm the date and time, using up/down arrows to adjust if needed. Note that Monday is considered Day 1, Tuesday is Day 2 etc. etc.
Note on setting automatic on/off times - ADMIN ONLY
See Manuals section, PLC manual link, pg 17 for clock timer setting process.
Compressor should turn on at 10:10AM and off at 22:00 on all days, for first timer.
Second and third timers set to 23:01/23:01, 22:00/22:00 or similar on/off time as they are not used.
Arbor Press
Arbor Press Periodic Maintenance
Service manual: https://drive.google.com/file/d/17N-GZd98lkBZe_qzui03i1omQ-WQyV2a/view
Clean and Lubricate
- Wipe off or vacuum the accumulated debris and dust.
- Lubricate the arbor press ram with a light machine oil.
Check and Service Ram
Check the ram for side-to-side and front-to-back play. If the play is excessive (per page 6 of the service manual):
- Loosen the hex nuts (11).
- Adjust (tighten) the screws (10 on side, 9 in front) just enough to eliminate the excess play.
- Tighten them equally to assure even contact with the ram (4).
- Hold the screw (10 or 9) in position and tighten the hex nut (11).
- Check to make sure the amount of play is acceptable.
Band Saw, Metal, Horizontal
Check horizontal bandsaw interior, clean if needed
Clean the Interior
- Open the side panel.
- Dredge out any buildup of chips, gunk, and other debris.
- Ensure the cutting fluid can make its way to the sight glass on the bottom right of the machine. If it's not visible, submit a maintenance request so a trained person can mix and add coolant.
- Ensure the drain for the drip tray is not obstructed
- Ensure the drain inside the blade guard door (leads into a tube) are not obstructed
Band Saw, Wood
Throat Plate Printable FIles
Replace the throat plate on the table saw with the printable in these files:
Use either PETG or ABS filament to print the new throat plate.
Do not use PLA.
To install the printed throat plate, carefully move it into place with the saw running, using the blade to cut the clearance slot.
Band Saw, Wood, Resaw
Throat Plate Printable FIles
Replace the throat plate on the table saw with the printable in these files:
Use either PETG or ABS filament to print the new throat plate.
Do not use PLA.
To install the printed throat plate, carefully move it into place with the saw running, using the blade to cut the clearance slot.
Bandsaw, Metal, Vertical
Vertical Metal Bandsaw - Weekly
Service manual: https://drive.google.com/file/d/1YgGuXN2GB-ZQffNzAmpv5Zo6hYNJFlxi/view?usp=drive_link
Task List
- With a thumb or cloth, check for grease on the shaft of the upper blade guide and no accumulated debris. Reapply with grease from the grease gun in the bottom drawer of the maintenance cart as necessary.
- Inspect the machine for wear.
- Clean off any dust and debris and wipe down the cabinet surfaces
- Check the blade for missing / dull teeth and file a tool report if a replacement is needed
Cleanup
Clean Computer Lab and Conference Room
Materials
For a disinfectant, you can use sanitizing spray (kept under the kitchen sink, with refills in the maintenance closet)
Apply disinfectant, wait three minutes, then wipe with a clean cloth or paper towel.
If we are out of disindectant, submit a purchase request: https://protohaven.org/purchasing
Task List
- Disinfect all keyboards and mice.
- Dust off and wipe down all computers, tables, and chairs.
- Clean the whiteboards. (Do not touch areas that are marked "DO NOT ERASE" or similar.)
- Throw out any trash or debris. (Any loose papers should be placed on top of the printer in the conference room.)
- Tidy up any disorganized cables.
Clean front desk area and shelves
Task List
- Organize all hand tools. (Put similar tools close to each other and ensure power cables are nicely stowed.)
- Place any loose papers on the front desk in the desk organizer on the left hand side of the desk. Notify the #techs channel on Discord of what was placed there.
- Clean off the whiteboard to the side of the front desk.
- Tidy up any loose cables.
- Toss any trash.
Clean out overhead air filters in woodshop
Safety
- Wear eye protection.
- Wear a dust mask.
Cleaning the Filters
Do this when the woodshop is not actively in use.
- Carefully lower the two overhead air filters in the woodshop using the winches mounted to the wall.
- Vacuum out the filters and the catch bags inside.
- Carefully raise the two overhead air filters in the woodshop using the winches mounted to the wall.
Clean Popcorn Maker
If the popcorn maker is already clean, you can just close out this task.
Clean Out Popcorn Compartment
- Unplug the popcorn maker.
- Remove any stale popcorn already in the popcorn maker.
Clean the Kettle
- Unplug the kettle.
- Lift the kettle up and out of the brackets.
- Wash the kettle with soapy water. (Do not submerge the kettle.)
- Let the kettle dry.
- Put the kettle back on the brackets in the popcorn maker.
- Plug in the kettle.
Clean the water pitcher
Clean Out the Pitcher
- Remove the lid.
- Wash and dry the lid.
- Remove the top reservoir.
- Remove the filter from the top reservoir and discard.
- Wash and dry the top reservoir.
- Wash and dry the pitcher.
Replace the Filter
Observe the filter replacement reminder sticker on the right side of the pitcher. If the current month is on or after the indicated "replace filter" date:
- Insert a new Brita filter into the top reservoir following the instructions on the wrapper of the new filter.
- Reassemble the pitcher.3. Move the sticker so that it's indicating the current month on the "New Filter" column.
The last step is very important - if the indicator is not adjusted, we'll be wasting brand new filters every time this task is scheduled.
If you used the last replacement filter, file a purchase request:
- Purchase request: https://protohaven.org/purchasing
- Amazon link for replacement filters: https://a.co/d/0wRp7dq
Clean wash tub and water fountain
Wash Sink and Water Fountain
- Remove and discard any debris from the sink.
- Wash both sections of the sink and the top surface of the water fountain with soapy water.
If Barkeep's friend or other stainless steel cleaner is available, follow the directions on the cleaner and apply it to the sink and water fountain.
Be sure to rinse both sink sections and the water fountain with plenty of water after cleaning.
Deep clean coffee maker
Service manual: Google Drive / Local PDF: DeLonghi Coffee Maker -216990-1.pdf
Follow the instructions on page 10 of the manual.
Dust and Sweep Forge Area
Safety
- Wear a dust mask.
- Wear safety glasses.
Task List
Do not dust the interior of the forges as improper cleaning may damage the refractory material.
- Use a shop vac or dust brush to remove dust from all visible surfaces, paying special attention to the tables, tool caddies, and other "installed" furniture in the space.
- Sweep the floor.
- Dispose of any debris in a nearby trash can.
Dust and Sweep Jewelry Area
Task List
- Use a shop vac, dust brush, or water-dampened paper towel to remove dust from all visible surfaces. (Pay special attention to the central table and the L-shaped table with finishing tools.)
- Wipe down the interior of the flame cabinet with a water-dampened paper towel.
- Sweep the floor. (Use the shop vac in the jewelery area to pick up the sweepings - the shop vac collects metals that can be recovered.)
- Report any unlabeled containers full of unknown liquids
Dust and Sweep Metals Area
Safety
- Wear a dust mask (if you do not have your own, disposable masks are available in the custodial room).
Task List
For each metal shop tool:
- Use a shop vac or dust brush to remove dust from all visible surfaces.
- Sweep the floors of the general metals, CNC plasma, welding, sand blasting, and precision metals areas.
- Gathered debris should be tossed into the rolling trash cans.
Dust and Sweep Studio Area
For each tool in the studio:
- Use a shop vac or dust brush to remove dust from all visible surfaces.
- Sweep the floor of the studio.
- Dispose of any debris using the rolling trash cans.
Dust and Sweep Woodshop Area
Safety
- Turn on the woodshop dust collection.
- Wear a dust mask. (If you do not have your own, disposable masks are available in the custodial room.)
- Wear hearing protection. (The dust collection is loud.)
Task List
For each woodshop tool:
- Use a shop vac or dust brush to remove dust from all visible surfaces.
- If you are familiar with the bandsaws and table saw: remove any sawdust built up in the interior of these machines.
- Sweep the woodshop floor. (To make final cleanup easier, you can push piles of sawdust to the floor-level dust gates, turn on the main dust collector, then open and close the gate using the lever on the top.)
- Leave overhead dust collection (not the main unit) to run on HIGH for 10 minutes.
- Turn off dust collection.
Dust sheet metals area
Safety
- Wear a dust mask.
- Wear safety glasses.
- Unplug all electrical equipment before cleaning.
Task List
With a dry cloth, wipe down all external surfaces of the sheet metal tools:
- shear
- slip roller
- finger brake
- shrinker/stretcher
- turret punch
- notcher
Empty leak catcher in custodial room
In the Custodial Room (behind the Jewelry Area) there is a bucket labeled "Leak Catcher" under a water pipe on the left side of the room as you enter.
- If the bucket is more than half full, dump the water into the sink and return it to its position under the water pipe.
- If you see additional water on the floor or the bucket is very full, notify a tech lead.
Empty Shop Vacs & Clean Filters
Safety
- Wear a dust mask. (If you do not have your own, disposable masks are available in the custodial room.)
- Wear safety glasses.
Empty Shop Vacs and Service Filters
We have 11 shop vacs - two in precision metals (one for dry, one for wet), one at the powder booth, and four near the wood shop. Two at the lasers. One in textiles, .
For all shop vacs (except for the special instructions; see belog):
- Roll it to the dumpster outside.
- Take off the top and dump the contents into the dumpster.
- Remove filter from top; gently knock against the inside of the dumpster, then replace.
- Visually check the filter for holes or punctures - if there are any, replace the filter and file a purchase request for additional filters.
- Secure the lid back onto the main body.
- Roll it back to where you found it.
Special Instructions
- The black "Wet Metals" vac typically contains aluminum, just dump it into the Aluminum trash can. Any coolant can be dumped into that trash can too.
- The 2 Orange Fein and the Powder coat vacuums have bags, check the bags, if they are nearing full, dump or replace the bags. New bags can be found in maintenance, on the left as you enter the room, near the floor. Place a purchase request if more bags are needed.
- The Jewelry vacuum has a bag and does not need to be changed, the metal in that bag gets sent to be recycled.
Lubricate door hinges
Lubricate Hinges
Add a little bit of oil to the hinges of each of the doors of:
- The ED Office
- Conference Room
- Staff Room
- Design Classroom
- Class Supply Room
- Maintenance Room
- Custodial Room
- Bathrooms
- Front Door
- All three doors leading out of the studio
Powder Coating - Sweep and Check Hoses
Service manual: https://drive.google.com/file/d/1q-U4OK-cNpTElOdnf1WNjkKlD4l9B48k/view
Safety
- Wear a dust mask.
- Wear safety glassess
Clean the Booth
- Turn on the booth ventilation system
- Use a broom to sweep the walls, ceiling, and floor of the booth.
- Use the area shop vac to vacuum up any powder.
- Turn off the booth ventilation system.
- Thoroughly vacuum the exterior surfaces of the powder coating booth.
- Sweep the floor around the powder booth and both the large and small ovens.
- Take the shop vac out to the dumpster and empty it carefully - powder coat is a fine dust.
Inspect the Hoses
Inspect the air and powder hoses (both in the booth and by the control box) for sintering, kinking, or other degradation.
If you note any problems, file a tool report.
Tool report: https://www.protohaven.org/maintenance
Purge the scrap bins
Woodshop
In the woodshop free bin and the free board caddy in the lathe area, remove any wood that:
- Is painted or treated
- Has nails/metal inside
- Is heavily splintered
- Is "swiss-cheesed" with little material to use, etc.
Metalshop
In the metalshop materials bins in the powdercoating area, transfer any unsuitable metals from the suitable bin to the unsuitable bin. Unsuitable metals includes anything:
- Galvanized/coated
- Swiss-cheesed
- Any materials that aren't identifiable as aluminum or carbon steel
The "unsuitable" bin gets picked up by a service periodically. If it is excessively full, tag @TechLeads in your shift report so we can bug the appropriate people.
Studio
In the two scrap bins by the laser cutters:
- Remove any small/unusable pieces
- Remove any pieces not on the allowed materials list (see QR code posted on the top of laser 2)
- Break down any pieces with large voids so they fit nicely within the bins
Verify Tool Tags (Physical & Digital)
Compare Online and Physical Tool States:
- Open https://api.protohaven.org/techs
- Make a note of tools in a yellow or red state.
- Visit each of the tools listed as red or yellow state and verify that there is a physical tag on the tool that matches that state. If the physical tag is missing, place a fresh one.
- Scan for tools with physical tags that do not have a digital yellow or red state.
- Update all tool reports to match the current state of the tool - this may not necessarily be exactly what the tag says. If you're unsure, ask on #maintenance.
Tool report link: https://www.protohaven.org/maintenance
CNC Metal Mill (Tormach)
Clean Tormach Coolant System
The coolant system on the tormach has a tank and a filter screen on it - these should be inspected and cleaned regularly so the coolant can properly flow.
Gather Materials
- 2 Buckets, can be found past the Tormach:
- One 5 gallon bucket
- One smaller bucket that has metal chips in it
- Rubber gloves (found in custodial room)
- Slotted spoon / spatula (found at the CNC Plasma)
Clean the Coolant System
- Place a 5 gal bucket on the table of the machine.
- Power the machine on:
- Turn the rotary switch on the right side of the machine to the ON position.
- Ensure the E-stop on the front of the machine is disengaged.
- Press Green button to power on.
- Place the 5 gal bucket under the coolant sprayer.
Turning on Mach3 and moving the table to one side may be necessary. - Run the pump.
- When the pump has run dry, turn the switch back to AUTO when done.
- When done using the computer, close Mach3, and go to the start menu on Windows and select shut down. Wait for the computer to fully shut down.
- Turn off the machine by turning rotary switch on the right back to the origional position.
- Put on rubber gloves.
- Scooping from the right side (near the pump) to the left to avoid packing chips into the filter screen, use the slotted spoon/spatula to scoop the chips from the bottom of the coolant tank into a maintenance bucket.
Get as many chips out of the coolant tank as reasonable; it does not need to be perfectly clean. - Place the chips in the aluminum recycling trash can that is in the machine shop area.
Some contamination of metals is unavoidable, but try to avoid introducing too much coolant into the recycling can. - Refill the coolant tank from the bucket you drained it into in step 3.
- Top off the tank with fresh coolant, to nearly the top lip of the tank.
- Return all tools to where you found them.
Deep Clean Tormach CNC
Safety
- Wear a dust mask. (If you do not have your own, disposable masks are available in the custodial room.)
- Wear safety glasses.
- Wear hearing protection.
- Wear gloves when handling chips.
Clean Tormach
- Vacuum out the ways and the chip tray using the wet/dry vac next to the Tormach.
- Remove any remaining visible chips from the front control panel, the coolant drain grate behind the machine, and elsewhere.
- Clean off the keyboard, mouse, and monitor with a damp cloth.
CNC Plasma
CNC Plasma 14 Day Maintenance
Test the PH of the water
- Locate the PH test strips, in the computer cubby hole at the CNC Plasma Computer station.
- Use a stick or other object to lightly stir the water in the table. Just lightly move the water in between the slats, careful not to splash out. Stir at least half the table.
- Remove one PH test strip from the bottle, seal the bottle back up quickly and make sure the lid is snug, the strips will go bad when exposed to air.
NOTE: Prior to wetting the strip, read steps 4 through 6 before continuing. The pH strip reading is most accurate immediately after the strip is wetted, and the indicated pH will continue to change after wetting. - Dip the colored end of the strip into the water for about 1 second. Remove and shake excess fluid from the strip.
- Compare the strip to the color chart on the bottle as follows:
- Hold the bottle in your left hand up right
- Hold the test strip in your right hand by the portion that is not exposed to the liquid
- Match the colors on the test strip parallel to one of the 14 rows corresponding to the pH on the bottle
- Take note of the PH reading:
- If the reading closely matches two rows on the bottle, record the pH to the 0.5 increment between the two rows
- Example: The test strip shows between 9 and 10. The pH is recorded as 9.5
- If the reading closely matches two rows on the bottle, record the pH to the 0.5 increment between the two rows
- Return the pH test strip bottle to the CNC Plasma computer cubby.
- Make an Air Table (Not ASANA) tool report:
-
In the "What would you like to Report" Section, enter "CNC Plasma 14 Day Maintenance entry: pH=[the measured pH]"
- If the PH reading is NOT between 9 and 10:
- Check "Create an Asana Task?" task to adjust the PH level of the table.
- Indicate in the "What would you like to Report" section "pH adjustment is required" in addition to the pH measurement entry above.
-
3d Print Files For CNC Plasma Table
Hose Filler
This is best printed on its side.
Plasma Table Water Supply v2.stepPlasma Table Water Supply v2.step
Overflow tube (sorry, it has reverse thread but it works fine).
The main tube is best printed on its side so the layer lines run along the part.
The gasket is printed from TPU
Plasma Table Bulkhead Fittings v2.step
CNC Router
CNC router dust collector - check interface between filter and bag
Safety
- Wear a dust mask. (If you do not have your own, disposable masks are available in the custodial room.)
- Wear safety glasses.
Check and clean interface
- Remove the top filter from the dust collector using the handle at the top.
- Visually inspect and brush any collected dust or debris resting on top of the funnel/cone area into the bag.
Downdraft Table
Downdraft Table Monthly Maintenance
Service manual: https://drive.google.com/file/d/1t_Rllh8OS5fv1GuQ800Qa1ZzpGfTkGr9/view
Safety
- Wear a dust mask.
- Wear hearing protection.
- Wear safety glasses.
Clean Downdraft Table
- Clean and/or vacuum dust drawer. (Dust drawer located on front face, bottom, left hand corner.)
- Remove table sections and vacuum exposed areas.
- Open the motor door and vacuum the inside of cabinet.
- Remove the filters and tap them out on the side of the dumpster - there's two of them (coarse and fine)
If suction is noticeably reduced, file a tool report (refer to "Servicing Filters" section of manual)
Drum Sander
Monthly Maintenance
- Perform weekly maintenance
- Remove the lower panel on the infeed side of the machine. Vacuum dust buildup from inside cabinet and off motor.
- Check v-belts for damage, tension, and wear. Yellow/Red tag the machine if issues are observed.
- Check for problematic issues:
- Loose mounting bolts.
- Worn or damaged sandpaper.
- Worn switch or buttons.
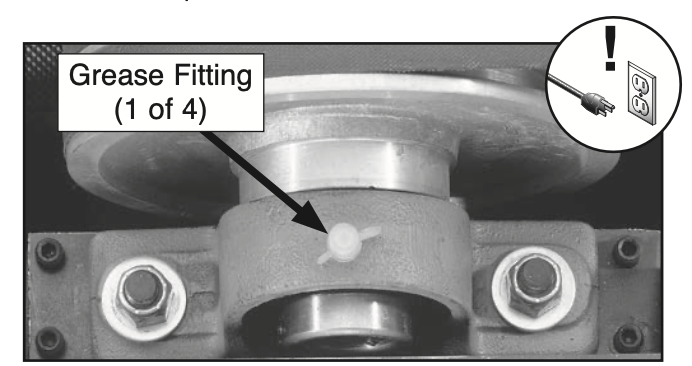
- Lubricate pillow bearings (fig 2) with 1–2 pumps from a grease gun.
- The manual says this should be done weekly, or per 20 hours of use. I expect monthly should be sufficient based on our usage.
- Avoid adding too much grease, which attracts sawdust.
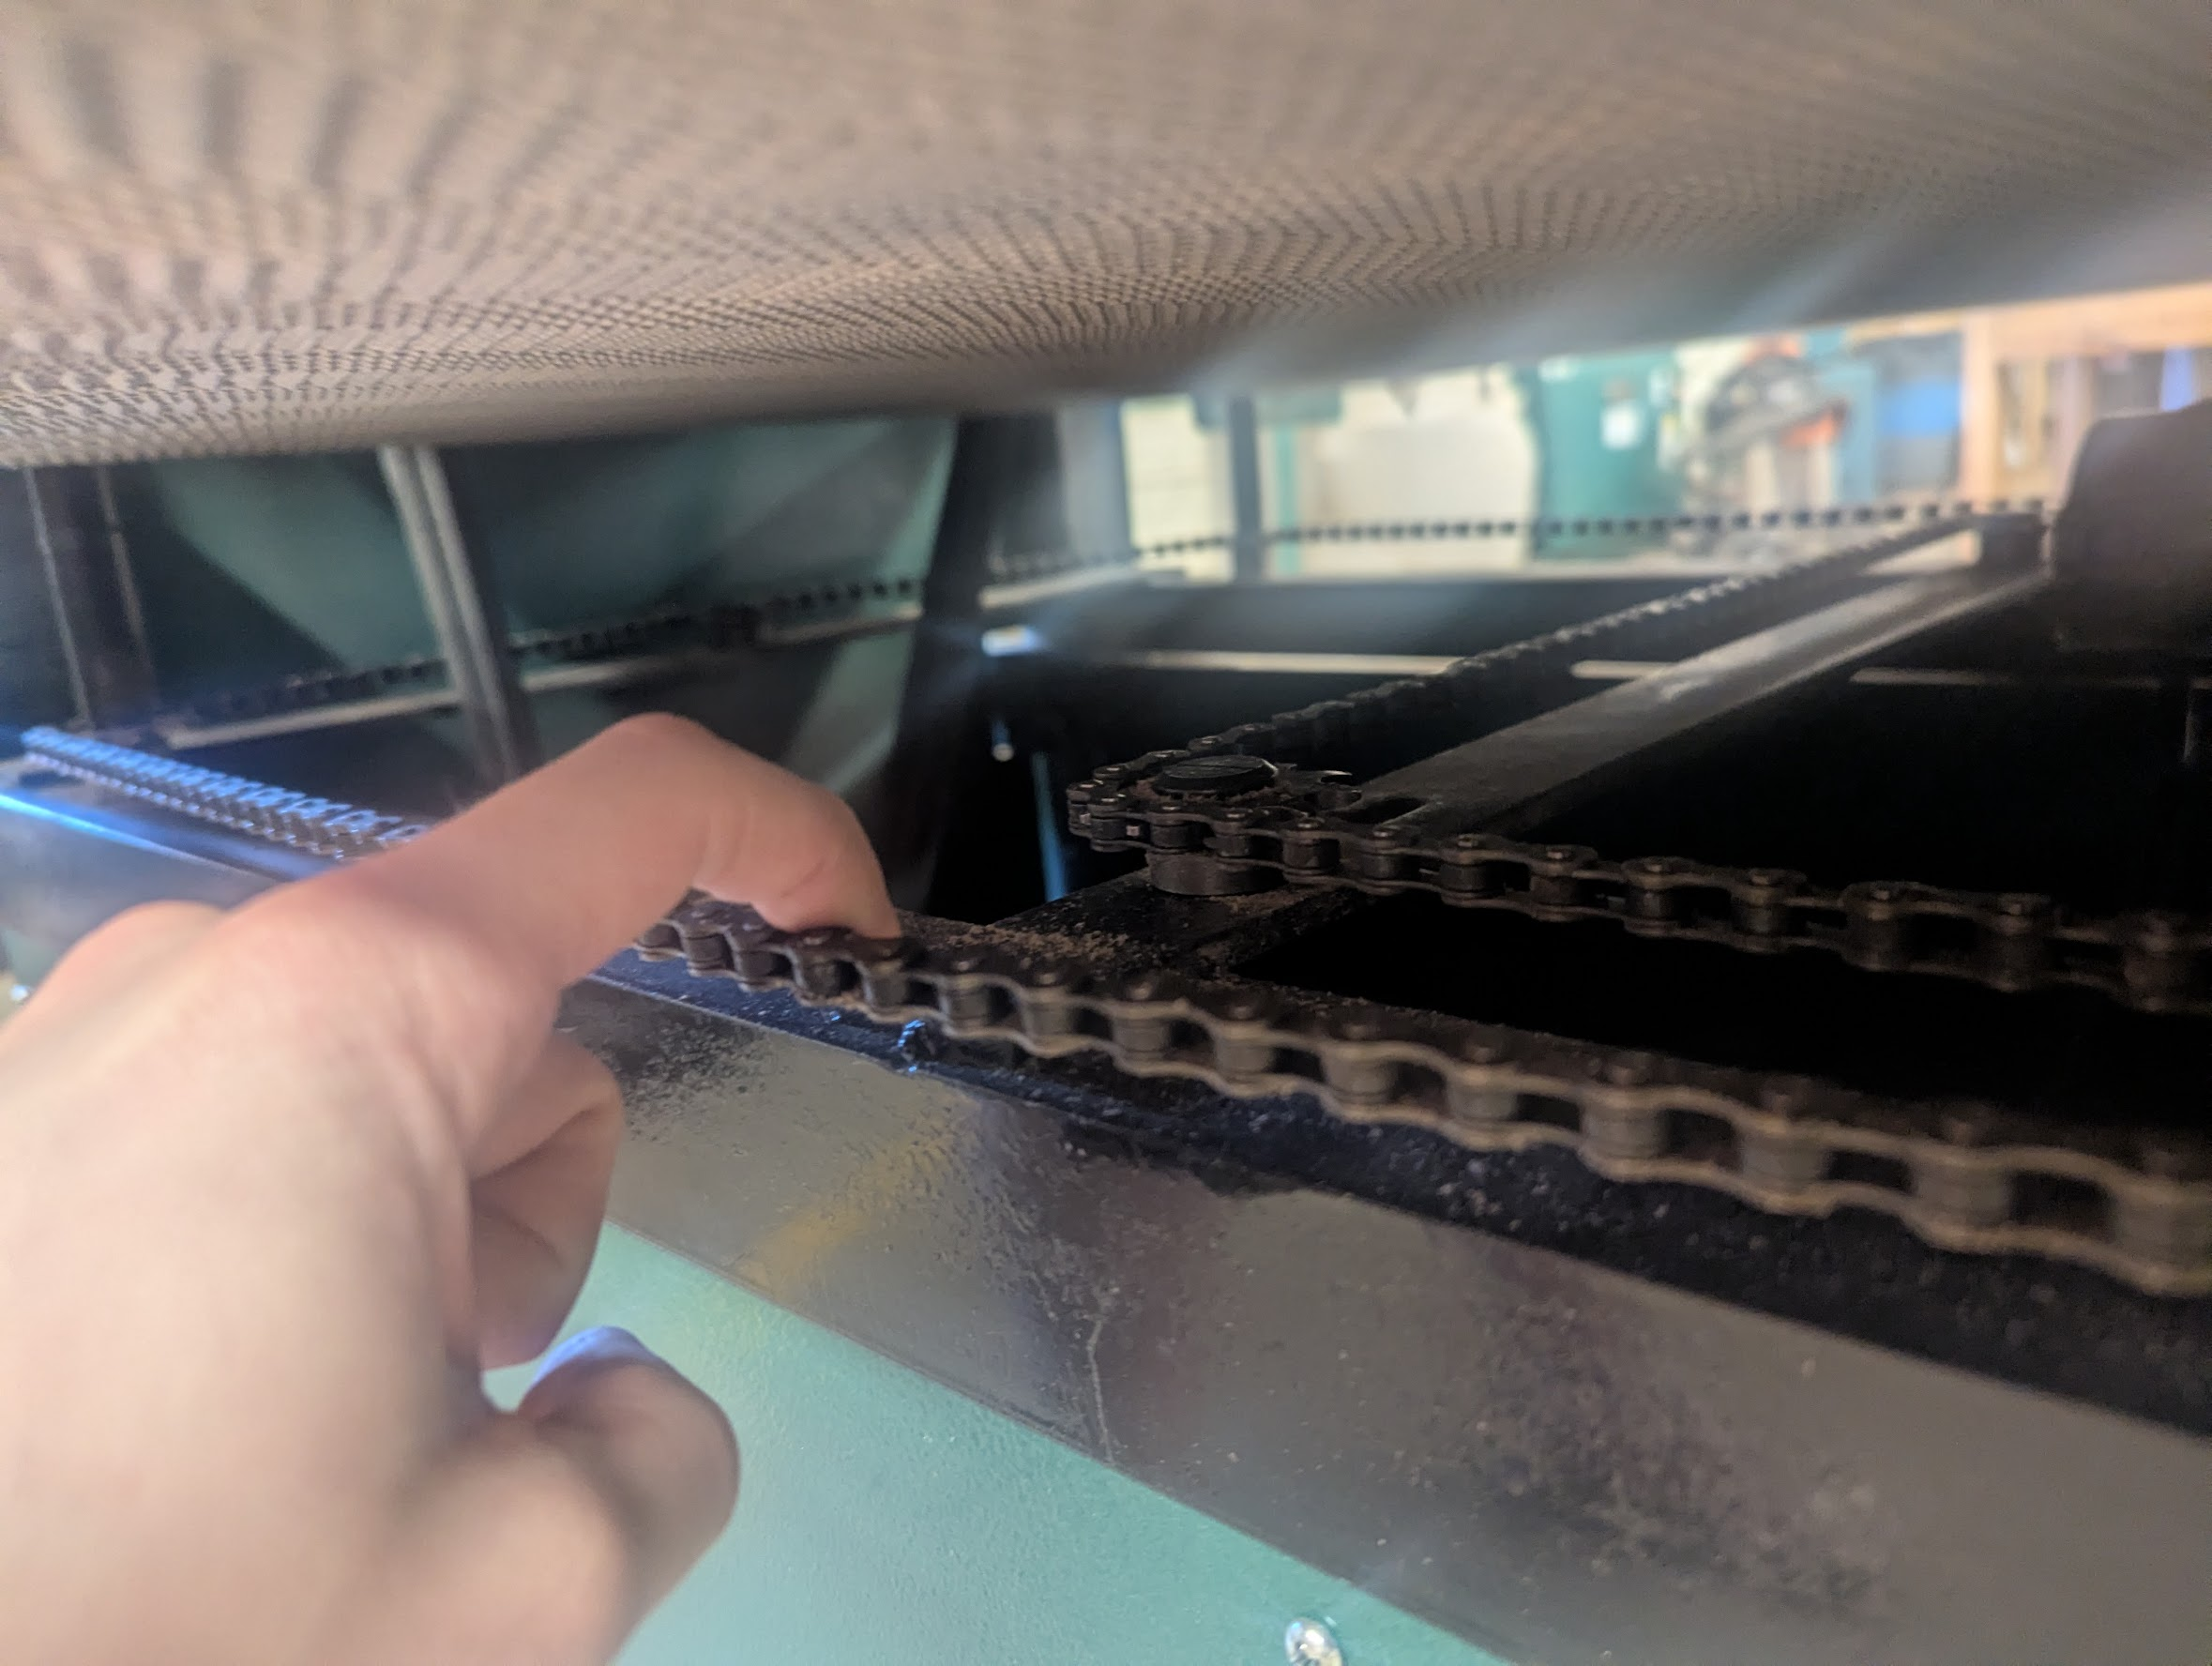
- Check the tension of the chain that connects all four of the threaded rods that position the bed. If the chain is loose, adjust it by repositioning the idler sprocket towards the middle rear of the machine (pictured in fig 3)
- Yellow/Red tag the machine if issues are observed.
 (fig 2)
 (fig 3)
Six Month Maintenance
- Lubricate conveyor table leadscrews and sprockets. (fig 3)
- Clean the leadscrews, chain, and sprockets with a soft wire brush.
-
Apply 1–2 pumps of grease from a grease gun onto the sprockets and leadscrew threads. Adjust the conveyor up or down to spread the grease thoroughly throughout the mechanisms.
- Avoid adding too much grease, which attracts sawdust
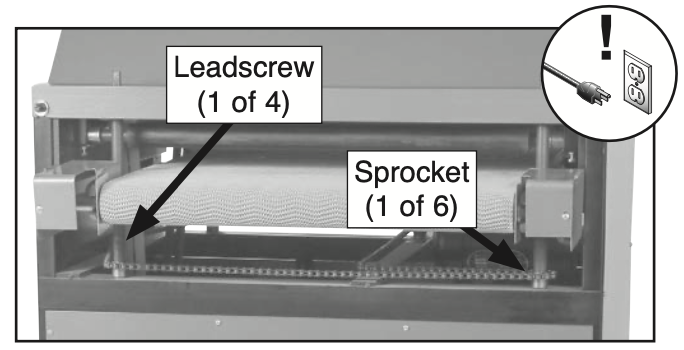 (fig 3)
Weekly Maintenance
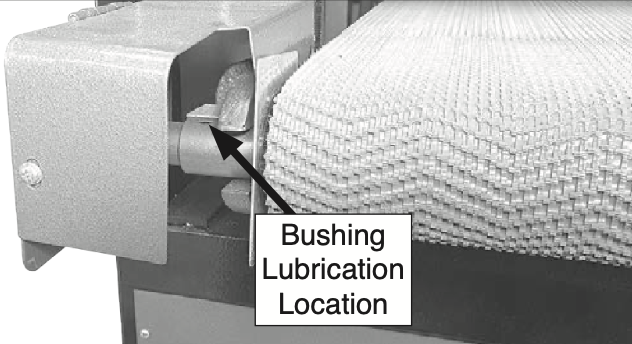
- Lubricate conveyor roller bushings with a couple drops of 3-in-1 oil from a can (located in Maintenance Cart drawer) in holes(fig 1).
- The manual says this should be done daily—since we do not see daily use, weekly should be OK
- Avoid adding too much oil, which attracts sawdust
- Vacuum dust buildup from underneath top cover.
- Check for worn or damaged sandpaper. Make a tool report that yellow tags the sander and alert the maintenance crew if the sandpaper needs to be cleaned.
- Check to see if the belt is tracking properly. The conveyor belt should not be touching the silver metal shields on each side. Make a tool report that yellow tags the sander and alert the maintenance crew if the conveyor belt tracking needs to be adjusted.
 (fig 1)
Dye Sublimation Printer
Check ink levels on dye sub printer
Prolonged use of the product when the ink level is below the line on the tank could damage the printer.
- Verify on the front of the machine that the ink tank levels are not below the minimum marking. If they are, file a tool report.
Tool report: https://airtable.com/appbIlORlmbIxNU1L/shrluff2WSzy8c3xd
Jewelry - Basic Maintenance
Maintenance tasks for jewelry area facilities and equipment
Clean polishing machine filter
Overview
Procedure
Setup
Clean the Filter
Jointer
Jointer Maintenance - Monthly
Task List
-
Clean the machine with a shop vac and dry cloth.
- Remove the dust collection buy pulling it away from the machine
- Inspect up inside the dust chute and make sure it is clear of buildup.
- Wax the cast iron surface of the table with a paste wax.
- Generally inspect the machine for damage and loose or warn parts. If any damage is found, submit a tool report.
Tool report: https://airtable.com/appbIlORlmbIxNU1L/shrluff2WSzy8c3xd
Jointer Maintenance - Weekly
Service manual: https://drive.google.com/file/d/1x37_ONdS5rXLuT0_jYOhp-QEAz2ClziH/view?usp=drive_link
Task List
- Unplug the machine
- Clean the cutter head.
- Check cutter teeth for chips and dullness and file a tool report if needed - DO NOT ROTATE THE INSERTS
- Generally inspect the machine for damage and loose or warn parts.
- Check the dust extraction for blockages and any large bits that could cause blockages.
Laser Cutter, Rabbit
Clean catch boxes below lasers 1 and 2
Underneath the Rabbit lasers there's a cabinet, containing a box that collects any small pieces of material that fall through the honeycomb.
Clean the Catch Boxes
For each of the large format lasers:
1. Unlatch and open the bottom panel in the front of the machine.
2. Find the handled catch box towards the top of the open space.
3. Remove the catch box by pulling it forward, then down and out of the machine.
4. Dump any contained loose material into a trash can.
5. Wipe away any remaining soot and debris with damp paper towel.
6. Clean any buildup of residue on the rear vent slots with plastic bristle brush (found on top of the black cabinets)
7. Replace the catch box,
8. Close and latch the bottom panel.
Laser 1 & 2: Clean bed and underneath - NEEDS REVIEW
This needs to be reviewed for content and tech_ready suitability before it is approved to be scheduled maintenance
- Remove the bed and clean up the material that has fallen though.
- Use a poking tool to free all of the material stuck in the honeycomb.
- Acquire a large bag and lot of easy off and clean the burnt on material from the bed.
- Rinse vigorously outside using a hose
- check belt tension
Laser 1 & 2: Clean Blower
- Reserve each laser one at a time to ensure they're not both down at the same time.
- Remove the blower from the system and loosen any large debris on the slots on the blower cage with a flathead screwdriver, then brush clean with a bristle brush. Be careful not to bend the fins.
- Check the water level in the chiller using the sight class on the back. If not between the min/max level, drain/refill using deionized distilled water. If the sight glass is clouded or moldy, file a tool report.
- Clean and lubricate the rails with machine oil.
For additional details, please see Exhaust System Maintenance.
Laser 1 & 2: clean honeycomb
Safety
Wear gloves
Wear safety glasses
Wear a dust mask
Clean Bed
1. Remove the honeycomb bed.
2. Clean up and discard any material that has fallen though the bed.
3. Use a poking tool to free all of the material stuck in the honeycomb. Clean up and discard material.
4. In a trash bag or on top of some cardboard, spray the honeycomb with oven cleaner and let sit following the directions on the can.
5. Rinse the honeycomb bed vigorously outside using a hose/pressure washer
Lathe, Wood
Wood Lathe - Monthly
Service manual: https://drive.google.com/file/d/1XsSwghnqBvr8uQD0qm1M8jcJ__te2DI1/view?usp=drive_link
Clean Dust and Debris
- Use pressurized air from the air compressor to blow out dust from around the electric motor and vfd, under the banjo and tailstock.
- Blow out the morse taper holes on the headstock and tailstock.
Clean Tailstock
- Remove the Tailstock from the Bed Rails.
- Blow off dust with compressed air.
- Clean the slide points and the clamp points with a fine grit nonwoven pad or #000 steel wool.
Clean Banjo
- Remove the Banjo (the big chunk of metal that bolts to the lathe bed that holds the toolrest) from the Bed Rails.
- Blow off dust with compressed air.
- Clean the slide points and the clamp points with a fine grit nonwoven pad or #000 steel wool.
Tighten Fasteners
Check and hand-tighten any loose connections in the tailstock:
- The slide lock lever
- The set screws on the handwheel
- The screws that hold the quill key on the back
Clean and Lubricate Rails
- Use a fine grit non woven pad or #000 steel wool to clean the rails from oxidation and stuck on debris.
- Lubricate with a wiped on coat of paste wax (found in the woodshop section of the maintenance room).
Inspect Belt for Wear
- Inspect all parts and accessories for wear and damage, file tool reports as appropriate.
Tool report: https://airtable.com/appbIlORlmbIxNU1L/shrluff2WSzy8c3xd
Lawnmower
Clean Lawnmower
- Remove the battery
- Clean the undercarriage using a putty knife and wire brush
- Reattach the battery
Maintenance Task Automation - For New Tasks, Start Here!
Maintenance Automation
The pages in this book (as well as the ones in Maintenance - Training Required and Maintenance - Admin Required) are used by software automation to periodically schedule tasks in the Shop & Maintenance Tasks Asana project.
Scheduling automation will only operate on pages that have been approved and which have the appropriate tags (as below).
Applying maintenance tags to a page
- While editing a wiki page, look to the right side of the page for an icon panel. There should be a "Page Tags" button there, that looks like a luggage tag:

- Click on the empty "Tag Name" field. You should see a suggested list of tags.
- Click on one of the suggested tags prefixed with
maint_to add it to the tags list. Repeat for all other tags with that prefix, so you havemaint_level,maint_freq_days, etc. all listed with their tag values not yet set. - Fill in the tags, using the suggested tag values to help. It may also help to use an already tagged wiki page as a reference by observing the set tags on on the left side of the page:

To set the tool_code tag, go to https://www.protohaven.org/equipment/ and scroll the Index table so the "Tool Code" column can be seen on the far right. Use the code for the corresponding tool.
The
maint_reffield can be anything, but it must be different than all other tasks. You can just grab a randomly generated UUID, name it similar to the maint_task value, etc. - Save the page when you're done. You can verify the page is visible to automation by clicking this link and using Ctrl+F to search for your task by name (note: works for tech_ready maintenance only)

Maintenance Tags
For details on what each tag means, see https://wiki.protohaven.org/books/metabook/page/tags-for-wiki-task-pages
Approving maintenance pages
Scheduling automation will not schedule maintenance on a page which has not been approved by at least one person with approval ability. See the header on this page for details on how to mark approvals, and who has this ability.
Miter Saw, Wood
Clean Miter Saw
Service manual: https://drive.google.com/file/d/16HFrtwBzy-s0uS8aojnePJ2yyeupkZX2/view?usp=drive_link
Procedure
Unplug before cleaning.
The miter saw should be cleaned with vacuum or a dry rag as needed to keep free of dust. Yellow plastic panel on work surface should be removed if there is saw dust build or debris up underneath.
Check the sliding rails, if there is resistance, use dry teflon lube.
Inspect and Clean Wood Miter Saw Blade
Service manual: PENDING
Inspect the Blade
Inspect the saw blade for wear and damage.
- If any teeth are missing, yellow tag the tool in a tool report and file a purchase request if there are no spares in the maintenance room.
- If two consecutive teeth are missing, file a tool report, replace the blade and place a purchase request if the last has been used.
Purchase request: https://protohaven.org/purchasing
Clean the Blade
Materials Needed:
- Dish soap
- Blade-Cleaning Kit (Found in the Maintenance Room)
- Drivers: T-30 Star and 7/32 Hex from the maintenance cart
The blade-cleaning kit should contain:
- A bin (for soaking)
- A brush
- Oily rags
- Hand towels
Procedure
- Unplug the saw.
- Remove the saw blade.
- Soak the blade in the cleaning solution for a few minutes, or apply cleaning solution with a sprayer.
- Scrub both sides with a plastic or brass bristle brush (not steel/stainless).
- Rinse throughly clean with water.
- Dry blade completely.
- Oil the entire surface very lightly with general purpose oil.
- Install the saw blade.
- Plug the machine back in.
Pedestal Grinders, Metal
Empty pedestal grinder media seperator
Empty the Media Seperator Drawer
To the right of the pedestal grinders is a big gray box that is the media separator.
There is a cabinet door on the bottom with retaining latches.
- Put on a dust mask and safety glasses
- Ensure the separator is off
- Check the vent ducting from to the separator, ensure connected and not filled with debris.
- Carefully empty the drawer inside the cabinet into the dumpster outside.
Pedestal grinder - cycle the media separator
The external air filter is a gray box to the right of the pedestal grinders.
Cycle the Filter
Using your foot, press and release the gray lever on the right side of the filter a few times to knock loose fine particles from the filter
Pedestal Grinder Maintenance (Weekly)
Service manual: https://drive.google.com/file/d/1QgkvdwpKXrfAl8W_3rSlNlg2mLRIDCh6/view
Task List
- Check the spacing between the tool rests and the grinding wheels. (The spacing should be less than 1/16 of an inch, never more than 1/8 Inch.)
- Adjust the tool rests if necessary (Use a 12mm wrench to loosen the two rest bolts. Tighten the bolts after adjusting.)
- Set the spark deflectors (the upper metal guard) to 1/16 of an inch from the wheel.
- Check for and clean any debris buildup in the ductwork, ensure all ducts are attached to the dust collector (except aluminum wheel; that goes into the bucket)
If the deflectors or tool rest cannot be adjusted within the distances above, file a tool report to replace the wheel.
Notes
More info on bench grinders: https://protohaven.org/wiki/_media/tools/grinder.pdf
Planer
Maintenance for the planer
Manual
https://drive.google.com/file/d/1epodmu5iSlOMjFa08aFL1iF1chJqBQEu/view
Planer Maintenance
Overview
- Clean the cutter head.
- Check cutter blades for chips and dullness.
- Wax the bed
- Generally inspect the machine for damage and loose or worn parts.
- Check the dust extraction for blockages.
Procedure
Setup
- Grab the maintenance cart.
- Rotate the switch to drum sander or off, this disconnects the planer from power.
- Use a 10mm wrench to remove the bolts holding in the dust collection scoop. Set the bolts aside in a container. Remove the scoop and set to the side.
- Use a 10mm wrench to remove the top plate of the cutter cabinet. Set the bolts aside in a container. Remove the top plate and set to the side.
Clean the cutter head.
- Wipe down interior and exterior surfaces.
- Clean out dust from the rubber gasket.
- Rotate the cutters to check for any wood chips or debris.
Check cutter blades.
Rotate the cutters, inspecting each row for any individual cutters that are loose, dull, or chipped.
If any damaged blades are found, note them in a tool report.
Generally inspect the machine and wax the bed
Generally inspect the machine for damage and loose or worn parts.
While inspecting, apply a wax to the cast iron bed.
Check the dust extraction.
Check the dust extraction for blockages and any large bits that could cause blockages. Test the dust collection gate.
Cleaning Up
Use the reserved bolts to reattach the plate at the top of the cabinet.
Use the reserved bolts to reattach the dust collection scoop.
Put away the maintenance cart.
Powder Coating Booth
Powder Coating - Deep clean
Safety
- Wear a dust mask. (If you do not have your own, disposable masks are available in the custodial room.)
- Wear safety glasses.
Clean the Filter
- Remove the fluffy filter off the wall of the booth, and the rigid filters from the rear of the machine.
- Take the filters outside.
- Clean the filters thoroughly with a vacuum.
Inspect the Cabinet
Check inside the ductwork/ventilation for blockage or gaps/holes and clear it out.
Inspect the tubing
Ensure the vinyl air pressure tubing has not swollen or started leaking - if it has, file a tool report.
Clean Shop Vac
- Roll the powder booth shop vac outside to the dumpster.
- Tap the filter against the inside wall of the dumpster to dislodge any caked on powder. If the filter looks excessively worn, file a purchase request for a replacement.
- Discard powder into the dumspter.
- Roll shop vac back to the powder coating area.
As a last step, reinstall the removed filters.
Powder Coating - Clean out hooks & wires
Task List
- Throw out any wire pieces that are excessively twisted/kinked and not useful for holding up parts.
- Sandblast any larger/stiff hooks that are fully coated in powder so they can better ground the parts that'll be hanging from them.
- Brush/vacuum around and inside the hooks/wires caddy to get rid of any loose powder.
Printable Nozzle
Step file for 3D printing a replacement nozzle for the Powder Coating gun
Fusion 360 model for designing a replacement nozzle for the Powder Coating gun. The inside diameter should remain the same but a wider nozzle can be designed for specific applications
Powder Coating Ovens
Powder Coating Ovens (both large and small) - Clean and inspect
Safety
- Wear a dust mask.
- Wear safety glasses.
Task List
To wipe down oven surfaces, use a clean shop rag and a mixture of water with a little soap. Just lightly damp, not dripping wet. (Do not use solvent-based cleaners, as they can affect the powder cure.)
- Lightly wipe down the interior oven floor, walls, and ceiling.
- Vacuum out the heating elements and remove any debris laying on top of them.
- Make sure the hinges on the door swing freely and easily. (Lubricate with gen purpose oil if needed.)
- Inspect the door gasket and make sure it has a good seal all the way around.
- Power the ovens on and make sure the elements get warm
While cleaning, check around the heating elements for signs of cracking or loose wires. If you find any loose or damaged wires, file a tool report.
Tool report: https://airtable.com/appbIlORlmbIxNU1L/shrluff2WSzy8c3xd
Safety
Check fire extinguishers
Fire extinguishers are located in the following areas:
- Kitchen
- Wood Shop
- Maintenance Room
- Blacksmithing
- Front Entrance
For each fire extinguisher:
- Verify that all fire extinguishers are pressurized (indicator is in the green range).
- Verify that they are within their inspection time frame.
If any fire extinguishers within a year of being out of inspection, file a tool report to handle retesting/replacement.
Tool report: https://airtable.com/appbIlORlmbIxNU1L/shrluff2WSzy8c3xd
Check First Aid Kits for low levels of supply
Check the inventory for the first aid kits. Restock any low supplies; backstock is stored in Custodial. Submit purchase requests if anything is needed - especially bandages as they disappear quickly.
There are three first aid kits - one each in the Kitchen, Woodshop, and Forge.
Purchase request: https://protohaven.org/purchasing
Check workshop outlets
Check all electrical outlets on ceiling drops and floor runs for loose outlets and/or cable clamps, improper use of "punch-out" junction boxes, or improper use of "power strips" not installed and used in accordance with instructions included in the listing, labeling or certification.
If you find any loose parts on the outlet drops, submit a maintenance request.
Maintenance request: https://airtable.com/appbIlORlmbIxNU1L/shrluff2WSzy8c3xd
Clean welding helmets and jackets
Gloves
Inspect gloves. Put in a purchase request for any pairs that have holes or excessive wear (don't throw them out until we have replacements)
Purchase request: https://protohaven.org/purchasing
Helmets
- Make a purchase request if the helmet is nonfunctional:
- If there are holes or excessive wear
- If the head strap is broken
- If the lens is difficult to see through
- Confirm the helments auto-darken - shine a phone light on them or take them into direct sunlight
- Wipe surfaces with a damp cloth
Jackets
- Inspect and report any holes, wear, or more than 3 missing buttons
- If any are excessively dirty, file a tool report so they can be machine washed (warm water, regular detergent, high water level)
Clean/sanitize safety glasses & hearing protection
Materials
For a disinfectant, you can use:
- Sanitizing wipes (kept in the maintenance closet)
- Sanitizing spray (kept under the kitchen sink, with refills in the maintenance closet)
- Alcohol
Apply disinfectant, wait three minutes, then wipe with a clean cloth or paper towel.
If we are out of disinfectant, submit a purchase request:
Purchase request: https://protohaven.org/purchasing
Task List
Clean the safety glasses and hearing protection in all of the following areas:
- Left of the the door by the kitchen.
- Left of the door by the textiles/electronics in the studio.
- Left of the door in the wood shop.
- Hanging off the caddies in the wood and general metals areas.
Flush Eye Wash Station (Monthly)
Run the eyewash station for 1-3 minutes. (This flushes any stagnant water from the line.)
CO Detector, Smoke Detector, and Thermostat Testing
The carbon monoxide detector is a small white plastic device located on the interior wall of the custodial room just to the right of the door.
Test CO Detector
Tool report: https://airtable.com/appbIlORlmbIxNU1L/shrluff2WSzy8c3xd
Vacuum CO Detector Grate
Use a shop vac to vacuum out any debris from the plastic grate on the carbon monoxide detector.
Do not use the shop vac assigned to the jewelry area. (The jewelry area shop vac should only be used for metals.)
Test Smoke Detectors
- Announce on the discord #general channel that fire alarms will be tested
- Alert all members in the shop that fire alarms will be tested
- Test each fire alarm by pressing the "test" button - this will produce several loud beeps:
- One in the conference room
- One in each bathroom
- One above the electronics bench in the studio
- One in the design classroom
- One in the staff room
- One in the custodial room
- For any alarms that fail to test, replace their battery, retest, and file a tool report (tagging the "Facilities" tool) with details.
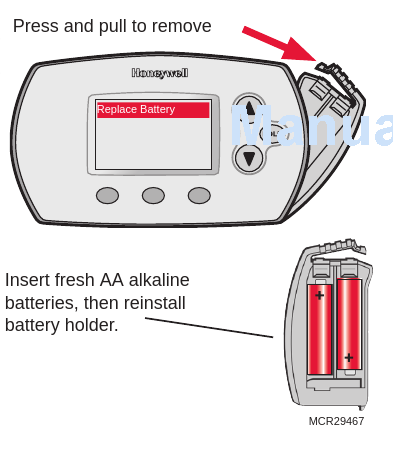
Check Thermostat Backup Batteries
Each of our thermostats contain two AA batteries.
For each of our four thermostats (two in the back shop, one in the studio by the woodshop door, one inside the conference room behind the TV):
- Check each thermostat to see if the REPLACE BATTERY indicator is flashing.
- Open the battery case following the image below and inspect the battery and terminals. If you see corrosion, carefully remove and dispose of the existing batteries, then use 220 grit sandpaper to clean the terminals (if they're corroded)
- The back shop thermostats are covered with a locked protective case. The keys to this case are in the drawer of the black rolling cart next to the front desk. A spare set are located in the keybox on the wall of the Graphics studio; the password is in Vaultwarden on the front desk PC.
- If the "replace battery" indicator is flashing, replace the batteries - there are spares in the class supply room.
- If this is the first time this task is completed this year, replace the batteries regardless of the indicator.
- Ensure the clock is set to the correct time - see honeywell_manual.pdf
- Ensure the battery holder is properly closed and any safety covers are returned and locked.
Test emergency lighting
Test Emergency Lighting
Turn off breaker 13 in panel A. (This breaker powers the emergency lighting.)
With the breaker off, confirm emergency lights are working in the following areas:
- by the bathrooms
- in the studio / front half of the building
- in the woodshop
- in the forge / loading bay
If any lights are not working, create a new tool report.
Tool report: https://airtable.com/appbIlORlmbIxNU1L/shrluff2WSzy8c3xd
Welding fume extractor - check filter
Service Fume Extractor Filter
- Check the filter gauge at the base of the machine.
- If the gauge indicates replacement is needed, fetch (or purchase request) a new one and swap the old one out.
Purchase request: https://protohaven.org/purchasing
Sandblaster
Empty Sandblast media separator
Empty the Media Separator Drawer
Behind the Plasma table is a square gray machine that is the media separator for the sand blaster.
There is a drawer on the bottom with two retaining latches.
- Put on a dust mask and safety glasses
- Ensure the sandblaster is off
- Pull and release the red lever on the right side of the filter a few times to knock loose fine particles from the filter.
- Check the vent ducting from the booth to the separator, ensure it's not filled with media.
- Empty the bottom drawer into the dumpster
- Use the Powder coating shopvac vacuum out the inside around the filter tubes and drawer box.
If we are out of sandblasting media, make a purchase request:
Purchase request: https://protohaven.org/purchasing"
Inspect and rotate sandblaster nozzle
Service manual - https://drive.google.com/file/d/10XyBZ8bd7pk9Vfl4iO3T76M2VwWSfi9C/view
Safety
- Wear a dust mask.
- Wear safety glasses.
Inspect/Rotate Nozzle
- Unplug the sandblaster
- Find a 1/8" Allen key in the maintenance cart.
- Unlock the carbide nozzle at the front end of the spray gun using the allen key, so that it can be removed.
- Take note of the nozzle position, in the end, we will want to reinstall the nozzle 1/4 turn further.
- Remove the nozzle and inspect for wear on the part that is inside the gun. If the wear is getting bad, let maintenance know.
- Rotate the carbide nozzle 1/4 turn clockwise (as looking down the barrel - but don't actually look down the barrel).
- Lock the carbide nozzle in place using the Allen key.
Inspect the Spray Gun and Tube
Inspect all around the body of the spray gun and the tube below it for holes. The steel tube can wear through on the back side of the 45º bend, on the part that faces the cabinet.
If any holes are found, red tag the sandblaster and file a maintenance report.
Check the Media Level
A small amount of media is better than overfilled. There only needs to be about 6" of media in the bottom the cabinet. If it looks low or over filled, contact the area lead for the Sand Blaster.
Notes
Rotating the nozzle extends the life of the nozzle.
Sandblaster - Deep clean
Safety
- Wear a dust mask. (If you do not have your own, disposable masks are available in the custodial room.)
- Wear safety glasses.
Tools/Materials Required
- Two 2-gal buckets (should be located near the machine)
- Soft mallet.
Clean Siphon Tube
- Remove the siphon tube via the two screws at the top. (Be careful and avoid dropping the screws.)
- Inspect the siphon tube for holes and file a tool report if any are visible.
- Blow compressed air through the siphon tube to dislodge any caked on abrasive and dirt.
- Reinstall siphon tube.
Clean Media
- Place a bucket under the bottom gate of the cabinet.
- Open the gate to drain out the media.
- Tap the sides of the hopper with a soft mallet to get any remnants out. (We don't need the hopper completely clean.)
- Take the buckets and a sifter outside.
- Pass the material through the sifter to remove and debris.
- Discard debris in the dumpster.
- Dump the sifted media back in the cabinet.
Test Hopper Motor
- Turn on the machine.
- Verify hopper motor under the cabinet is active and vibrating. If it isn't running, file a tool report.
Security
Update Wyze camera firmwares and adjust positioning
Click through each camera on the Wyze app (on the iPad, located by the front desk or in the Staff room).
For each camera:
- Ensure it is online.
- Ensure the firmware is up to date (it will prompt if otherwise).
- Ensure it is pointing in a way which maximizes the view of the area.
Check Keybox Battery
Enter the password followed by # and ensure the light on the front of the box is green (i.e. good battery). If you see any other color, replace the batteries (4x AA).
The password is present in Vaultwarden - accessible via the Chrome browser extension on the top right, at the front desk.
Slip Roll, Sheet Metal
Oil slip roll rollers
Safety
Ensure the machine is turned off and unplugged before oiling the rollers.
Oil the Rollers
Apply several drops of 3-in-1 oil (located in the maintenance cart) to the three large rollers of the slip roll. Most of the oil ports will be small holes towards the ends of either sides of the rollers - they'll be on parts of the roller that do not actively rotate when the machine is in operation:
- One oil port located on the left side of the top drive roller, plus the movable bushing on the right hand side (the one that you pull out to allow removal of fully concentric projects, see picture below)

- Two oil ports on either side of the bottom drive roller - you can lift the top roller out via the removable bushing on the right side.
- Two oil ports on either side of the idler roller on the back of the machine
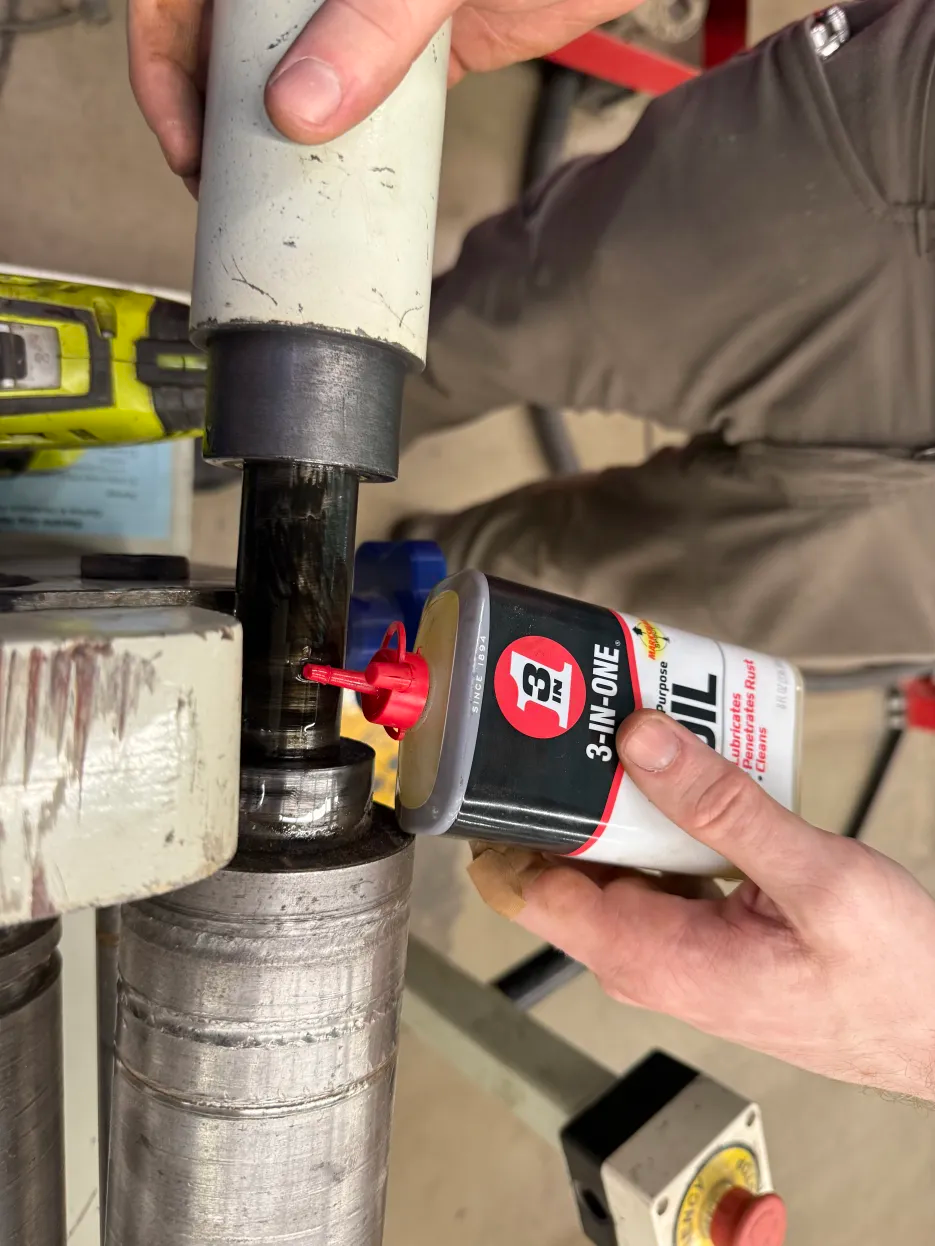
In Case of Excessive Friction
If the rollers aren't rolling freely after applying the 3-in-1 oil, use a spray can of WD-40 on the oil ports and work the rollers back and forth (side-to-side as well as rotating around) to dislodge any gunk.
Soldering Iron
Check Consumables
- Check if the tip is in good condition: no obvious damage, good point, no deep pitting. Replace tip if needed.
- Check the sponge to make sure it is in good condition. Replace sponge if needed.
Storage
Check for missing tags on paid storage
Check for Storage Violations
- Open any lockers without storage tags and look for any materials stored there.
- Examine all board/bar and sheet storage for items stored without storage tags.
- Check for any cages with stored items that are also missing a storage tag.
- Check for any parking spaces with stored stuff and no tag.
- Look for improperly stored stuff on and around the shelves by the powder coating area.
Handle Storage Violations
For any paid storage violations:
- If there are small items, put them in the lost and found.
- If there's substantial stuff, create a storage violation using the iPad at the front desk.
Table Saw
Saw Blade Marking
FIle to łaser PH logo onto saw blades
Router Table
3D printable items
Replacement Throat Plates for the Router Table
We have a Woodpeckers model number mumble router table attachment, which accepts plastic throat plates for supporting workpieces against various sized bits. The throat plates have proven to be somewhat sacrificial (particularly the popular sizes). We can print more of them:
We have files for the following apertures:
| Aperture Size | STL FIle |
| 0.5 Inch | WoodpeckerThroat1_2.stl |
| 0.75 Inch | WoodpeckerThroat3_4.stl |
| 1 Inch | WoodpeckerThroat1.stl |
| 1.25 Inch | WoodpeckerThroat1_1_4.stl |
| 1.5 Inch | WoodpeckerThroat1_1_2.stl |
| 1.75 Inch | WoodpeckerThroat1_3_4.stl |
| 2 Inch | WoodpeckerThroat2.stl |
Recommended materials:
- PETG (See Jason; we have some in Maint)
- ABS
PLA is not recommended for this application: the insert will be brittle, and may shatter.
3D Printable Shims for under the router plate
These Shims are used to keep the Rockler router plate level with the table. The shims are tapered from .045" in the rear to .018" in the front. Two are needed, one for each side of the router plate, and are placed between the aluminum plate and the fiberboard table.
These shims can be printed in PLA
Facilities & Outside
Magnet roller the parking lot
Sharp metal debris can accumulate in our parking lot - this poses a hazard to car tires, so it's important to periodically pick up metallic sharp objects using our magnet roller.
- Retrieve the magnet roller, usually located near the recycling bin by the forge area or alternatively behind the metal lathe (near the spare gas tanks)
- Walk the roller all throughout the parking lot as if you were vacuuming a floor.
- Periodically bring the roller to a non-parking area and pull the black handle on the roller up do disengage the magnet and drop off any debris.
- When finished, shop vac up any recovered debris and store the roller back where you found it.
Correct thermostat temperatures and modes (HVAC)
See this Asana task for history.
Our AC systems will fight each other if set to different modes - this dramatically increases our power bill and takes away money which could be used to buy consumables and other equipment.
Read this doc in its entirety before changing anything
Ensuring correct temperatures
- Read the rest of this document first for context.
- If "Run Schedule" is visible, press it and mention this on #techs - this indicates that the thermostat was in a manual mode.
- Select "Set Clock/Day/Schedule", then" Set Schedule". Ensure the times and set points for "Wake", "Leave", "Return", and "Sleep are set accordingly:
- Summer (when internal shop temp exceeds 76F)
- "Wake": 7:45AM, 86F
- "Leave": 10AM, 76F for studio/small rooms, 80F for main shop
- "Return": 9:30PM, 86F
- "Sleep": 10PM, 86F
- Winter (when internal shop temp drops below 65F)
- "Wake": 7:45AM, 55F
- "Leave": 10AM, 65F
- "Return": 9:30PM, 55F
- "Sleep": 10PM, 55F
- Summer (when internal shop temp exceeds 76F)
- Ensure that the schedule is set exactly the same for both MonTueWedThuFri and for SatSun (Sat + Sun separately for conference room)
- Ensure that the conference room thermostat is not displaying "HOLD" on the display. If it is, report to #techs and click on "Run Schedule" to set it on the automated schedule.
If the interface is unclear / confusing, see honeywell_manual.pdf around pg 10:
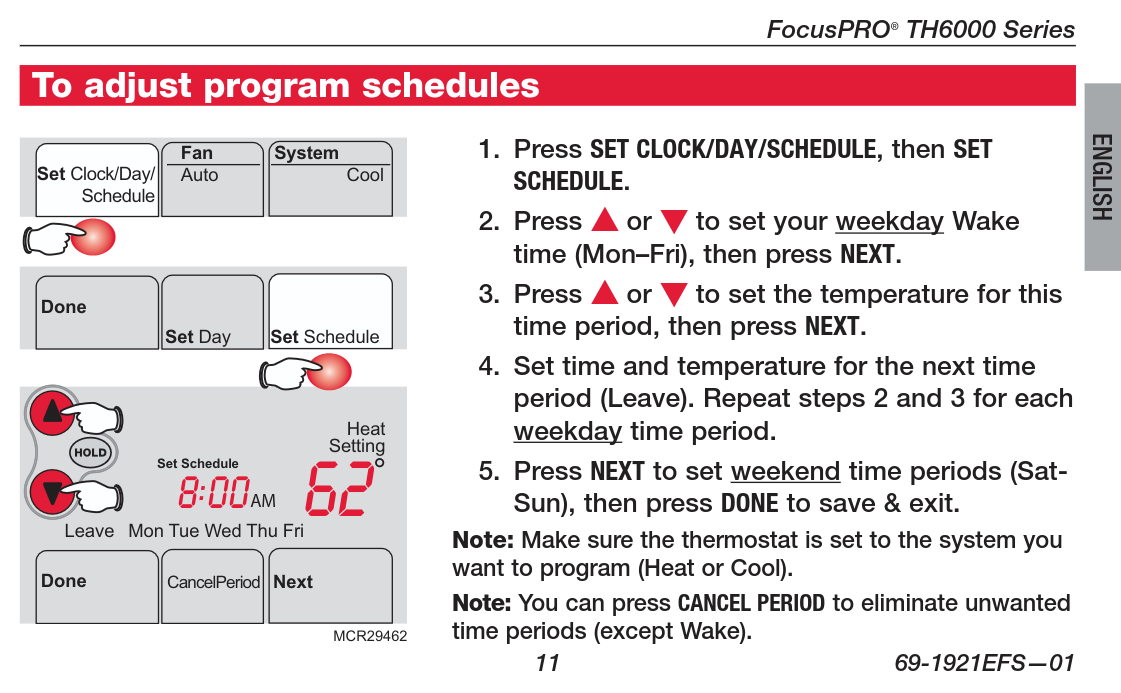
Conference room thermostat
The conference room thermostat is a different model from the rest; these are its quirks:
- Control buttons are hidden; flip the panel down at the bottom to access the buttons.
- Must set all "Wake", "Leave", "Return", "Sleep" options, also Saturday and Sunday are two different programs
- Latest wake permits is 7:45 AM on weekdays; but it's different for weekends and "heat" mode has different timing limitations than "cool" mode. This is why our schedule uses "Away" and "Return" to set the boundaries during shop hours.
Thermostat Locations
Digital thermostats:
- There are two in the back shop - one by powder coat, one by general woodshop on the poles
- One in the studio by the woodshop door
- One in the conference room
- This one is a different model; see "Conference room thermostat" section above.
Heater thermostats:
- One in the forge; controls forge heater
- 2 broken/unused thermostats in back shop - one by wood lathe exit door, other on wall by plastics/class supply room
"Away" temperatures
Adjust set point by 10 degrees outside of business hours (higher on cool mode, lower on heat mode)
Summer
Only set to cool mode when the internal shop temperature exceeds 76F
When the internal shop temperature exceeds 76F:
- All digital thermostats:
- Mode: Cool
- Set point: 76F for studio and small rooms, 80F for main shop
- "Sleep": 86F
- Fan: Auto
- Heater thermostats:
- Forge: 55F
- All others: OFF
Winter
Only set to heat mode when the internal shop temperature drops below 65F (or other cases below)
When the internal shop temperature drops below 65F, OR if >24h of below-freezing outside temperatures forecast, OR if temperatures below 0F forecast overnight:
- All digital thermostats:
- Mode: Heat
- Set point: 65F
- "Sleep": 55F
- Fan: Auto
- Heater thermostats:
- Forge: 55F
- All others: OFF
Mail/Package Receiving Shelf
- Place a post it note or tape a slip of paper with the current date on all of packages that are on the shelf.
- Look for older packages that have been there for a week or more and move them to the lost/found shelf in Camden's office.
- Important: Email Camden at: Camden@protohaven.org or via direct message on Discord and let her know the names on the packages that got moved back to her office. Camden will reach out to those people.
Front Door August Lock Batteries
- Get 4 AA batteries
- Get a small flat blade screwdriver or knife
- The inside cover of the lock is removed by pressing the August Logo at the bottom and detaching the magnets.
- Remove the batteries, use a tool to help remove the rear batteries.
- Install new batteries (watch for green light when the last battery is installed. This indicates success.
- Reinstall cover, with the August symbol at the bottom.
- Test the lock function with your app.
There is no obvious low battery indicator, we are doing this on a 9 month cadence to be safe
Welding Tables
Welding Table Maintenance
Welding Table Maintenance (Mig and Tig tables)
Wipe table down with a dry rag.
Inspect the table for spatter/BBs. Use a straight edge to assist in finding them. If tables have not seen much use, looks to be free from BBs and still has a good coating of anti spatter, just mark this task complete.
Use a cold chisel (solid bar with a wedge on the end, not a woodworking chisel!) and hammer to remove them by placing the chisel as close to parallel to the surface of the table as possible and striking with moderate force. Chisels and punches should be in the top of the welding tool box (or in the forge, return to the forge when done using).
If the spatter does not come off with one tap of the hammer. Circle with a sharpie and note it in a maintenance report, check the asana task box to generate an asana task with it. DO NOT GRIND THE TABLE.
Use a round punch to remove spatter from dog holes. If they do not easily pop off, also circle and include in the maintenance report.
Finish by lightly coating the tables with anti spatter spray.
Pantograph
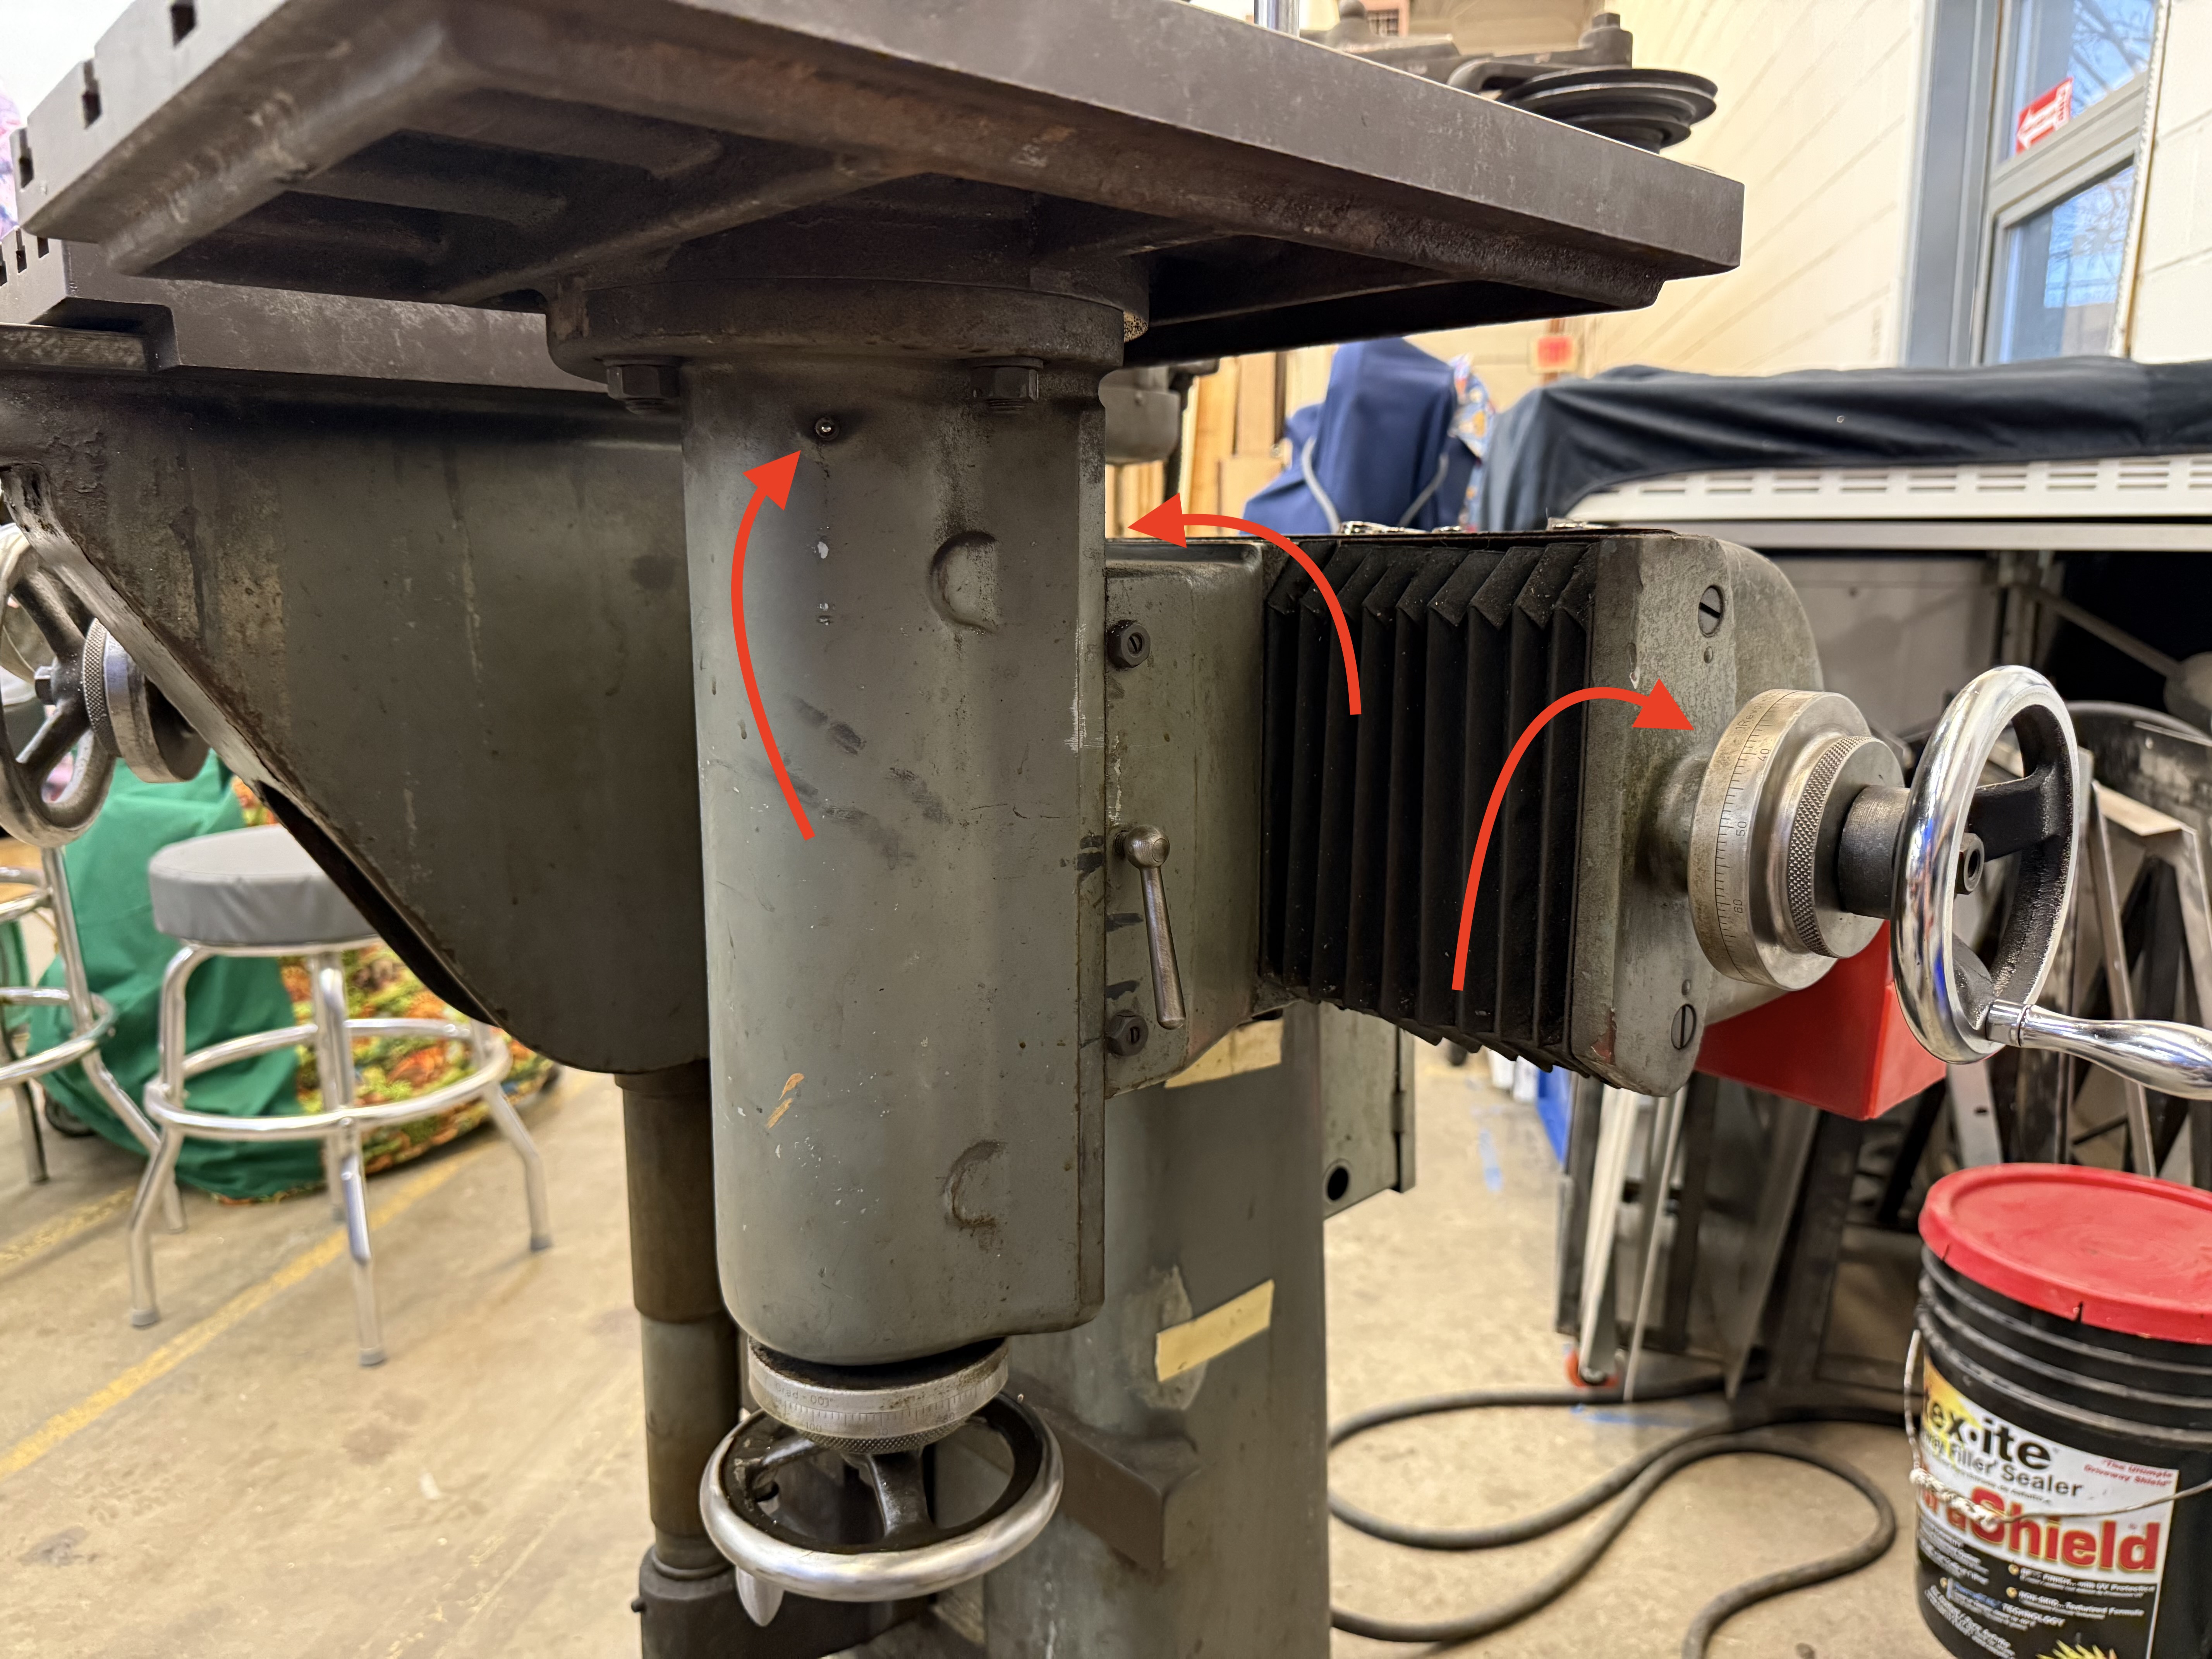
Oil the Pantograph
The pantograph needs occasional oiling. We use the way oil from the manual metal lathe that is in the black bottle on the lathe. 2 pumps of oil in each spot of the pantograph is sufficient.
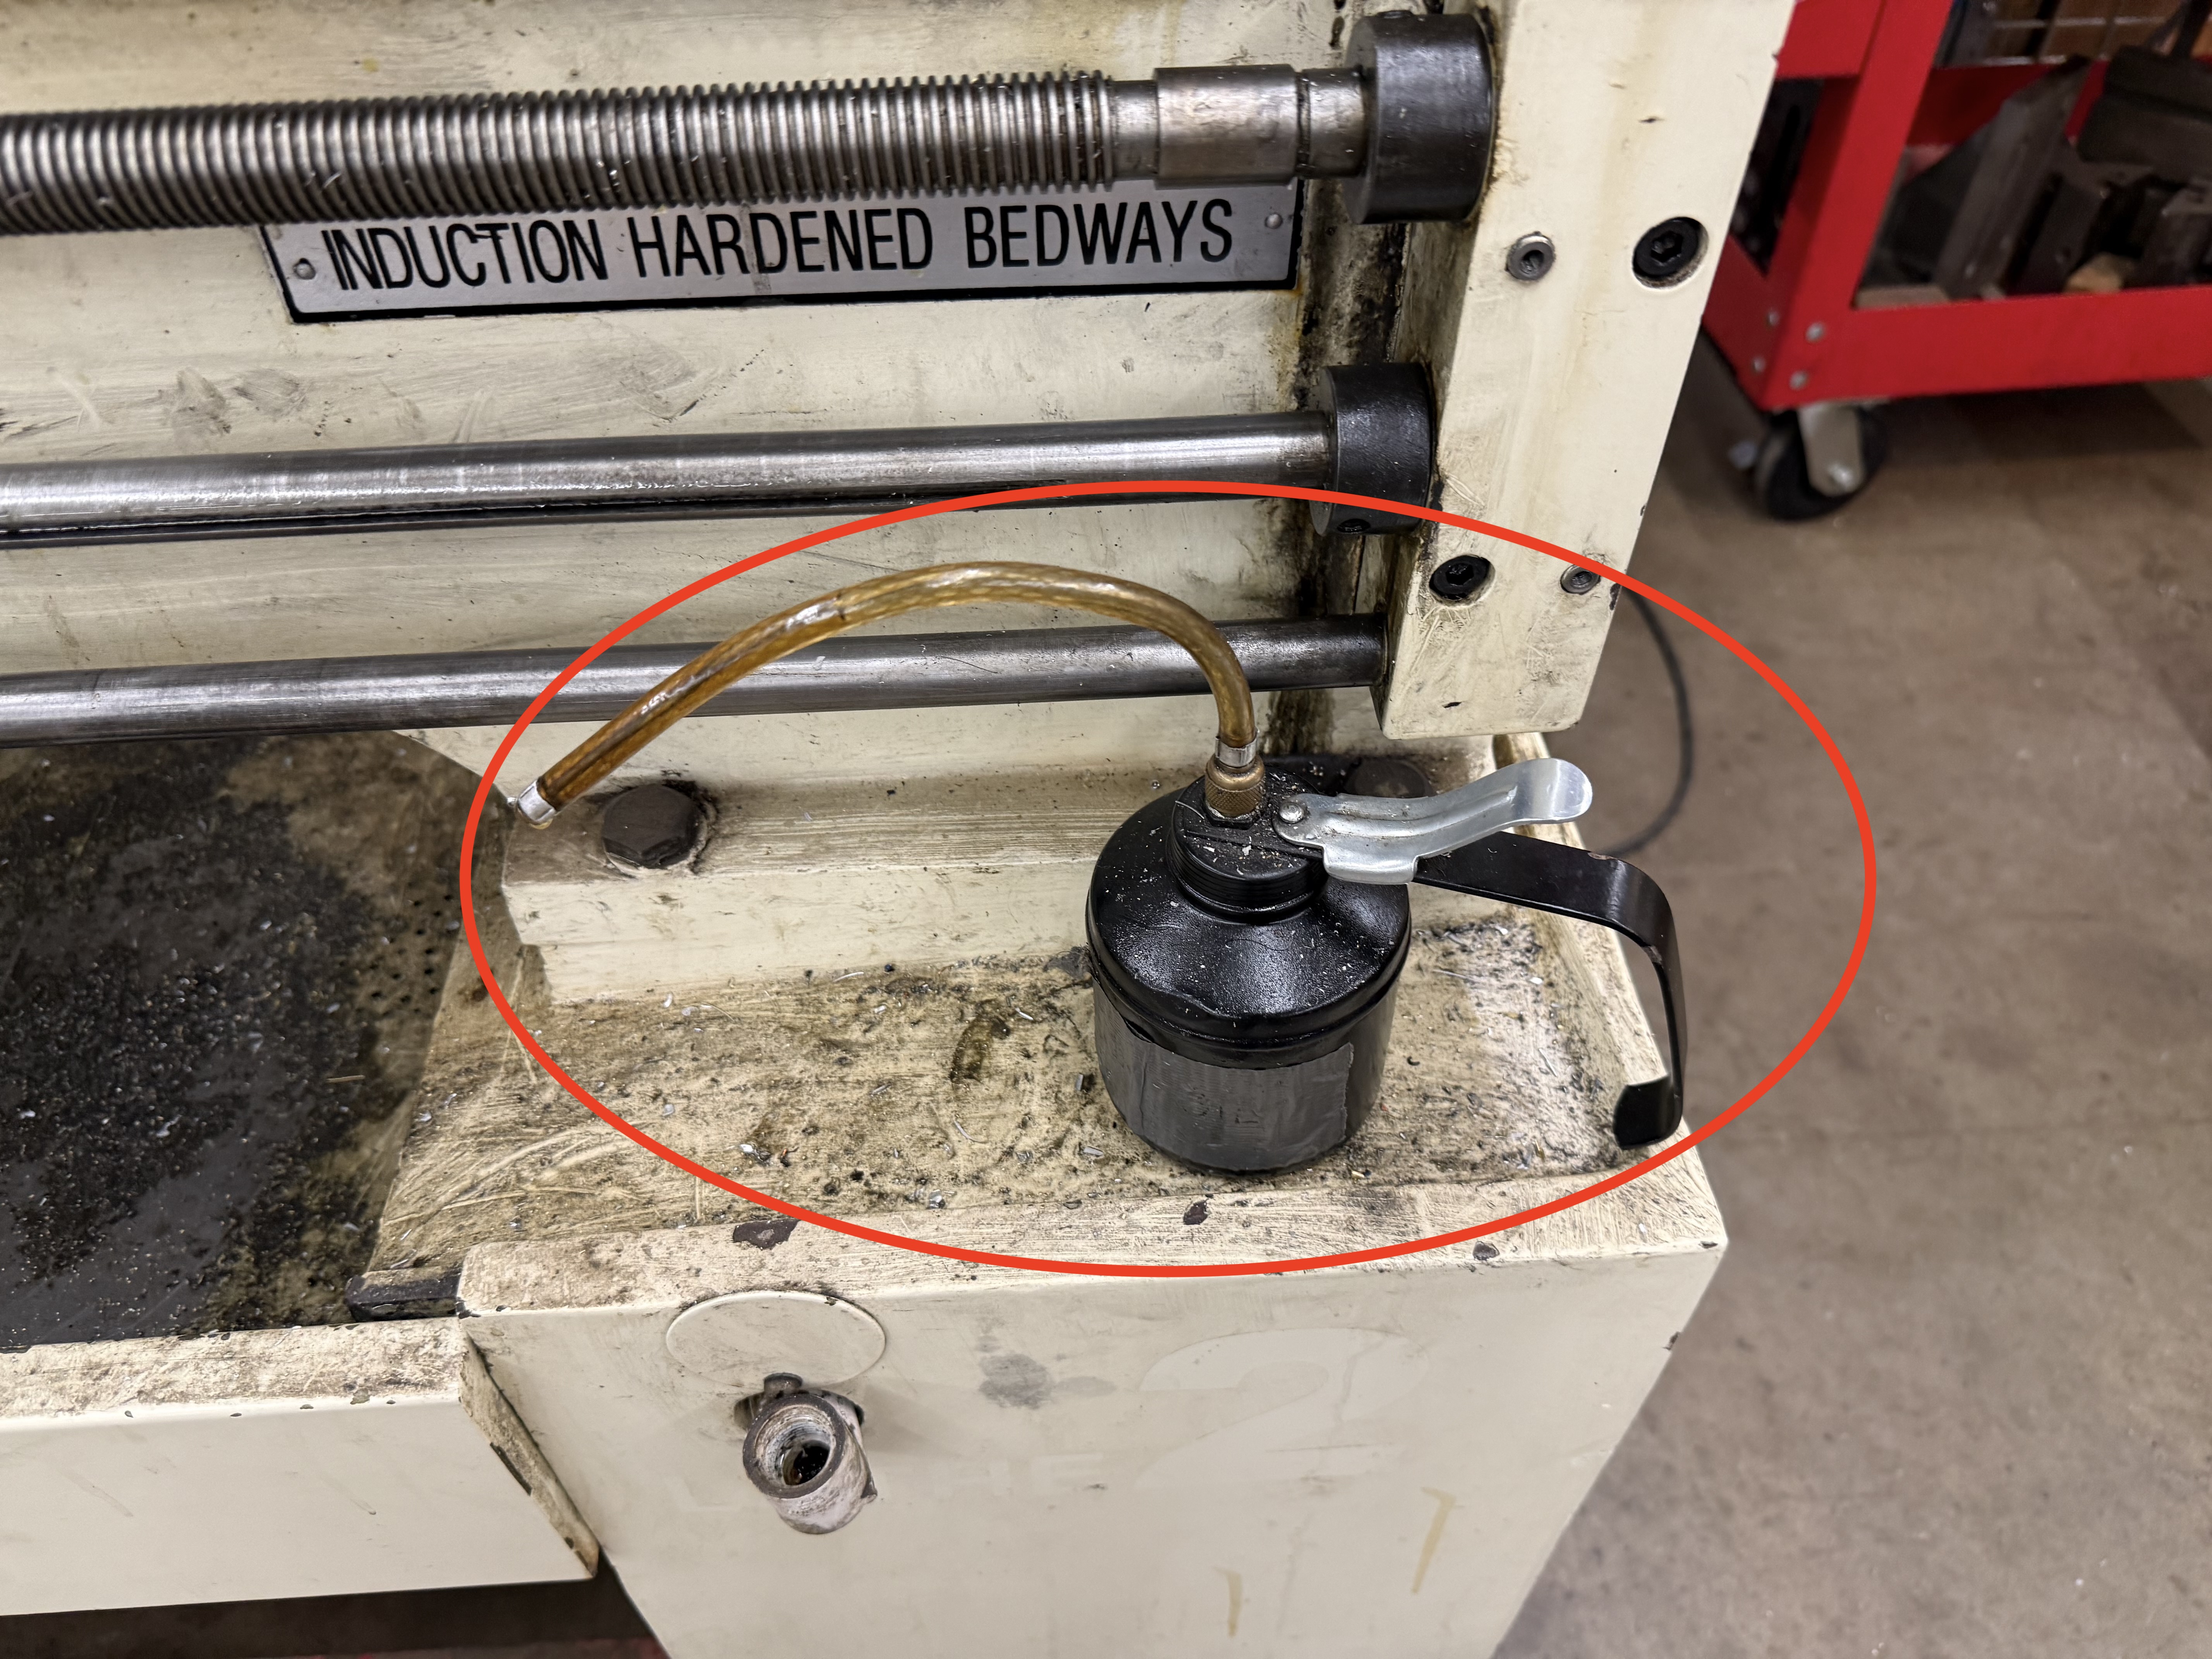
There are many places to oil the machine, there are ball oilers, where the nozzle of the oil can needs to be pushed into the ball oiler and a couple pumps are dispensed. There are also dovetails that need a little oil. Just dripping a little oil on the dovetails and spreading around is usually sufficient. Make sure to get both sides (or top and bottom of each dovetail that is listed in the images.
Dovetail below the Deckel sign, Dovetail to the right of it. 3 ball oilers (one on each handle). One ball oiler in the center of the casting.
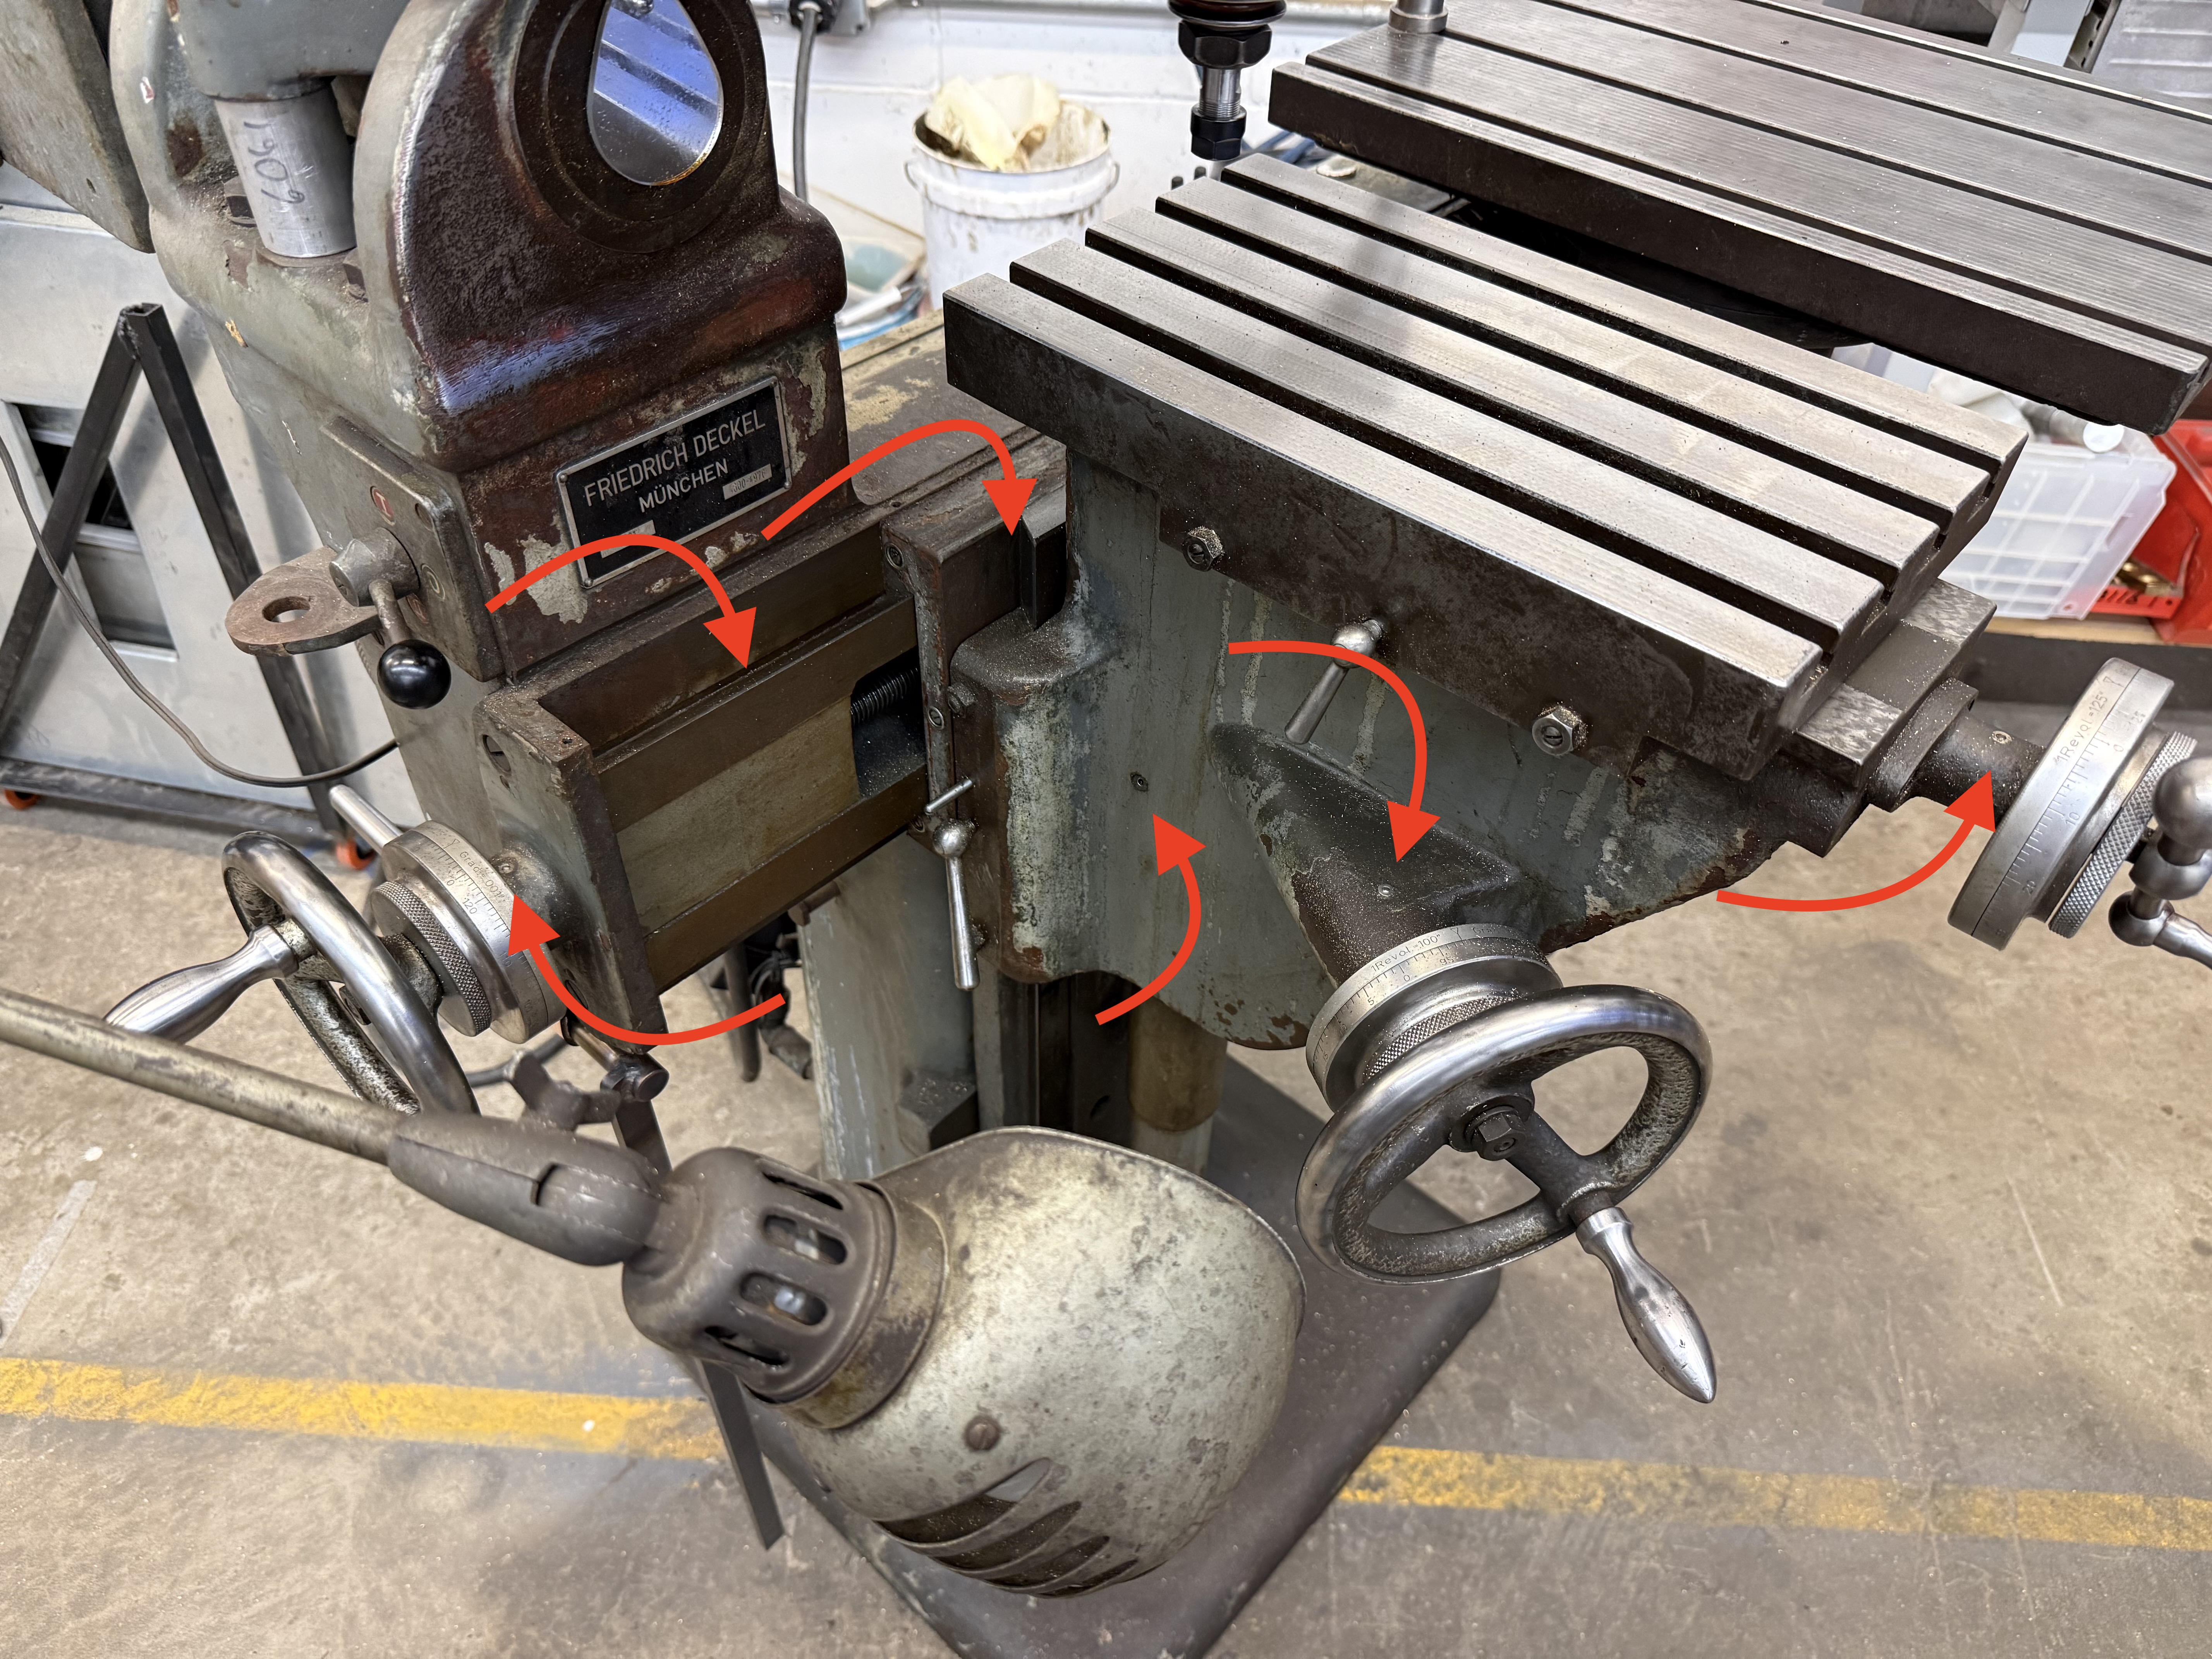
Dovetail between the tables
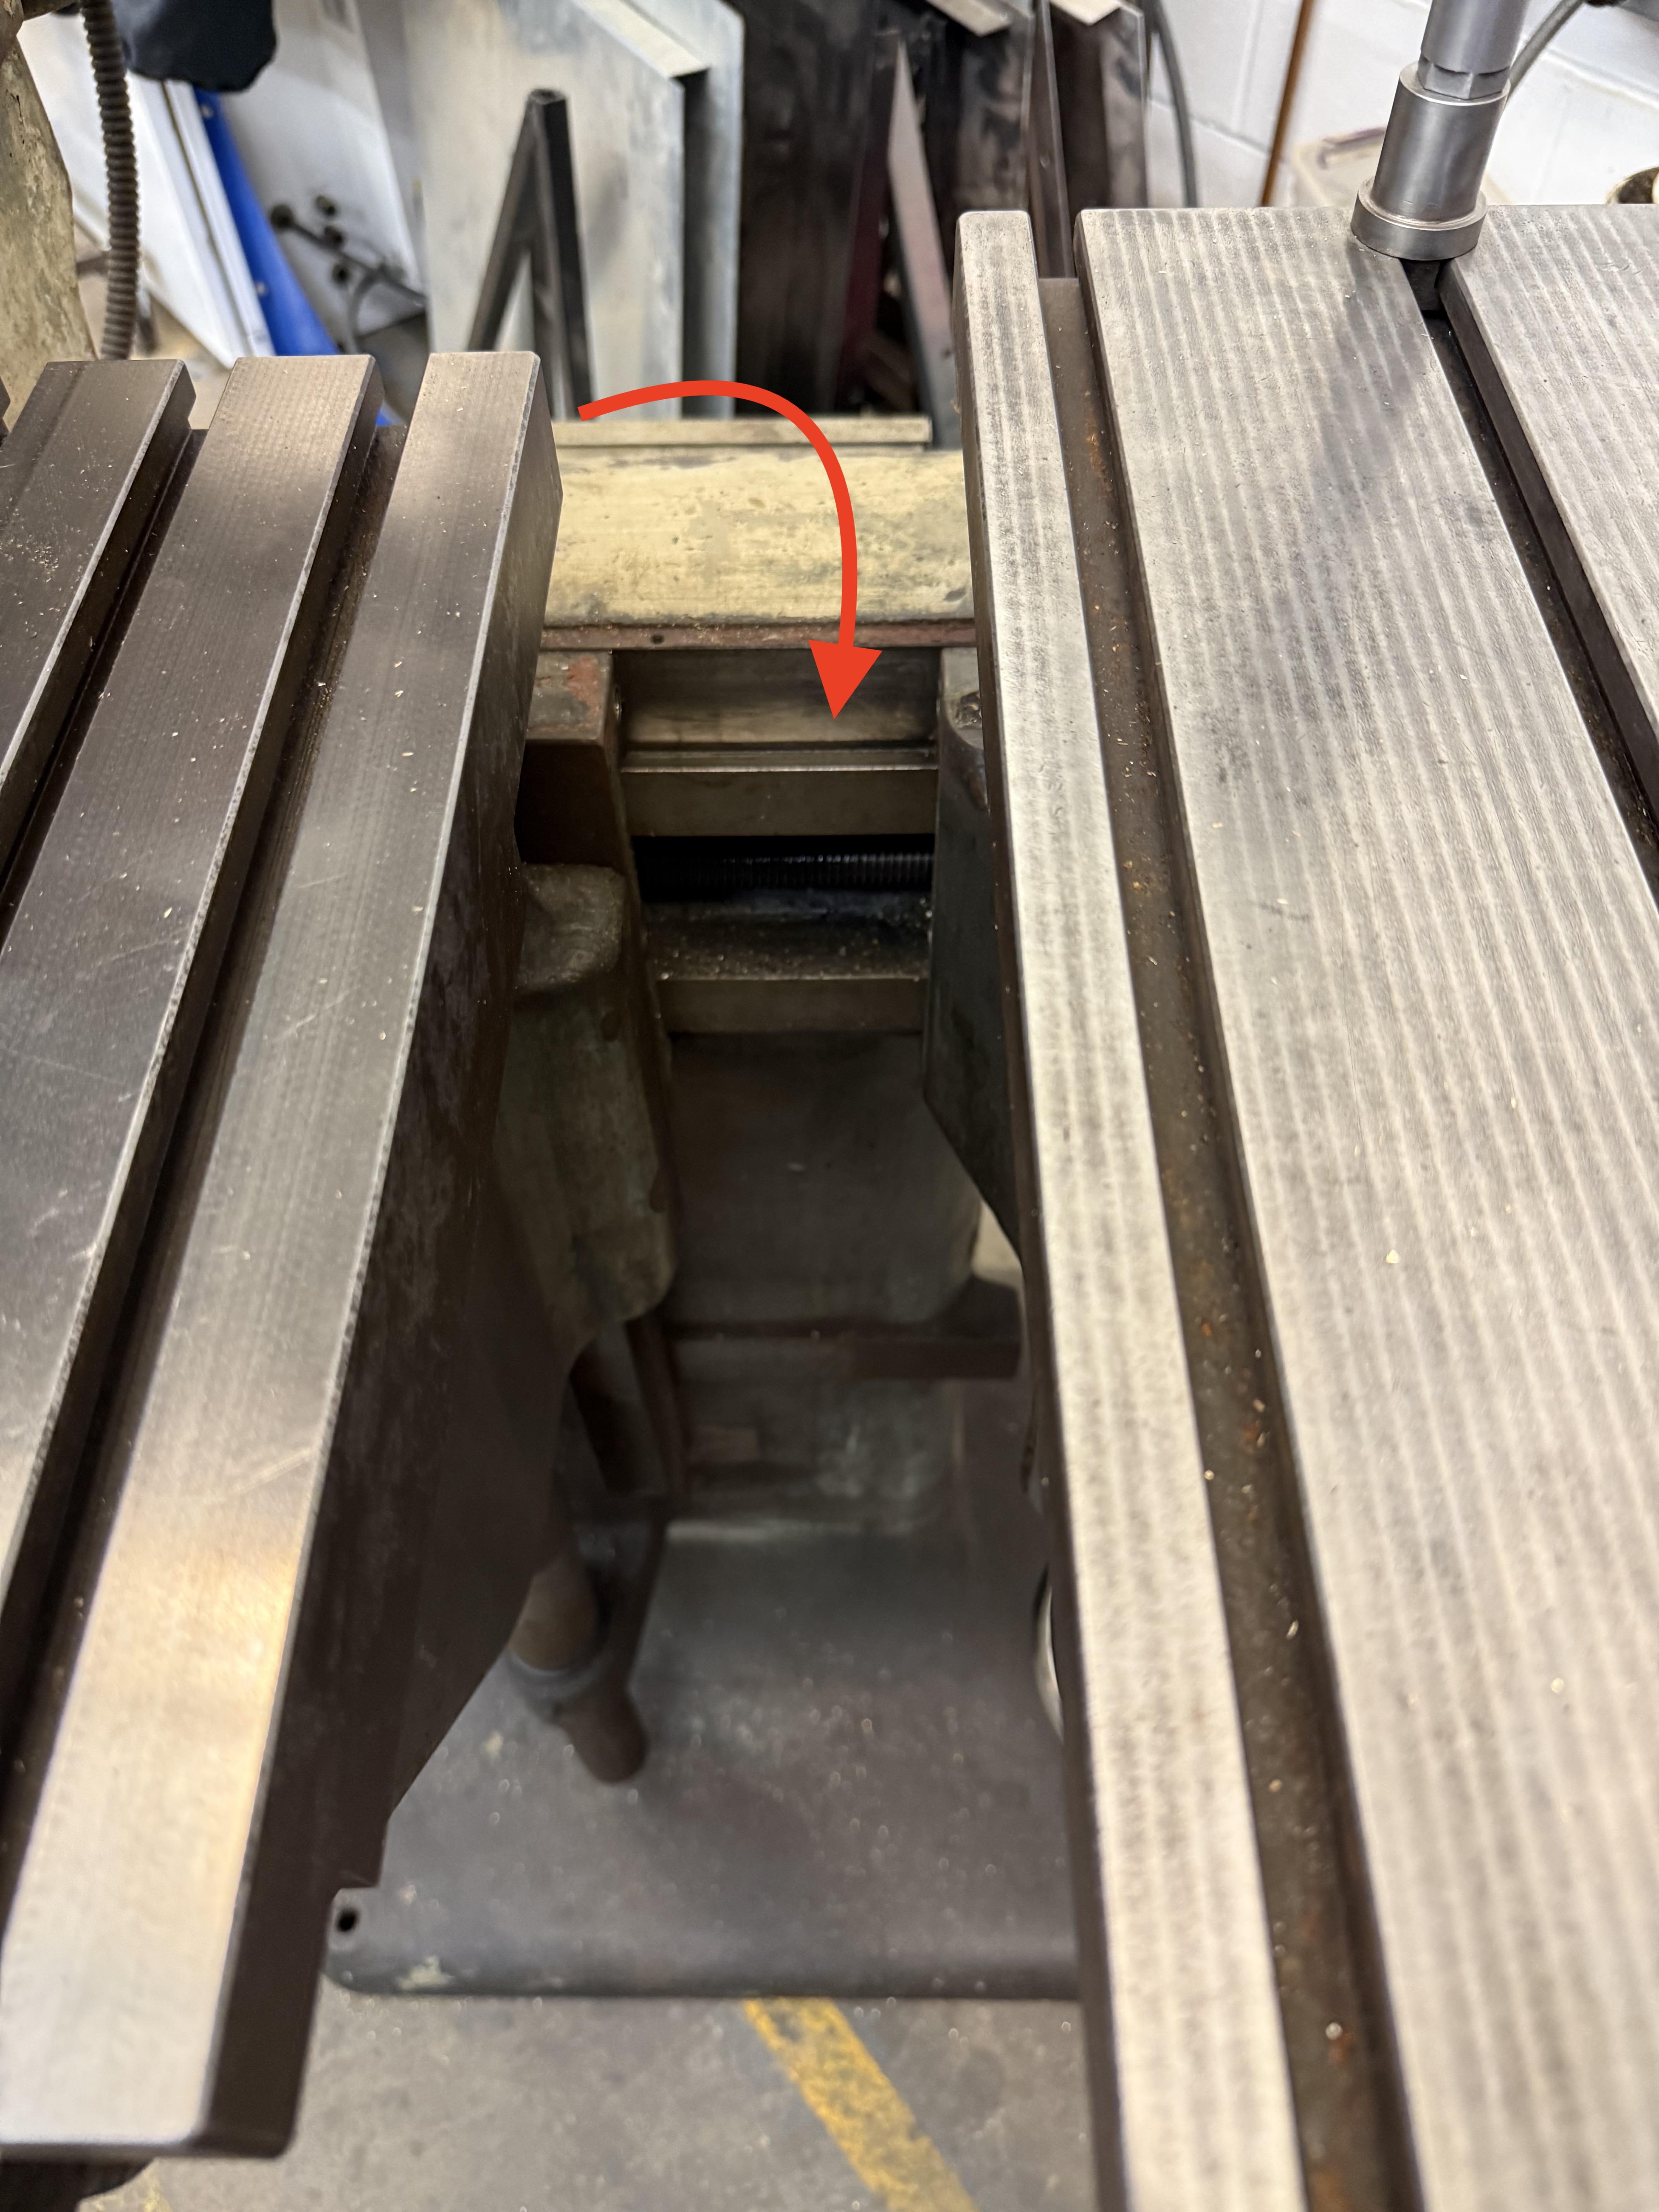
Dovetail in the center of the picture, get both sides. Ball oiler under the table and one on the handle .
Injection Molder
Injection Molder - Lubricate Clamp System
- Ensure there are no obstructions inside the chamber - should just be a couple aluminum blocks.
- Identify the "PUSH TO CLAMP" knob on the bottom left of the machine, and the locking lever underneath it
- Slide the lock lever to the right, then push the knob in to initiate clamping. Make a note of any jittering/seizing in the clamp mechanism.
- Pull the knob out to return the clamp to the rest position.
If there was jittering/seizing when clamping, apply a light amount of spindle to the three ports - one at the base of the middle bar, and one on either side of the drum towards the rear of the clamping assembly. Then repeat steps 1-4 several times to work the oil into the system.